
Smart Prepaid
System
User's Manual
Version 2.0.0
3.3.3 Set Charge Solution/Tariff Rate........................................................... 32
3.6.10 Communication Point....................................................................... 77
3.7.1 Vending Station Management............................................................ 92
3.9.2 Management Token.......................................................................... 105
3.9.3 Read Meter Configuration................................................................ 110
3.9.13 Management Token Order.............................................................. 124
3.11.2 Abnormal Recharge Alarm.............................................................. 128
3.11.5 SMS To Customer Log..................................................................... 131
3.12.5 Load Management.......................................................................... 137
3.12.6 Relay Control Task History.............................................................. 140
3.12.8 Device Configuration Scheme......................................................... 142
3.13.2 Negative Balance Report................................................................. 146
3.13.3 Consumption Statistics Report Daily............................................... 147
3.13.4 Payment Mode Switch Report........................................................ 148
3.13.5 Account Max Power Setting Reconcilation..................................... 149
3.13.7 Zero Monthly Consumption
Report................................................ 149
3.13.10 Vending Statistical Report............................................................. 152
3.13.11 Account Information..................................................................... 155
3.13.14 Vending Operation Log................................................................. 160
3.13.15 Consumption Statistics Report..................................................... 161
3.13.16 Consumption Statistics Report Monthly....................................... 162
3.13.18 Sanction Load Violation Report.................................................... 163
3.13.19 Special Recharge Details Report................................................... 163
3.13.20 Not Collected Meter Statistics Report.......................................... 164
3.13.22 Abnormal Archive Information Report......................................... 165
3.13.23 Purchase SMS Preview List........................................................... 165
3.13.24 Meter On/Offline Details.............................................................. 166
3.13.25 Meter On/Offline Details.............................................................. 166
3.13.27 Clear Tamper Report..................................................................... 167
3.14.2 Online
Device Monitoring............................................................... 169
3.14.5 Customer
Information Change Log................................................. 172
3.17.2 Basic Validation Rule Management................................................ 198
3.17.3 Customized Rule Management....................................................... 199
3.18.5 Time division of sales statistics....................................................... 209
1 Summary
This User Manual introduces the detail of Smart Prepaid System,
Includes:
Introduction: provides a brief introduction to
Smart Prepaid System and its main features. And it also provides an
introduction to common components of the system. (Page 3)
Operation Guide: provides introductions of the
functions of each global menu and operation steps in detail. (Page 7)
Process Guide: introduces several important
processes and user can follow the steps provided to process. (Page 121)
Frequently Asked Questions: provides solution
to frequently asked questions (Page 123)
System Deploy: provides introductions of
deployment of the system. (Page 125)
2 Introduction
Smart Prepaid System is an essence of the
smart metering system and prepayment system, and presents the advantage of both
systems to utilities, which is recognized by the profession. It is designed for
utilities of all sizes and service types, from the Electric Power Company,
substation, feeder, transformer to residential. The system is used for sale
management, archive management, token management, vending management, tariff
solution, real-time monitoring and control of devices, meter data collection,
data processing, power quality analysis etc.
2.1 Main Features
Log and Authorization
System management and setting
Sale management
Archive management
Vending management
Device management
Event Process
Real-time monitoring and control of devices
Data reading, monitoring, statistics, analysis
2.2 Account
v Smart Prepaid System has two types of accounts: ordinary user and super
user.
v
The user can sign in with a valid
account and get its authorized pages and operations.
v
Account can be added, deleted,
modified, started or stopped on User Management-User page after sign in
(Section 3.9.1).
v
Account can be distributed a role.
Different roles have different operation authorities, and role can be added and
assigned on User Management-Role page after sign in (Section 3.9.2).
2.3
Login In
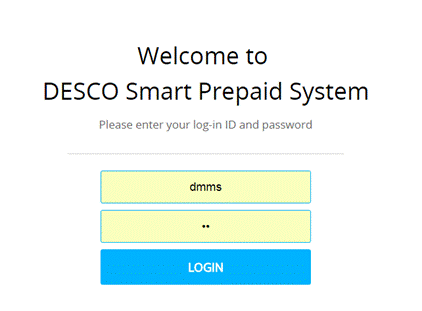
1. Start Web
browser, access Smart Prepaid System using web server URL
2. Access login page
3. Choose language
at login page, the default language is English
4. To log-in, enter
the username and password and click on the "LOGIN"
button
Note:Account will be locked after 3 times continuously failing log-in, and
user needs to contact the administrator to unlock the locked account.
2.4 Login Out
1. Login in system successfully
2. Click "Logout" icon on the top
right corner, then access login page
![]()
2.5 Global Menu
Global menu is used for the user to access
corresponding function module quickly which is on the right side of the page.
Click the left/right arrow to expand/hide it
v Sale
v AMI Home
v Tariff Management
v Rebate Solution Management
v Area Management
v Archive Management
v Vending Management
v Account Management
v Token
v Adjustment
v Event Management
v Device Management
v Report
v Monitoring
v User Management
v Setting
v VEE Management
v Sale Dashboard
v Audit Account Bill
v Job Management
v Maintenance Management
Introduction
of the function of each menu will be provided in the next chapter.3 Operating Guide.
2.6 Navigation Top
Navigation Top is a common component of the system which consists
of five parts: system symbol, help icon, download icon, user icon, and logout
icon.
![]()
v System Symbol
System Icon is on the top left corner, and every city has its respective icon.
![]()
v Help Icon
Help Icon is on the top right corner, and the help documentation
is displayed by clicking the icon.
![]()
v Download Icon
Download Icon is on the top right corner and operator can download
the tools.
![]()
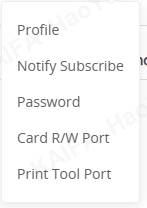
v User Icon
User Icon is on the top right corner.
The drop-down operations list is displayed when the mouse over the
icon which includes Profile and Password. The user can click
"Profile" to modify his account information and click
"Password" to modify his account password.
![]()
v Logout Icon
Logout Icon is on the top right corner.
Click "Logout" icon to log out the system and access
login page.
2.7 Area Tree
On some pages which provides several different dimensions of
statistical information which can be filtered by area tree.

The following
table lists the items shown in the figure above:
|
No |
Item |
Icon |
|
1 |
DESCO |
|
|
2 |
Utility |
|
|
3 |
Substation |
|
|
4 |
Feeder |
|
|
5 |
TR |
|
|
6 |
DCU
(Power On) |
|
|
7 |
DCU
(Power Off) |
|
|
8 |
CT
Meter |
|
|
9 |
Poly
Phase Meter |
|
|
10 |
Single
Phase Meter |
|
|
11 |
Balance
Meter |
|
3
Operating Guide
This chapter introduces the functions of each
global menu in detail and the operation steps of accessing these functions.
3.1 Sale
Operators
can sale electricity and manage Sale Tokens in this page.
It consists of four parts: Account
Search, Vending Station Information, Vending Records,Read Data.
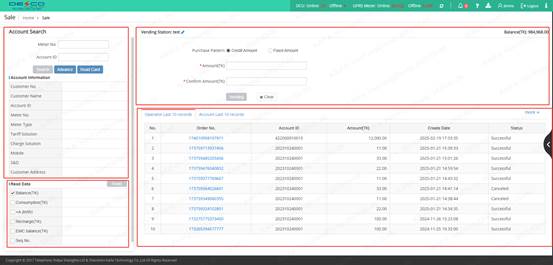
3.1.1
Account Search
Before
generating sale tokens, the operator should select one valid account using
Account Search.
3.1.1.1 Account Search
The operator has three ways to get account
information.
v Search
account based on Meter No.
or Account No.
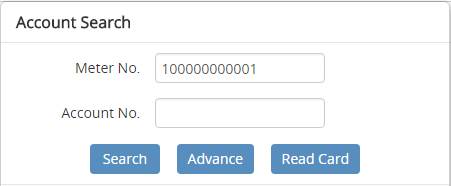
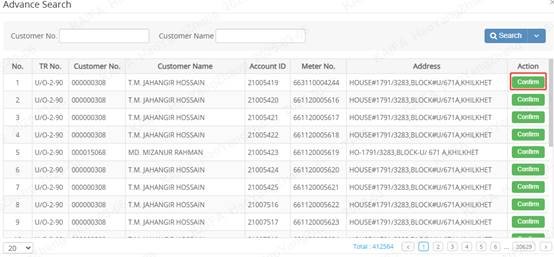
v Click "Advance" button to search customer based Customer No. or
Customer Name. Then the operator can get meters
which custom that operator searched have. Then click "Confirm" button
to get account information.
v Click
"Read Card " button to get account information which has been written
into
the card. But please make sure that the card already is inserted into the card
reader first.
3.1.1.2 Account Information
If
operator selected a valid account the information will display.
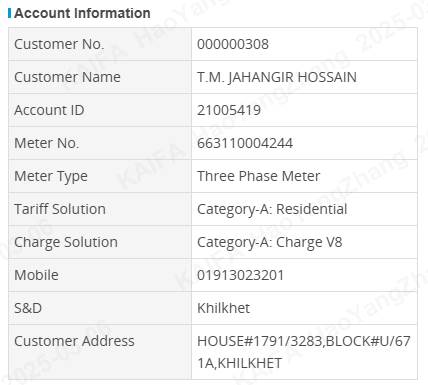
The
following table lists the items shown in the figure above:
|
No |
Item |
Description |
|
1 |
Customer No. |
Identification number of the Customer |
|
2 |
Customer Name |
Customer Name |
|
3 |
Account No. |
Identification number of the Meter
point |
|
4 |
Meter No. |
Identification number specific to a
subscription product - 021160000492 |
|
5 |
Meter Type |
The meter's Phase Type -1p -3p |
|
6 |
Tariff Solution |
Tariff Solution name |
|
7 |
Charge Solution |
Charge Solution name |
|
8 |
Mobile |
|
|
9 |
S&D |
|
|
10 |
Customer Address |
|
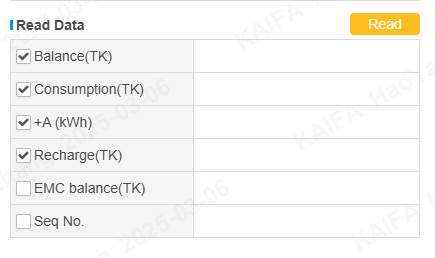
3.1.2 Read
Data
Click the selection then click the
"Read" icon to read data from meter.
3.1.3
Vending
In this part operator can sale electric to
customers.
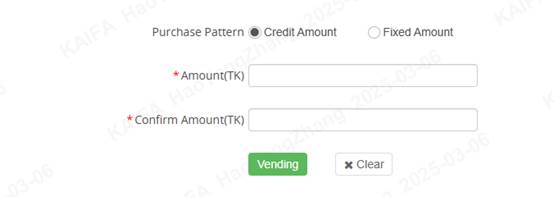
3.1.3.1 Purchase Pattern
There are 2
patterns: Credit Amount and Fixed Amount.
v Credit Amount: in this pattern, customers
should pay money as much as the amount operator inputting. But the money
recharge into the meter is less than or equal to the input amount because of
subbing other sundry.
v Fixed Amount: in this pattern, the amount
operator inputting is the meter should be recharged. But the customer should
pay money greater than or equal to the amount operator inputting because of
adding other sundry.
3.1.3.2 Amount
Input amount that customer wants to purchase.
3.1.3.3 Vending
Click
"Vending" button to create a charge form. The operator can get some
charge information in this form.
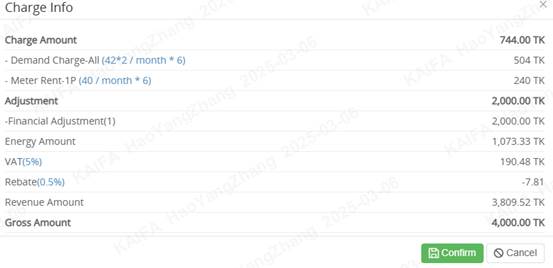
The
following table lists the items shown in the figure above:
|
No |
Item |
Description |
|
1 |
Adjustment |
Adjustment |
|
2 |
Energy Amount |
How much recharge into the meter |
|
3 |
Revenue Amount |
Revenue |
|
4 |
Gross Amount |
How much customers should pay |
The other information is in the Tariff
Solution Section.
Click "Confirm" button to
generate Sale Token.
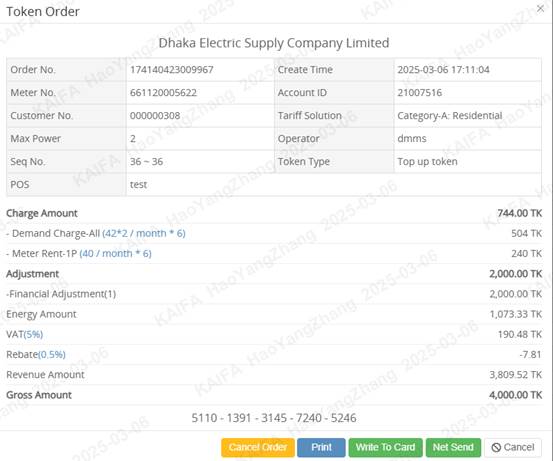
The
following table lists the items shown in the figure above:
|
No |
Item |
Description |
|
1 |
Order No. |
Identification number of the Token
Order |
|
2 |
Create Time |
The Token Order's created time |
|
3 |
Meter no. |
Identification number of the Meter |
|
4 |
Account No. |
Identification number of the Meter Point |
|
5 |
Customer No. |
Identification number of the Customer |
|
6 |
Tariff Solution |
The Tariff Solution's name |
|
7 |
Max Power |
Max Power of the metering point |
|
8 |
Operator |
The operator name which operator
generated this Token Order |
|
9 |
Seq No |
The Token's sequence |
|
10 |
Token Type |
The Token Order type -Get credit token |
|
11 |
Pos |
The vending station's name which
operator generated this Token Order |
|
12 |
Token Number |
The number of the Token -6038 - 0511 - 6129 - 6705 - 4975 |
The operator can operate token order by
following actions.
|
No |
Action |
Description |
|
1 |
|
Cancel the order and the order status
will be changed to Cancel. - Only the order status is Issued or
Failed can be canceled. |
|
2 |
|
The operator can print the order as a receipt. - Only the order status is not Cancel can be printed. |
|
3 |
|
Write tokens of the order into the
card. - The number of the tokens cannot over
25. |
|
4 |
|
Send tokens of the order through net. |
|
5 |
|
Close this Token Order popup. |
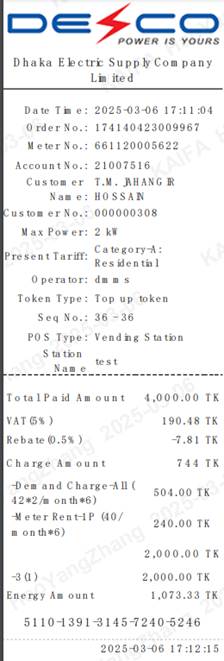
v Print Order
Click
"Print" button to preview receipt.
3.1.4
Vending Records
In this part, the operator can access and
manage last 10 vending records based on operator or account by clicking the
corresponding tab.
When the Operator Last 10 vending records tab
is active, the table will show the login operator's last 10 vending records.
When the Account Last 10 vending records tab is active, the table will show the
selected account's last 10 vending records.
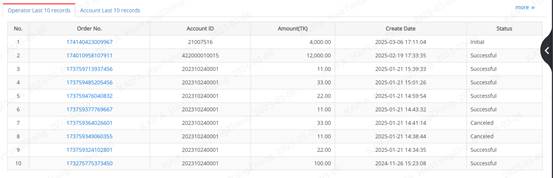
The
following table lists the items shown in the figure above:
|
No |
Item |
Description |
|
1 |
Order No. |
Identification number of the
token order |
|
2 |
Account No. |
Identification number of the
metering point |
|
3 |
Amount |
How much customers pay |
|
4 |
Create Date |
The time when the order was
created |
|
5 |
Status |
The Status of Token Order. -Initial: Token order is just
created. -Issued: Token order has been
written into the card or sending by net -Failed: Meter cannot receive
the Token Order (View appendix to access the
detailed information about fail) -Success: Meter has already
received the Token Order |
3.2 AMI Home
This section introduces the home page
of the AMI system. Operators can access the statistical analysis of the meter
data and perform operations on the readings in the operation table.
This page includes following 6 tabs:
v Home
v Event
v Meter Readings
v Relay Control
v Collection Status
v Online Statistics
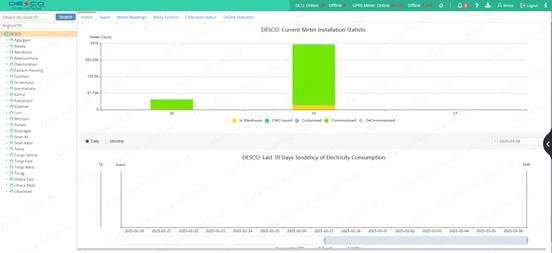
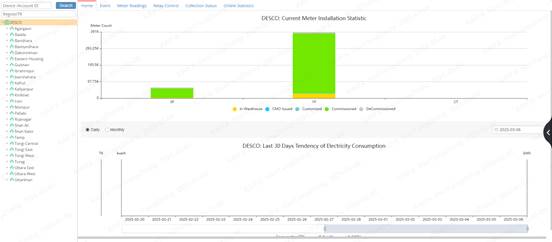
3.2.1 Home
Here are two charts: "Current
Meter Installation Statistic" and "Last 30 Days Tendency of
Electricity Consuption".Operator can choose area from left tree to watch
the different chart here.
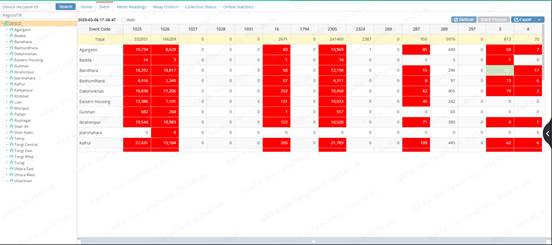
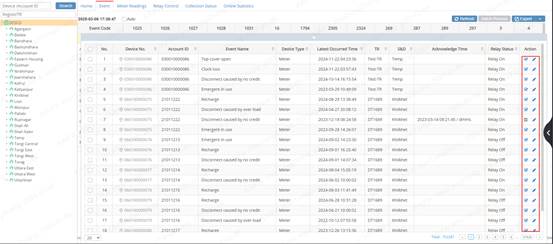
3.2.2 Event
Operators can see the total number of
events with different event codes here. They can click to expand and view the
details of the event list. On the detail page, they can manually operate the
event.
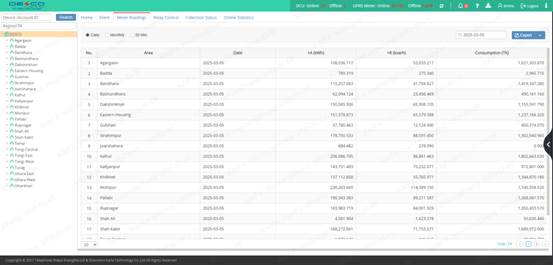
3.2.3 Meter Readings
Operators can view the daily
settlement, monthly settlement, and LP data for the selected area here. They
can also select different transformers to view the detailed settlement data of
the meters under each transformer.
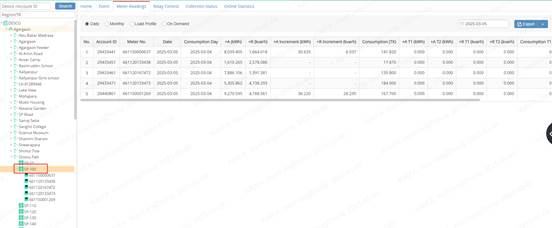
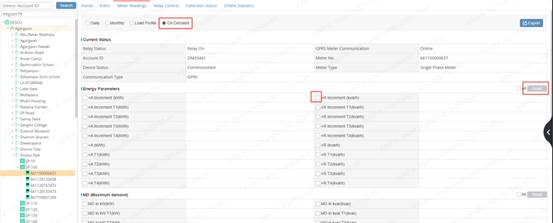
When an operator selects a certain
meter, an "On Demand" option will appear on the interface, and the
operator can directly click the "Read" button to perform real-time
data reading on the device here.
3.2.4 Relay Control
Operators can view the relay-on and
relay-off status of the meters under different regions here. When an operator
selects a certain device, the right-side page will allow the operator to read
the relay status of the device and perform the operations of relay-off or
relay-on.
3.2.5 Collection Status
Operators
can view the collection statistic of the daily settlement, monthly settlement,
and LP of the devices in different regions here, and the data export function
is supported. When the operator clicks on the bar chart, a statistical details
list will be displayed at the lower end.
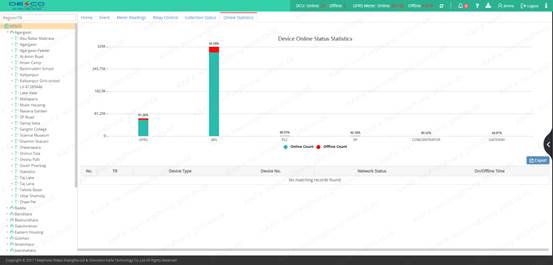
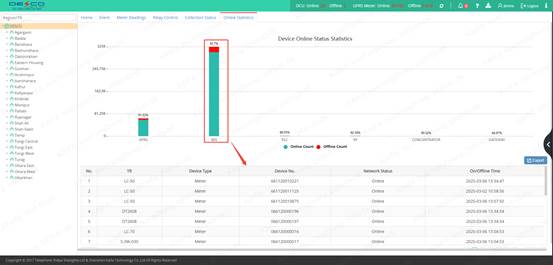
3.2.6 Online Statistics
Operators can view the online status
of the devices in different regions here, and the data export function is
supported. When the user selects the bar chart, a specific list of devices will
be displayed at the lower end.
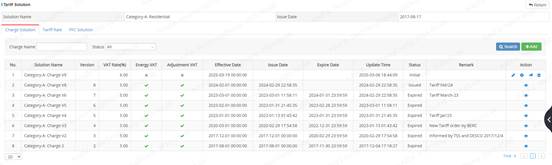
3.3 Tariff Management
This
section provides an introduction to Tariff menu. The operator can access and
manage charge solution and tariff rate.
From
the global menu, click "Tariff Management" to enter (Global menu >
Tariff Management).
3.3.1 Search
Search
Tariff Solution based on Solution Name and Status.
The following table lists the items
shown in the figure above:
|
No |
Item |
Description |
|
1 |
No. |
The show sequence number of tariff
solution |
|
2 |
Solution Name |
The name of tariff solution |
|
3 |
Issue Date |
The date when tariff solution was
issued |
|
4 |
Create Date |
The date when tariff solution was
created |
|
5 |
Status |
-Not Issued -Issued -Expired |
|
6 |
Remark |
The remark of tariff solution |
|
8 |
Action |
|
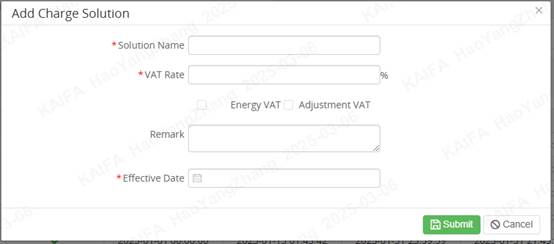
3.3.2 Add Tariff Solution
Click "Add" to open "Add Tariff
Solution" popup.
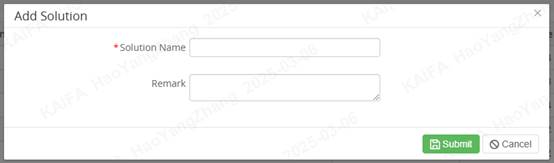
|
No |
Item |
Description |
|
|
1 |
Solution
Name |
Solution
Name |
|
|
2 |
Remark |
|
|
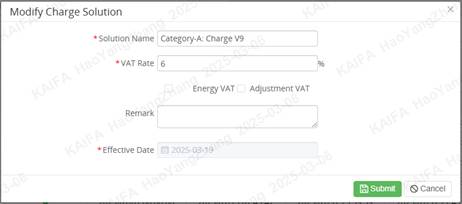
3.3.3 Set Charge Solution/Tariff Rate
Click "Set" icon to enter
"Set" page.
In this page, the operator can set
charge solution and tariff rate and PFC Solution by clicking the tab.
![]()
3.3.3.1
Charge Solution

3.3.3.1.1 Search
Search
Charge Solution based on Charge Name and Status.
The
following table lists the items shown in the figure above:
|
No |
Item |
Description |
|
1 |
No. |
The show
sequence number of tariff solution |
|
2 |
Solution Name |
The name of
charge solution |
|
3 |
Version |
The Version
number of charge solution |
|
4 |
Vat Rate |
The vat rate |
|
5 |
Energy VAT |
If should pay
VAT for energy |
|
6 |
Adjustment VAT |
If should pay
VAT for Adjustment |
|
7 |
Effective Date |
The time of this solution
effective |
|
8 |
Issue Date |
The time of this solution issue |
|
9 |
Expire Date |
The time of this solution expire |
|
10 |
Update Time |
The time of
the last update time |
|
11 |
Status |
-Not Issued -Issued -Expired |
|
12 |
Remark |
The remark of
charge solution |
|
13 |
Action |
|
3.3.3.1.2 Add
Click "Add" to open
"Charge Solution Add" popup.
3.3.3.1.3 Set Charge Item
Click "Modify" to
"enter Set Charge Item" page. (Only when the Status is not issued)
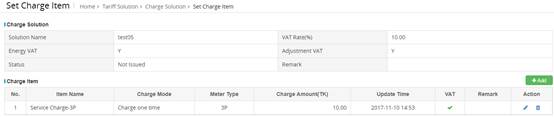
v Charge
Solution
v Charge
Item
3.3.3.1.3.1 Add
Click
"Add" button to open "Charge Item Add"
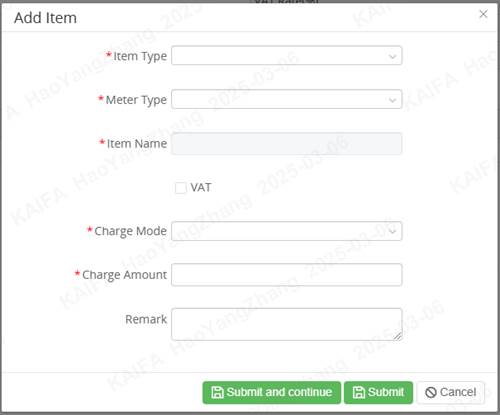
The following table lists the items
shown in the figure above:
|
No |
Item |
Description |
|
|
1 |
Item Type |
-Service
Charge -Minimum
Charge -Demand Charge -Meter Rent |
|
|
2 |
Meter Type |
Which type
will be effective -All -1p -3p |
|
|
3 |
Item Name |
The name of
the item. The same as Item type |
Cannot
be modified |
|
4 |
Vat |
If should pay
VAT for this item |
|
|
5 |
Charge Mode |
-Charge one
time: Only pay this item at the first charge -Charge
monthly: Pay this item monthly. -Charge by max
power (kW) monthly : Pay amount by max
power monthly. |
|
|
6 |
Charge Amount |
How many
should pay |
|
|
7 |
Remark |
The remark of
Item. |
|
Click ![]() to add charge item and open a new popup.
to add charge item and open a new popup.
Click ![]() to add charge item.
to add charge item.
3.3.3.1.3.2 Edit
Click
"Edit" icon to edit the charge item.
3.3.3.1.3.3 Delete
Click
"Delete" icon to delete the charge item.
3.3.3.1.4 Edit
1. Click
"Edit" icon to open the "Charge Solution Edit" popup.
2. Can edit
the configuration only when status is Not Issued.
3. Click ![]() to change statue to Issue.
to change statue to Issue.
3.3.3.1.5 Delete
Click
"Delete" ![]() icon to delete the charge solution. (Only when
the Status is not issued)
icon to delete the charge solution. (Only when
the Status is not issued)
3.3.3.1.6 View
Click
"View" icon to view charge item.
3.3.3.2
Tariff Rate
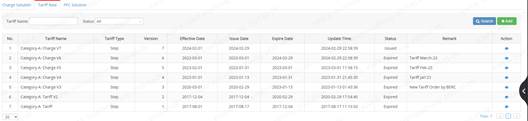
3.3.3.2.1 Search
Search Charge Solution based on Charge Name
and Status.
The following
table lists the items shown in the figure above:
|
No |
Item |
Description |
|
1 |
No. |
The show
sequence number of tariff rate |
|
2 |
Tariff Name |
The name of
Tariff |
|
3 |
Tariff Type |
-Step Tariff -TOU Tariff -Single Tariff |
|
4 |
Version |
The Version
number of Tariff |
|
5 |
Effective Date |
The date when
tariff was effective |
|
6 |
Issue Date |
The date when
tariff was issued |
|
7 |
Expire Date |
The date when
tariff was Expired |
|
8 |
Update Time |
The time of
the last update time |
|
9 |
Status |
-Not Issued -Issued -Expired |
|
9 |
Remark |
The remark of
Tariff |
|
10 |
Action |
|
3.3.3.2.2 Add
Click
"Add" button to open "Add Tariff Rate Information" popup.
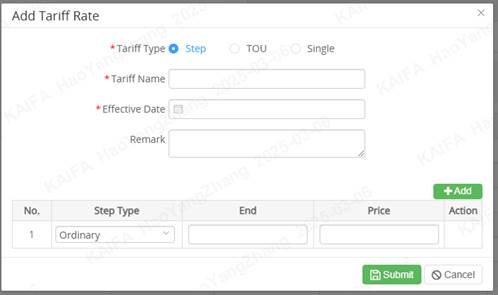
1. Choose
Tariff Type
2. Input
Tariff Name and Remark (not required).
3. Choose
Effective Date.
4. Set tariff
configuration.
v
Step Tariff
n
Choose Step Type
n
Set step interval's end
(kW). If this is the first interval, its start is 0.If this is the final
interval shouldn't set end.
n
Set price how much per
kilowatt hour in this step interval.
n
Click ![]() to add new step interval.
to add new step interval.
v
TOU
n
Set time interval's start
time. If this is the final interval, its end time is 24.
n
Set price how much per
kilowatt hour in this time interval.
n
Click ![]() to add new time interval.
to add new time interval.
v
Single Tariff: Set price how much per kilowatt hour
6. Click "Save" button to add Tariff
Rate.
3.3.3.2.3 Edit
1.Click ![]() to open "Edit Tariff Rate
Information" popup
to open "Edit Tariff Rate
Information" popup
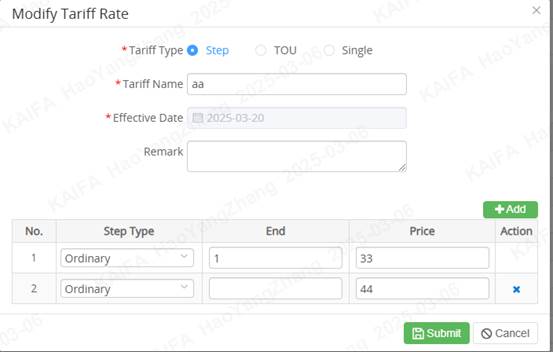
2. Edit Tariff
Rate Information.
3. Click ![]() to change status to Issued.
to change status to Issued.
4. Click
"submit" to save this edit.
3.3.4 Edit
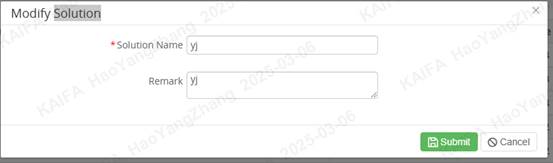
1.Click ![]() to open "Modify Solution" popup
to open "Modify Solution" popup
3.3.5 Delete
Click
"Delete" icon to delete the charge solution. (Only when the Status is
not issued)
3.3.6 View
Click
"View" icon to view Tariff Solution configuration.
3.3.7 Expire
Click
"Expire” icon to make charge solution expire
3.4
Rebate Solution Management
This
section provides an introduction to Rebate Solution menu. The operator can
access and manage Rebate solution.
3.4.1
Rebate Solution
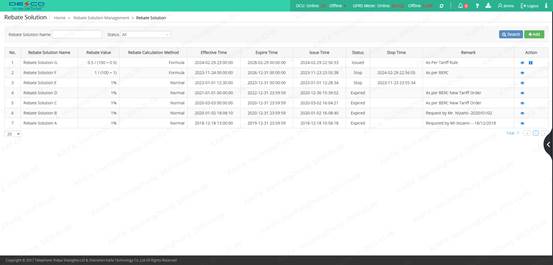
3.4.1.1 Search
Search
Rebate Solution based on Rebate Solution Name and Status.
The following table lists the items
shown in the figure above:
|
No |
Item |
Description |
|
1 |
No. |
The show sequence number of rebate solution |
|
2 |
Rebate Solution Name |
The name of rebate solution |
|
3 |
Rebate Value |
The value of rebate solution |
|
4 |
Rebate Calculation Method |
The calculation method of rebate solution |
|
5 |
Effective Time |
The time of rebate solution effective |
|
6 |
Expire Time |
The time of rebate solution expire |
|
7 |
Issue Time |
The time of rebate solution
issue |
|
8 |
Status |
-Not Issued -Issued -Expired |
|
9 |
Stop Time |
The time of rebate solution stop |
|
10 |
Remark |
remark |
|
11 |
Action |
|
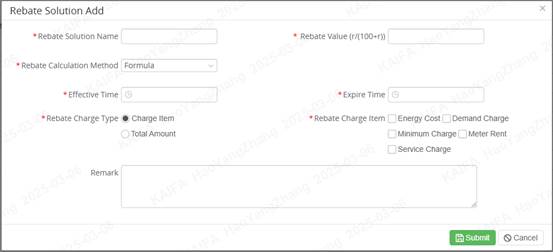
3.4.1.2 Add
Click "Add" to open
"Rebate Solution Add" popup.
3.4.1.3 Modify
Click "Modify" to open
"Rebate Solution Modify" popup.
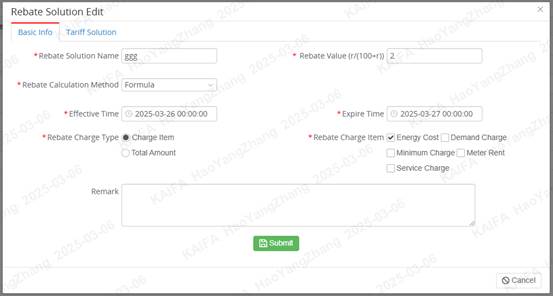
There
are two tab:Basic info & Tariff Solution
Tariff
Solution:
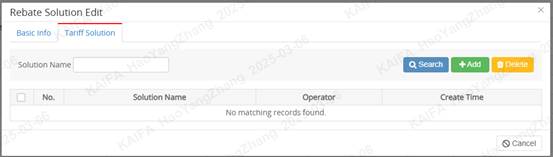
Click
"Add" button to open Rebate Solution Add which can bind Tariff solution
to Rebate solution:

3.4.1.4 Delete
Click
"Delete" icon to delete the Rebate solution. (Only when the Status is
not issued)
3.4.1.5 Issue
Click
"Issue" ![]() icon to view Rebate Solution configuration.
icon to view Rebate Solution configuration.
3.4.1.6 View
Click
"View" icon to view Rebate Solution configuration.
3.4.1.7 Expire
Click
"Expire" ![]() icon to make Rebate solution expire
icon to make Rebate solution expire
3.5
Area Management
This
section
provides an introduction to area management menu. User can access and manage area
(Utility, Substation, Feeder, and TR) information, and maintain left area tree
node
From
global menu, click "Area Management" to enter area management page
(Global menu > Area Management)
Area
management includes following functions:
v Search -
Search area information based on Code and Name
v Add - Add a
new area information
v Import -
Import area information
v Delete -
Delete selected area information
v
Modify - Modify selected area
information
3.5.1
Search
Search
area information based on Code and Name.
The following table lists the items
shown in the figure above.
|
Item |
Description |
|
|
1 |
No. |
The show sequence number of area |
|
2 |
Code |
Code |
|
3 |
Name |
Area name |
|
4 |
Type |
The type of Area: -Esp -feeder -transformer |
|
5 |
Full area name |
Full area name (consist of all of the
parent-node of the area
and the area's own
name ) |
|
6 |
Update Date |
Update time |
|
7 |
Description |
Description |
|
8 |
Action |
|
3.5.1
Import
Import area information:
1.
Click button![]() , import
page popup
, import
page popup
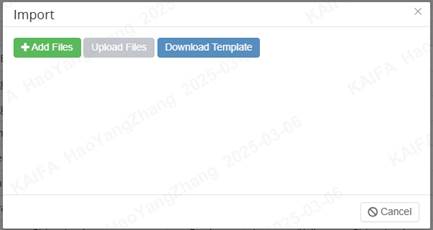
2.
Click "Download Template"![]() to
download template file
to
download template file
3. Open
template file, and fill in area information based on template format
4. Click
"Add file"![]() to import
information file
to import
information file
5. After
successfully import, new tree node will generate in left tree node
3.5.2
Add
The user can choose an area tree node to add a new node
as it's descendent:
Example: Add new node
"Utility_Test" under DESCO:
1.
Click "DESCO" from left tree nodes
2. Click
"Add" button to show "Add" popup
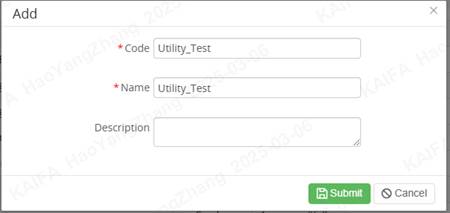
The
following table lists the items shown in the figure above.
|
No |
Item |
Description |
|
|
1 |
Code |
Identification
code specific to an area |
|
|
2 |
Name |
Area
Name |
|
|
3 |
Description |
|
|
3. Input
Code, Name, and Description then click "Submit"
4. After
operation successfully and the new node "Utility_Test" appears under
PTES.

3.5.3
Delete
The operator can click "delete" icon
to delete the node.
3.5.5
Modify
The
operator can click "modify" icon to open the modify popup.

Name and Description can be modified.
3.6
Archive Management
This
section provides an introduction to archive management menu. The operator can
access and manage all kinds archive detail information here.
Archive
Management includes following 15 sub menus:
v Metering Point
v Post Paid Metering Point
v DCU
v Meter
v Module
v SIM
v HES Server
v Customer
v Model
v Communication Point
v Register Meter
v Shipment File
v Gateway
v Smart Box
v Api Key Device
3.6.1 Metering Point
From the global menu, click
"Archive Management" to expand it, and then click "Metering
Point" to enter metering point information page (Global menu > Archive
Management > Metering Point):

In metering point information page,
the operator can use following functions to access and manage metering points.
3.6.1.1 Search
Search
based on Account No, Meter No., Area, Main Meter No.,Tariff Solution, Status,
Install Status,Install Type,Meter Type,Communication Type,Install Address. The
following table lists the items shown in the figure above:
|
No |
Item |
Description |
|
1 |
Account No |
Identification
number specific to a user - U999010002 |
|
2 |
Customer No. |
Identification
number specific to a customer which is generated automatically by the system.(Section
3.3.3) |
|
3 |
Customer Name |
Customer
name(Section 3.3.3) |
|
4 |
Max Power(kW) |
Max Power(kW) |
|
5 |
Consumption
Type |
-P.T. -L.V. |
|
6 |
Communication
Type |
Communication
Type: -485 -GPRS -Offline -PLC -RF |
|
7 |
TR No. |
Transformer
No (Section 3.5) |
|
8 |
Tariff
Solution |
Tariff
Solution Name (Section 3.7) |
|
9 |
Meter Type |
-1P -3P -CT |
|
10 |
Meter No. |
Identification
number specific to a subscription product - 021160000492
(Section 3.3.2) |
|
11 |
Install Type |
-New Connection -Conversion -Replacement |
|
12 |
Install Date |
Install Date |
|
13 |
Install
Address |
Install
Address |
|
14 |
Install Description |
|
|
15 |
Open Account
Scheme |
Open Account
Scheme Name(Section 3.4.1) |
|
16 |
Solar(W) |
Solar value |
|
17 |
Install Status |
-Not Installed -CMO Issued -Customized -Registered |
|
18 |
Status |
- In use - Stop |
|
19 |
Action |
|
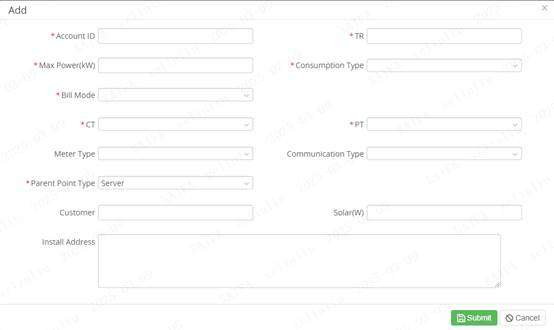
3.6.1.2 Add Metering Point
The operator can click "Add"
button to add a new metering point.
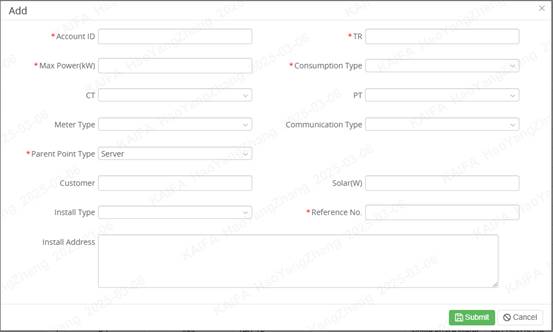
The
following table lists the items shown in the figure above.
|
No |
Item |
Description |
|
|
1 |
Account No |
Identification
number specific to a user- U999010002 |
|
|
2 |
Transformer |
Installation
Area |
|
|
3 |
Max Power(kW) |
Max Power(kW) |
|
|
4 |
Consumption
Type |
-P.T. -L.V. -D.T |
|
|
5 |
CT |
Ct |
|
|
6 |
PT |
Pt |
|
|
7 |
Meter Type |
-1P -3P |
|
|
8 |
Communication
Type |
- GPRS - 485 - Offline |
|
|
9 |
Parent Point
Type |
-Server -DCU -Meter -Repeater -Gateway |
|
|
10 |
Customer |
Customer
Name |
|
|
11 |
Solar(W) |
Solar value |
|
|
12 |
Install Type |
-New Connection -Conversion -Replacement |
|
|
13 |
Reference No. |
Reference no |
|
|
14 |
Install
Address |
Installation
address |
|
3.6.1.3 Import Metering Point
The
operator can click "Import" button to add new metering points by
importing excel using the following download template.
![]()
Import
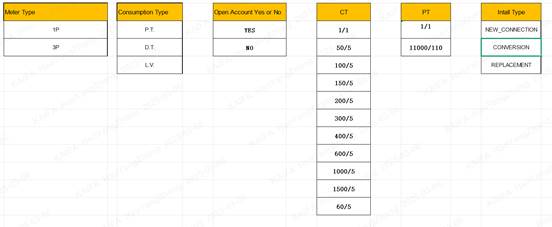
data must follow rules as below:
1.
Account No. is required and shouldn't exist in the system already. And Account
No. should be 12 digits only.
2. The transformer is required and
shouldn't exist in the system already.
3. Customer No. is not required. But
if operator input the Customer No., please make sure the Customer No. already
exists in the system.
4. Meter Type, Power Supply Voltage,
and Consumption Type are required. Please input corresponding value as
following:
3.6.1.4 Import Metering Point-Meter
The
operator can click "Import Metering Point-Meter" button to bind the
metering point and meter by importing excel using the following download
template.
![]()
Import
data must follow rules as below:
1. Account No. is required and should
already exist in the system.
2. Meter No. is required and should
already exist in the system. Meter Status should be "Not installed"
or" Removed".
4. Tariff Solution is required and
should be already existed in the system.
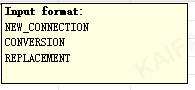
5.Install Type please input
corresponding value as following:
3.6.1.5 Export
Click "Export" button to
export data to excel.
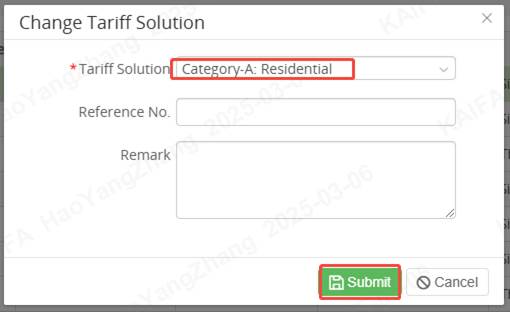
3.6.1.6 Change Tariff Solution
The
operator can batch change tariff solution setting to selected metering points.
Check
the checkboxes and click "Change Tariff Solution" button to select a
tariff solution to change.
3.6.1.7 Set Open Account Scheme
The
operator can batch set open account scheme to selected metering points.
Check
the checkboxes and click "Set Open Account Scheme" button to select
an open account scheme to set.

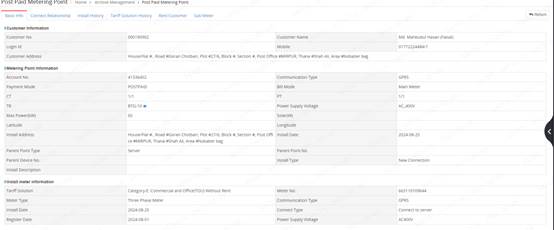
3.6.1.8 Detail
The
operator can view the customer Information, metering point information. Install
meter information, meter install history from the selected metering point.
Selected
one metering point record, and click the "Detail" icon, then the
following screen is displayed:
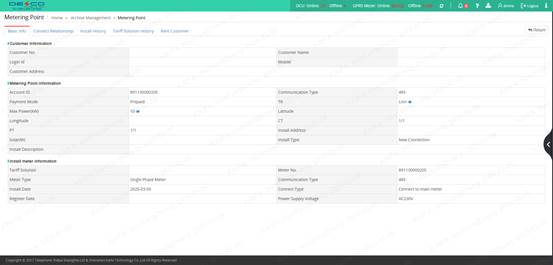
Here
include following tabs:
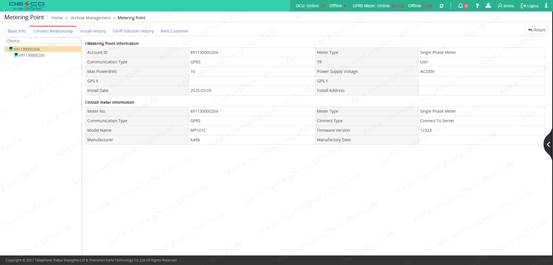
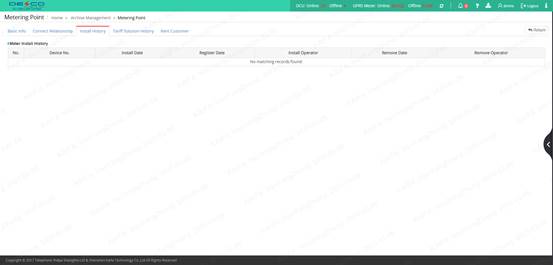
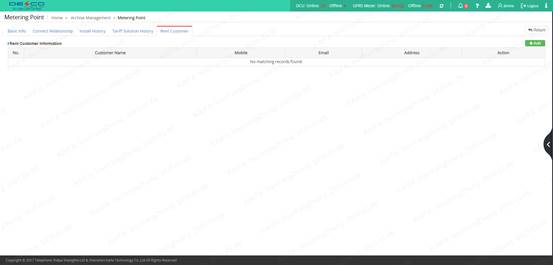
v Basic Info
- View the information of meter point
v
Connect Relationship - View the
connection relationship of meter point
v
Install History -- View install history
of meter point
v
Tariff Solution History -- View the
tariff solution history of meter point

v
Rent Customer -- View and manage the
rent customer
3.6.1.9 Install Meter
The
operator can select one metering point without installing a meter to install
the meter.
![]()
Selected
one metering point record which status is not installed, and click the
"Install" icon, then the following popup is displayed:
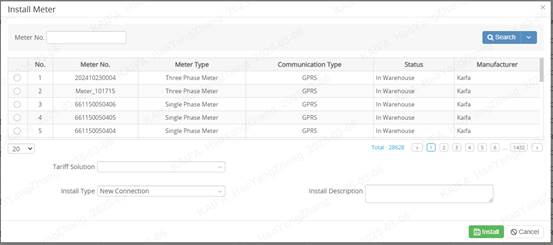
Selected
one meter, install date, register date, and tariff solution to install the
meter.
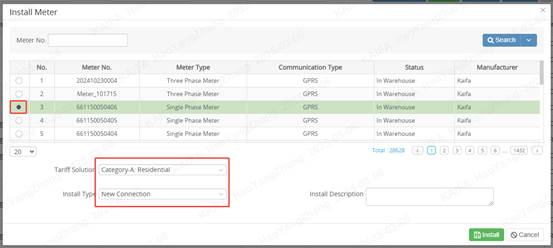
After installing operation successful, the
metering point status will change from "Not Installed" to
"Installed". The operator can no longer to do "install" and
"delete" action but can do "replace" action.
![]()
3.6.1.10 Replace Meter
The operator can select one metering
point with installing a meter to replace its meter.
![]()
Selected
one metering point record which status is installed, and click the
"replace" icon, then the following popup is displayed:
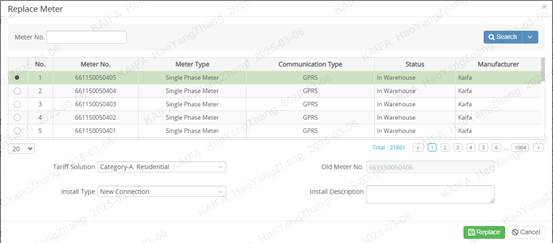
After
replacing operation successful, the metering point' meter No. will change to
the replacing meter No..
![]()
Note: If the original meter has
unhandled token orders, the operator can't remove the original meter and
replace new meter successfully. The system will prompt the operator as below:

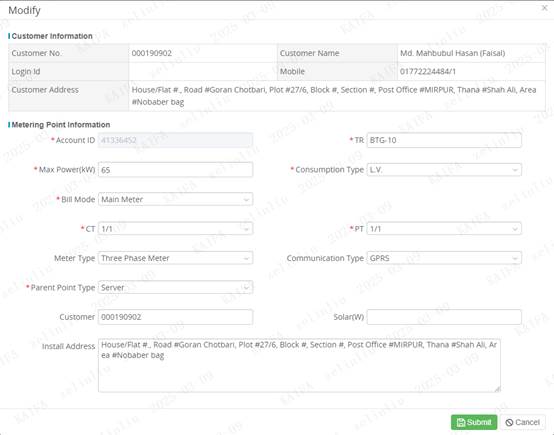
3.6.1.11 Modify Metering Point
The operator can modify the selected
metering point info by clicking "Modify" icon.
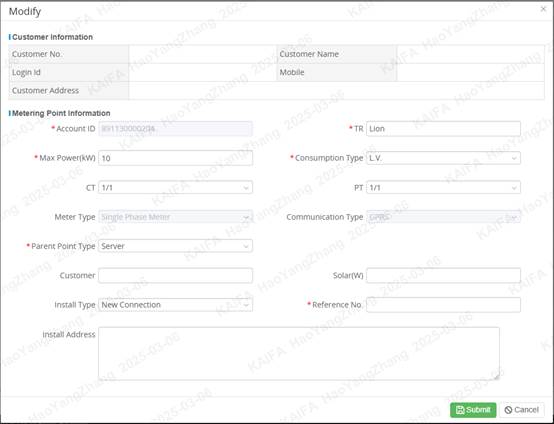
Only
Transformer, Max Power (kW), CT,PT,Consumption Type, Parent Point Type,
Customer,Solar(W),Install Type,Reference No. and Install Address info can be
modified.
3.6.1.12 Delete Metering Point
The
operator can delete the selected metering point which status is not installed
by clicking "delete" icon.
![]()
3.6.2 Post Paid Metering Point
From the global menu, click
"Archive Management" to expand it, and then click "Post Paid
Metering Point" to enter meter information page (Global menu > Archive
Management > Post Paid Metering Point):

In post paid metering point
information page, the operator can use following functions to access and manage
post paid metering point.
3.6.2.1 Search
Search based on Area, Account ID,
Meter No., Main Meter No..
The following table lists the items shown in the figure above:
|
No |
Item |
Description |
|
1 |
No. |
Serial number, used to identify each record. |
|
2 |
Account No. |
Metering Point
Account No. |
|
3 |
Bill
Mode |
Billing method
|
|
4 |
Customer
No. |
Customer
number |
|
5 |
Customer
Name |
The
name of the customer. |
|
6 |
Max
Power(kW) |
Maximum
power in kilowatts |
|
7 |
Consumption
Type |
specifying
the category of electricity usage.
|
|
8 |
Communication
Type |
Method of
communication |
|
9 |
TR No. |
Transformer
number |
|
10 |
Tariff
Solution |
Pricing
scheme for calculating |
|
11 |
Install Status |
Installation
status of the equipment. |
|
12 |
Status |
Current
status of the record. |
|
12 |
Action |
|
3.6.2.2 Add
The operator can click "Add"
button to add a new post paid metering point.
The
following table lists the items shown in the figure above.
|
No |
Item |
Description |
|
|
1 |
Account ID |
Identification
number specific to a subscription product - 021160000492 |
|
|
2 |
TR |
Transformer No |
|
|
3 |
Max Power(kW) |
Max Power(kW) |
|
|
4 |
Consumption
Type |
-P.T. -L.V. |
|
|
5 |
Bill Mode |
Initialization
data in database。 |
|
|
6 |
CT |
-1/1 -50/5 |
|
|
7 |
PT |
-1/1 -11000/110 |
|
|
8 |
Meter Type |
Meter
Type |
|
|
9 |
Communication
Type |
- GPRS - 485 - Offline |
|
|
10 |
Parent Point
Type |
Parent
Point Type |
|
|
11 |
Customer |
Customer
Name |
|
|
12 |
Solar(W) |
Solar(W) |
|
|
13 |
Install
Address |
Installation
address |
|
3.6.2.3 Import
The
operator can click "Import" button to add new points by importing
excel using the following download template.
3.6.2.4 Export
Export checked data into Excel file
3.6.2.5
Modify GPS
The operator can click "modify”
icon to open the point info.
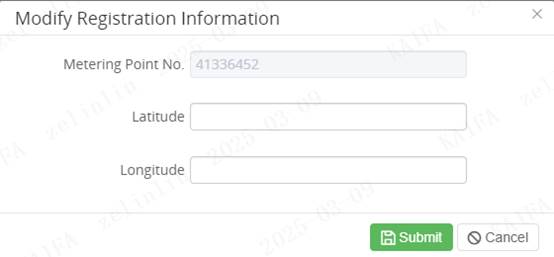
Latitude, Longitude can be modified.
3.6.2.6 View
Click
"view” icon to open the post paid metering point.
3.6.2.7
Replace Meter
Click on the
'Replace Meter' icon to replace the meter.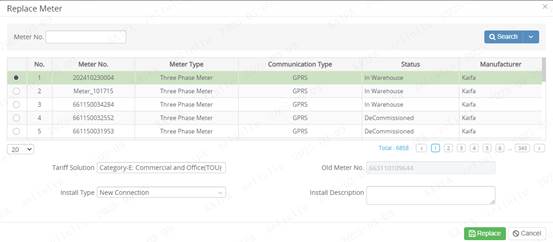
3.6.2.6 Modify
The operator can modify the selected
point info by clicking "Modify" icon.
TR,
Max Power(kw), Communication Type, Bill Model, CT, PT, Meter Type,
Communication Type, Parent Point Type, Customer, Solar(w), Install Addresscan
be modified.
3.6.3 DCU
From the global menu, click
"Archive Management" to expand it, and then click "DCU" to
enter customer information page (Global menu > Archive Management > DCU):
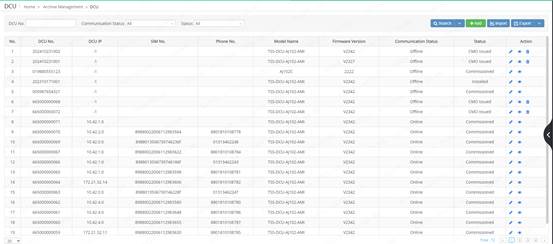
In DCU information page, the operator
can use following functions to access and manage DCU :
3.6.3.1 Search
Search based on DCU No., Communication
Status, Status.
The following table lists the items shown in the figure above:
|
No |
Item |
Description |
|
1 |
No. |
Serial
number, used to identify each record. |
|
2 |
DCU
No. |
DCU
device number |
|
3 |
DCU
IP |
Ip
address |
|
4 |
SIM
No. |
SIM
Serial number
|
|
5 |
Phone
No. |
Phone
number |
|
6 |
Model
Name |
Model
name |
|
7 |
Firmware
Version |
Firmware
version serial number |
|
8 |
Communication
Status |
Communication
status |
|
9 |
Status |
Status |
|
10 |
Action |
Modify; |
3.6.3.2 Add
The
operator can click "Add" button to add a new DCU device.
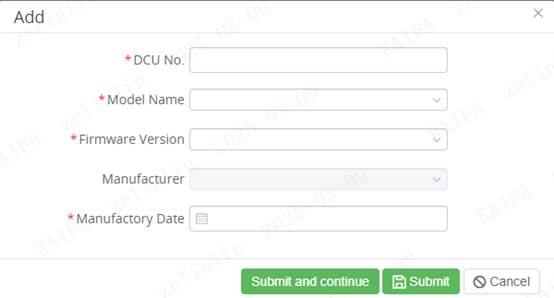
The
following table lists the items shown in the figure above.
|
No |
Item |
Description |
|
|
1 |
DCU
No. |
DCU number
specific |
|
|
2 |
Model
Name |
Model
Name |
|
|
3 |
Firmware
Version |
Firmware
version serial number |
|
|
4 |
Manufacturer |
Manufacturer |
|
|
5 |
Manufactory
Date |
Manufacturer
Date |
|
|
|
|
|
|
3.6.3.3 Import
The
operator can click "Import" button to add new DCUS by importing excel
using the following download template.
Import
data must follow rules as below:
1.
DCU No. is required and should not be existed in the system already.
2. Mobile Name is required and should
be existed in the system already and please make sure the mobile is valid.
3. Firm Version is required and should
be existed in the system already and please make sure the firm version is
valid.
4. Manufactory Date is required and
please make sure the date is valid.
3.6.3.4 Export
Export checked data into Excel file
3.6.3.6 Modify
The
operator can modify a DCU by clicking the "Modify” icon.
Model
Name, Firmware Version, Manufactory Date can be modified.
3.6.3.7 Delete
The operator can delete selected DCU
by clicking "Delete" icon.
3.6.4
Meter
From the global menu, click
"Archive Management" to expand it, and then click "Meter"
to enter Meter information page (Global menu > Archive Management >
Meter):
In meter information page, the
operator can use following functions to access and manage Meter server:
3.6.4.1 Search
Search based on Meter No., Status, Lot
No..
The following table lists the items shown in the figure above:
|
No |
Item |
Description |
|
1 |
Lot No. |
Lot
No. |
|
2 |
Meter No. |
Identification
number specific to a subscription product - 021160000492 |
|
3 |
Meter Type |
- 1p - 3p |
|
4 |
Communication
Type |
- GPRS - 485 - Offline |
|
6 |
Model Name |
Model Name |
|
7 |
Manufacturer |
KAIFA |
|
8 |
Payment
Mode |
|
|
9 |
Status |
- Not
Installed - Installed -
Commissioning - Commissioned - To Be
Replaced - To Be
Removed - Scrapped - Removed |
|
10 |
Action |
|
3.6.4.2 Add
The
operator can click "Add" button to add a new meter.
The
following table lists the items shown in the figure above.
|
No |
Item |
Description |
|
|
1 |
Meter No. |
Identification
number specific to a subscription product - 021160000492 |
|
|
2 |
Meter Type |
-1P -3P |
|
|
3 |
Model Name |
Initialization
data in database。 |
|
|
4 |
Firm Version |
Initialization
data in database。 Show
different options by selecting different model name |
|
|
5 |
Manufacturer
Name |
Initialization
data in database。 |
|
|
6 |
Communication
Type |
- GPRS - 485 - Offline |
|
|
7 |
Lot
No. |
Lot
No. |
|
|
|
Seal
number 1 |
number
1 |
|
|
|
Seal
number 2 |
number
2 |
|
|
|
Seal
number 3 |
number
3 |
|
3.6.4.3
Import
The
operator can click "Import” button to add new meters by importing excel
using the following download template.
Import
data must follow rules as below:
1.
Meter No. is required and should exist in the system already.
2. Firm Version is required and should
exist in the system already.
3. Model Name is not required. But if
operator input the Model Name, please make sure the Model Name already exists
in the system.
4. Lot No is not required.
5. Meter Type, Communication Type are
required.
3.6.4.4
Export
Export checked data into Excel file
3.6.4.5
Modify
The
operator can modify the selected meter info by clicking "Modify” icon.
Meter
Type, Communication Type, Model Name, Firm Version, Manufacturer Name, Lot No.,
info can be modified.
3.6.4.6
Delete
The
operator can delete the selected meter which status is In Warehouse
by clicking "delete” icon.
![]()
3.6.5 Module
From the global menu, click
"Archive Management" to expand it, and then click "Module"
to enter Module information page (Global menu > Archive Management >
Module):

In meter information page, the
operator can use following functions to access and manage module:
3.6.5.1 Search
Search based on Module No., Model
Type, Meter No.
The following table lists the items shown in the figure above:
|
No |
Item |
Description |
|
1 |
Module
No. |
Module
No. |
|
2 |
Module
Type |
Module
Type |
|
3 |
Meter
No. |
Meter
No. |
|
4 |
Remark |
Remark |
|
|
|
|
3.6.5.2
Export
Export
checked data into Excel file
3.6.6 SIM
From the global menu, click
"Archive Management" to expand it, and then click "SIM" to
enter Module information page (Global menu > Archive Management > SIM):
In SIM information page, the operator
can use following functions to access and manage SIM:
3.6.6.1
Search
Search based on SIM No., Phone NO.,
Status.
The following table lists the items shown in the figure above:
|
No |
Item |
Description |
|
1 |
SIM
No. |
SIM
No. |
|
2 |
Phone
No. |
Phone
number |
|
3 |
Device
Type |
|
|
4 |
Device
No. |
Device
No |
|
5 |
Status |
Status |
|
6 |
Action |
|
3.6.6.2 Add
The operator can click "Add”
button to add a new SIM.
The
following table lists the items shown in the figure above.
|
No |
Item |
Description |
|
|
1 |
SIM No |
Identification
number specific |
|
|
2 |
Phone No. |
Phone
number |
|
|
3 |
Device Type |
-Meter -DCU -Gateway |
|
|
4 |
Device No. |
-Device
number |
|
3.6.6.3
Import
The
operator can click "Import" button to add new SIM by importing excel using
the following download template.
3.6.6.4
Export
Export
checked data into Excel file
3.6.6.5
Modify
The operator can modify a SIM by clicking the
"Modify” icon.
Phone
No., Device Type, Device No. info can be modified.
3.6.6.6
Uninstall
The operator can uninstall the device by clicking
the 'Uninstall' button.
3.6.7 HES Server
From the global menu, click
"Archive Management" to expand it, and then click "HES
Server" to enter HES server information page (Global menu > Archive
Management > HES Server):

In HES Server information page, the
operator can use following functions to access and manage HES server:
3.6.7.1
Search
Search based on HES Server Name.
The following table lists the items shown in the figure above:
|
No |
Item |
Description |
|
1 |
HES
Server Name |
HES
Server Name |
|
2 |
Description |
Description |
|
3 |
IP |
HES
Server IP |
|
4 |
Port |
HES
Server Port |
|
5 |
Status |
-
Enable -
Enable |
|
6 |
Type |
-
Auto Collection Server -
Communication Server |
|
7 |
Created
Time |
HES
server created time |
|
8 |
Modify
Time |
HES
server created time |
|
9 |
Action |
|
3.6.7.2 Add
The
operator can click "Add" button to add a new server.
|
No |
Item |
Description |
|
|
1 |
HES
Server Name |
HES
Server Name |
|
|
2 |
IP |
IP |
|
|
3 |
Port |
Port |
|
|
4 |
Description |
Description |
|
|
5 |
Type |
-
Auto Collection Server -
Communication Server |
|
|
6 |
Status |
-
Enable -
Enable |
|
3.6.7.3
Modify
The operator can modify the selected
server info by clicking "Modify" icon.
HES
Server Name, IP, Port, Description, Type, and Status info can be modified.
3.6.7.4
Delete
The operator can delete selected
server by clicking "Delete" icon.
3.6.8
Customer
From the global menu, click
"Archive Management" to expand it, and then click
"Customer" to enter customer information page (Global menu >
Archive Management > Customer):
In customer information page, the
operator can use following functions to access and manage customer:
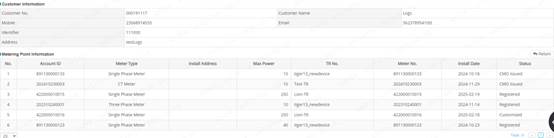
3.6.8.1
Search
Search based on Customer No., Customer
Name, Address, Identifier.
The following table lists the items shown in the figure above:
|
No |
Item |
Description |
|
1 |
Customer
No. |
Identification
number specific to a customer which is generated automatically by the system. -
000000012 |
|
2 |
Customer
Name |
Customer
name |
|
3 |
Identifier |
Identifier |
|
4 |
Email |
Customer
email |
|
5 |
Address |
Customer
address |
|
6 |
Mobile |
Customer
mobile |
|
7 |
Action |
|
3.6.8.2 Add
The
operator can click "Add" button to add a new customer.
The
following table lists the items shown in the figure above.
|
No |
Item |
Description |
|
|
1 |
Customer
Name |
Identification
number specific to a subscription product
- 021160000492 |
|
|
2 |
Identifier |
Customer
Identifier |
|
|
4 |
Mobile |
Customer
mobile |
|
|
5 |
Email |
Customer
email |
|
|
6 |
Address |
Customer
address |
|
3.6.8.3
Import
The
operator can click "Import" button to add new customers by importing
excel using the following download template.
Import
data must follow rules as below:
1.
Identifier is required and should not be existed in the system already.
2. Mobile is required and should be
existed in the system already and please make sure the mobile is valid.
3. Email is not required. But if
operator input the Email, please make sure the email is valid.
3.6.8.4 Export
Export checked data into Excel file
3.6.8.5
Modify
The operator can modify the selected
customer info by clicking "Modify" icon.

Customer
Name, Login ID, Address, Mobile, Password, and Email info can be modified.
The
operator can bind metering points by click "Bind" button.

Select
one meter and click "Submit" button. After a successful operation,
the submitted meter will be shown under Metering Point Information.
![]()
3.6.8.6
Detail
The
operator can view the customer Information, its binding metering point
information of the selected customer.
Selected
one customer record, and click the "Detail" icon, then the following
screen is displayed:
3.6.8.7
Delete
The operator can delete selected
customer by clicking "Delete" icon.
3.6.9
Model
From the global menu, click
"Archive Management" to expand it, and then click "Model"
to enter HES server information page (Global menu > Archive Management >
Model):

In model information page, the
operator can use following functions to access and manage model:
3.6.9.1
Search
Search based on Model No., Model Name,
Manufacturer, Device Type.
The following table lists the items shown in the figure above:
|
No |
Item |
Description |
|
1 |
Model
No. |
Model
No. |
|
2 |
Model
Name |
Model
Name |
|
3 |
Manufacturer |
KAIFA |
|
4 |
Power
Supply Voltage |
Voltage |
|
5 |
Device
Type |
Device
Type |
|
6 |
Description |
Description |
|
7 |
Action |
|
3.6.9.2
Modify
The
operator can modify the selected model info by clicking "Modify"
icon.
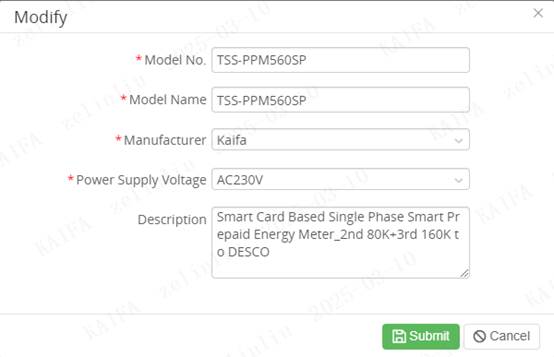
Model
No., Model Name, Manufacturer, Power Supply Voltage, Description can be
modified.
3.6.9.3
Firmware Version
The
operator can modify the firmware version of the selected model by clicking on
the "Firmware Version" icon.
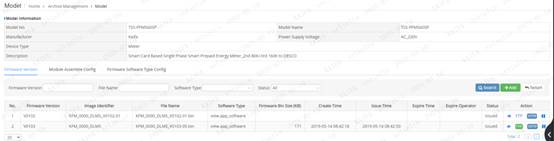
The
operator can add Firmware Version info by click "Add" button.
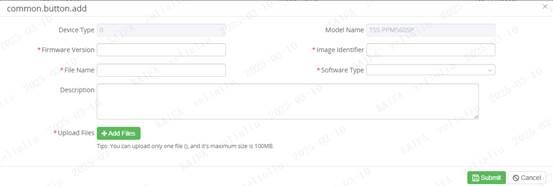
the
submitted firmware veresion will be shown under Information.

3.6.10
Communication Point
From the global menu, click
"Archive Management" to expand it, and then click "Communication
Point" to enter HES server information page (Global menu > Archive
Management > Communication Point):
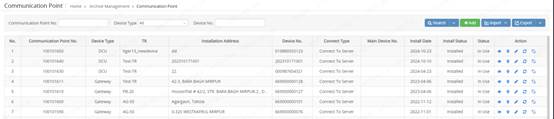
In Communication Point information
page, the operator can use following functions to access and manage
Communication Point:
3.6.10.1
Search
Search based on Communication NO.,
Device Type, Device No..
The following table lists the items shown in the figure above:
|
No |
Item |
Description |
|
1 |
Communication
Point No. |
Identification
number specific to a user - U999010002 |
|
2 |
Device
Type |
-DCU -Gateway -Smart
Box |
|
3 |
TR |
Transformer |
|
4 |
Installation
Address |
Address |
|
5 |
Device
No. |
Device
No |
|
6 |
Connect
Type |
Connect
Type |
|
7 |
Main
Device No. |
|
|
8 |
Install
Date |
Install
Date |
|
9 |
Install
Status |
Install
Status |
|
10 |
Status |
Status |
|
11 |
Action |
Replace Uninstall |
3.6.10.2 Add
The operator can click "Add" button
to add a new Communication Point.
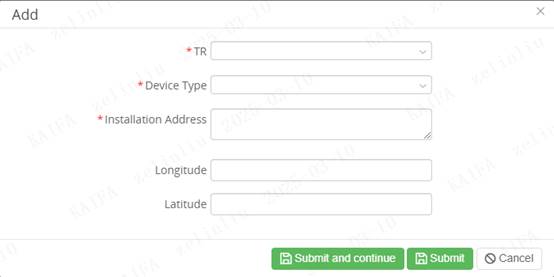
|
No |
Item |
Description |
|
|
1 |
TR |
Transformer number |
|
|
2 |
Device
Type |
Device
Type |
|
|
3 |
Installation
Address |
Installation
Address |
|
|
4 |
Longitude |
Longitude |
|
|
5 |
Latitude |
Latitude |
|
3.6.10.3
Import
The
operator can click "Import" button to add new devices by importing
excel using the following download template.
3.6.10.4
Export
Export
checked data into Excel file
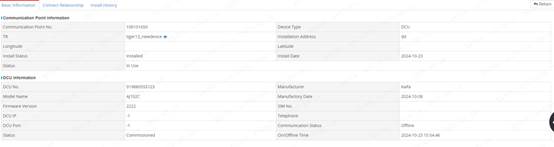
3.6.10.5 View
Click
"View" icon to view Communication Point configuration.
3.6.10.6
Modify GPS
The operator can click "modify”
icon to open the point info.
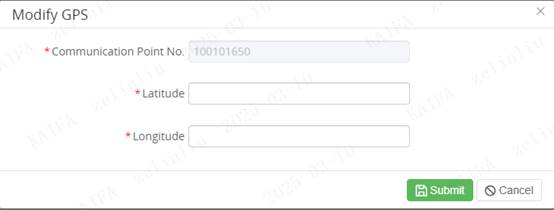
Latitude, Longitude can be modified.
3.6.10.7
Modify
The
operator can modify the selected communication point basic info by clicking
"Modify" icon.
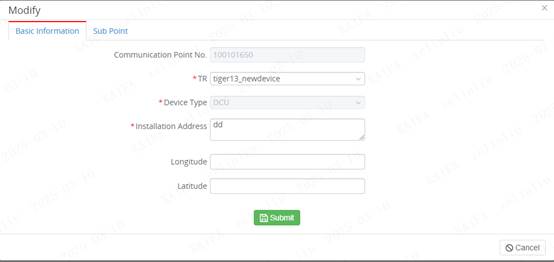
TR,
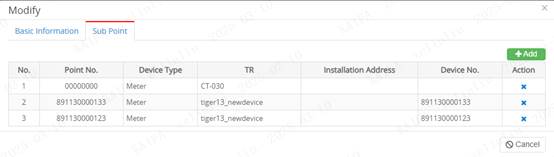
Installation Address, Longitude, Latitude can be modified.
The
operator can modify the selected communication point Sub point Info.
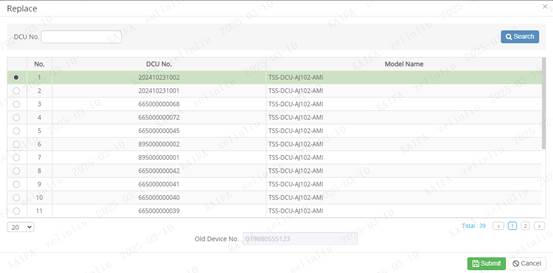
3.6.10.8
Replace
Click on the 'Replace' icon to replace the DCU
device.
3.6.10.9
Uninstall
The operator can uninstall the Communication Point
by clicking the 'Uninstall' button.
3.6.11
Register Meter
From the global menu, click
"Archive Management" to expand it, and then click "Register
Meter" to enter Meter server information page (Global menu > Archive
Management > Register Meter):
In Register Meter information page,
the operator can use following functions to access and manage Register Meter:
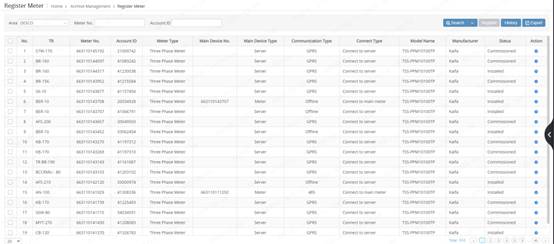
3.6.11.1
Search
Search based on Area, Meter No., Account ID.
The following table lists the items shown in
the figure above.
|
No |
Item |
Description |
|
1 |
TR |
Transformer
No |
|
2 |
Meter
No. |
Identification
number specific to a meter |
|
3 |
Account ID |
Identification
number specific to a account |
|
4 |
Meter Type |
Meter
Type |
|
5 |
Main
Device No. |
Main
Device number |
|
6 |
Main
Device Type |
|
|
7 |
Communication
Type |
Communication
Type: -485 -GPRS -Offline -PLC -RF |
|
8 |
Connect
Type |
Connect
Type |
|
9 |
Model
Name |
Model
Name |
|
10 |
Manufacturer |
-Kaifa |
|
11 |
Status |
- Commissioned - Installed |
|
12 |
Action |
Register |
3.6.11.2
Register
The operator can click the "Register"
button to register the meter date.

3.6.11.3
History
Operator can add view history by clicking
"History” button

3.6.11.4
Export
Click
"Export" button to export data to excel.
3.6.12
Shipment File
From the global menu, click
"Archive Management" to expand it, and then click "Shipment
File" to enter Shipment File information page (Global menu >
Archive Management > Shipment File):

In Shipment File information page, the
operator can use following functions to access and manage Shipment File:
3.6.12.1
Search
Search based on File Name, Device
Type, Status, Description.
The following table lists the items shown in the figure above:
|
No |
Item |
Description |
|
2 |
File
Name |
File
Name |
|
3 |
Device
Type |
-DCU -Meter -Repeater -Module |
|
4 |
File
Size (KB) |
File
Size |
|
5 |
Device
Count |
Number
of devices |
|
6 |
Import
Time |
Import
Time |
|
7 |
Create
Time |
The
creation time of the device |
|
8 |
Operator |
|
|
9 |
Description |
Description |
|
10 |
Status |
Status |
|
12 |
Action |
|
3.6.12.2 Add
The
operator can click "Add" button to add a new Shipment File.
|
No |
Item |
Description |
|
|
2 |
Device
Type |
-DCU -Meter -Repeater -Module |
|
|
3 |
Description |
Description |
|
|
4 |
Upload
Files |
Files |
|
3.6.12.3 View
Click
"View" icon to view File Name info.

3.6.13
Gateway
From the global menu, click
"Archive Management" to expand it, and then click "Gateway"
to enter Gateway information page (Global menu > Archive Management >
Gateway):

In Gateway information page, the
operator can use following functions to access and manage Gateway:
3.6.13.1
Search
Search based on Gateway No.,
Communication Type, Status.
The following table lists the items shown in the figure above:
|
No |
Item |
Description |
|
2 |
Gateway
No. |
Gateway
Number |
|
3 |
Model
Name |
CG124 |
|
4 |
Firmware
Version |
V0002 |
|
5 |
Communication
Type |
GPRS |
|
6 |
Manufacturer |
Kaifa |
|
7 |
Manufactory
Date |
The
creation time of the device |
|
10 |
Status |
Status |
|
12 |
Action |
|
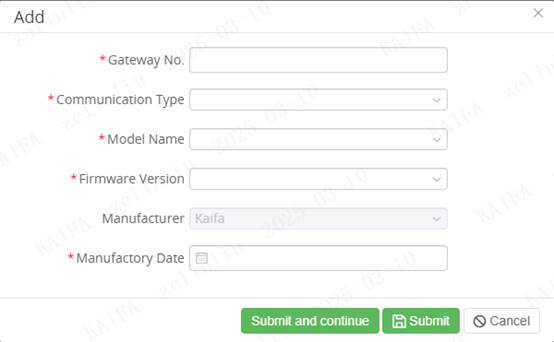
3.6.13.2 Add
The
operator can click "Add" button to add a new Gateway.
|
No |
Item |
Description |
|
|
1 |
Gateway
No. |
Gateway number |
|
|
2 |
Communication
Type |
GPRS |
|
|
3 |
Model
Name |
CG124 |
|
|
4 |
Firmware
Version |
V002 |
|
|
5 |
Manufacturer |
Kaifa |
|
|
6 |
Manufactory
Date |
Date |
|
3.6.13.3
Import
The
operator can click "Import" button to add new gatewaies by importing
excel using the following download template.
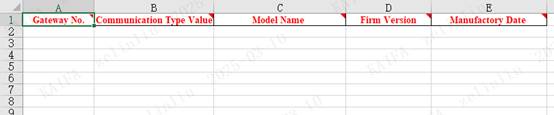
Import
data must follow rules as below:
1.
Gateway No. is required and should not be existed in the system already.
2. The input format for Manufactory
Date is YYYY-MM-DD.
3.6.13.4
Export
Click
"Export" button to export data to excel or PDF.
3.6.13.5
Modify
The operator can modify the selected
gateway info by clicking "Modify" icon.

Manufactory Date can be modified.
3.6.13.6 View
Click
"View" icon to view Gateway info.

3.6.13.7
delete
The operator can delete selected
gateway by clicking "Delete" icon.
3.6.14
Smart Box
From the global menu, click
"Archive Management" to expand it, and then click "Smart
Box" to enter Gateway information page (Global menu > Archive
Management > Smart Box):

In Smart Box information page, the
operator can use following functions to access and manage Smart Box:
3.6.14.1
Search
Search based on Smart Box No., Communication
Type, Status.
The following table lists the items shown in
the figure above.
|
No |
Item |
Description |
|
1 |
Smart
Box No. |
Smart
Box No |
|
Model Name |
SMART_BOX_TEST |
|
|
3 |
Firmware
Version |
v_samrt_1 |
|
7 |
Communication
Type |
-485 |
|
|
Manufacturer |
Kaifa |
|
|
Manufactory
Date |
Manufactory
Date |
|
8 |
Status |
Connect
Type |
|
9 |
Action |
|
3.6.14.2 Add
The
operator can click "Add" button to add a new Smart Box No.

|
No |
Item |
Description |
|
|
1 |
Smart
Box No. |
Smart
Box number |
|
|
2 |
Communication
Type |
485 |
|
|
3 |
Model Name |
SMART_BOX_TEST |
|
|
4 |
Firmware
Version |
V_smart_1 |
|
|
5 |
Manufacturer |
Kaifa |
|
|
6 |
Manufactory
Date |
Date |
|
3.6.14.3
Import
The
operator can click "Import" button to add new smart_boxs by importing
excel using the following download template.
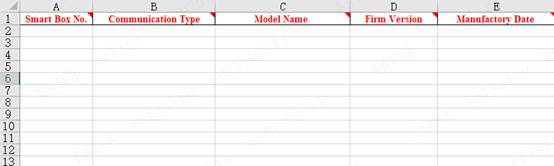
Import
data must follow rules as below:
1.
Smart Box No. is required and should not be existed in the system already.
2. The input format for Manufactory
Date is YYYY-MM-DD.
3.6.14.4
Export
Click
"Export" button to export data to excel or PDF.
3.6.14.5
Modify
The
operator can modify the selected smart box info by clicking "Modify"
icon.
Manufactory Date can be modified.
3.6.14.6 View
Click "View" icon to view smart box
info.

3.6.14.7
Delete
The operator can delete selected smart
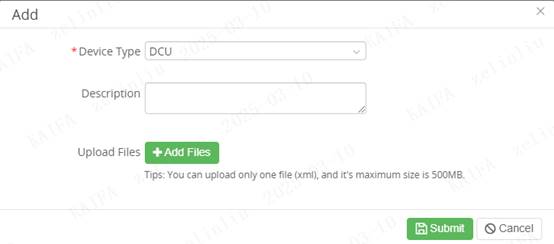
box by clicking "Delete" icon.3.6.15 API Key
Device
From the global menu, click
"Archive Management" to expand it, and then click "API key
Device" to enter Gateway information page (Global menu > Archive
Management > API key Device):

In Api Key Device information page,
the operator can use following functions to access and manage Api Key:
3.6.15.1
Search
Search based on Api Name, IP White
List, Payment Mode.
The following table lists the items shown in the figure above:
|
No |
Item |
Description |
|
2 |
Api
Name |
Api
key name |
|
3 |
Callback
ApiKey |
Callback
ApiKey |
|
4 |
Callback
Password |
Callback
Password |
|
5 |
Callback Url |
Callback Url |
|
6 |
Callback User
Name |
Callback User
Name |
|
7 |
Create Time |
Create Time |
|
10 |
IP White List |
IP White List |
|
12 |
Action |
|
3.6.15.2 Add
The
operator can click "Add" button to add a new Smart Box No.
|
No |
Item |
Description |
|
|
1 |
Payment
Mode |
-Internet
Banking -Mobile
Banking -Sms
Banking -Payment
Cards -VendingStation -Mobile
Banking -Pos
Machine |
|
|
2 |
Api
Name |
Api
Name |
|
|
3 |
IP
White List |
IP White List |
|
|
4 |
Callback Url |
|
|
|
5 |
Callback
ApiKey |
Callback
ApiKey |
|
|
6 |
Callback
User Name |
Callback
User Name |
|
|
7 |
Callback
Password |
Callback
Password |
|
|
8 |
Auth
Type |
Auth
Type |
|
|
9 |
Description |
Description |
|
3.6.15.3
Pause
The operator can click the "Pause" button
to change the status.
3.6.15.4
Modify
The
operator can modify the selected smart box info by clicking "Modify"
icon.
Api Name, IP White List, Callback Url,
Callback ApiKey, Callback User Name, Callback Password, Auth Type, Description
can be modified.
3.6.15.5 View
Click
"View" icon to view Api key Device info.

3.7
Vending Management
This section provides an introduction to
Vending Station menu. The operator can manage vending station and vending
station operator recharge.
Open Account includes following 2 submenus:
v
Vending
Station Management
v
Vending
Station Operator Recharge
3.7.1 Vending Station Management
From the global menu, click "Vending Management"
to expand it, and then click "Vending Station Management " to enter
this page (Global menu > Vending Management > Vending Station
Management).
In this page, the operator can manage the
vending station.
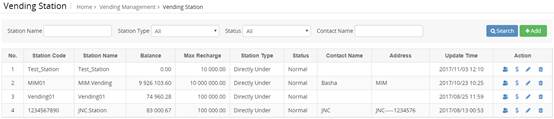
3.7.2.1
Search
Search Vending Station based on Station Name.,
Station Type, Status and Contact Name.
The following table lists the items shown in
the figure above:
|
No |
Item |
Description |
|
1 |
No. |
The show sequence number of
Vending Station |
|
2 |
Station Code |
The code of station |
|
3 |
Station Name |
The name of Station |
|
4 |
S&D |
S&D |
|
5 |
Balance |
The balance amount how much this
vending station have |
|
6 |
Moblie |
Moblie |
|
7 |
Max Recharge |
The max balance which this
vending station can have |
|
8 |
Station Type |
The type of station -Directly Under -Retail Outlet |
|
9 |
Status |
-Normal -Logoff |
|
10 |
Contact Name |
|
|
11 |
Address |
|
|
12 |
Update Time |
The time of the last update |
|
13 |
Action |
|
3.7.2.2 Add
Click
"Add" button to open "Station Add" popup.
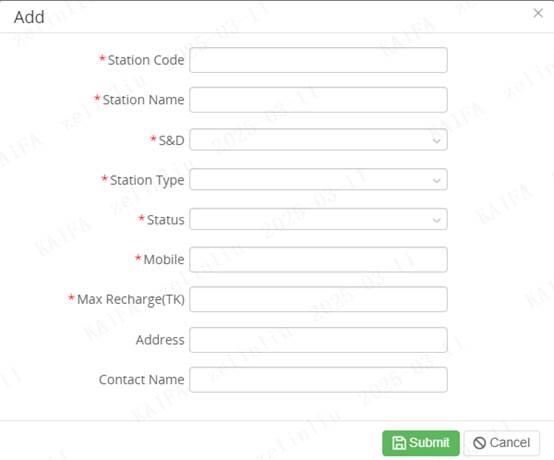
The
following table lists the items shown in the figure above.
|
No |
Item |
Description |
|
|
1 |
Station
Code |
The code of
station |
|
|
2 |
Station
Name |
The
name of Station |
|
|
3 |
S&D |
|
|
|
4 |
Station
Type |
The type of station -Directly Under -Retail
Outlet |
|
|
5 |
Status |
-Normal -Logoff |
|
|
6 |
Mobile |
|
|
|
7 |
Max
Recharge |
The
max balance which this vending station can have |
|
|
8 |
Address |
|
|
|
9 |
Contact
Name |
|
|
3.7.2.3
Operators Management
Click
"Operators" to enter "Operator Management" page to manage
its operators.
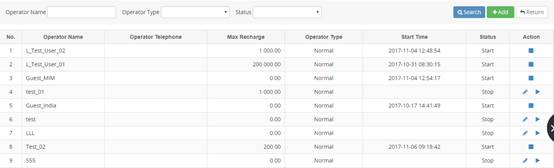
3.7.2.3.1 Search
Search
operator which belongs to this station based on Operator Name., Operator Type
and Status.
The following table lists the items shown in the figure above:
|
No |
Item |
Description |
|
1 |
No. |
The show sequence number |
|
2 |
Operator Name |
The name of operator |
|
3 |
Operator Telephone |
|
|
4 |
Max Recharge |
The max balance which this operator
can have |
|
5 |
Operator Type |
-Normal -Manager: Can do recharge operation |
|
6 |
Start Time |
The time when this operator started |
|
7 |
Status |
-Start: This operator can be recharged -Stop: This Operator cannot be
recharged |
|
8 |
Action |
|
3.7.2.3.2 Add
Click
"Add" button to open Add page to add a user to the vending station.
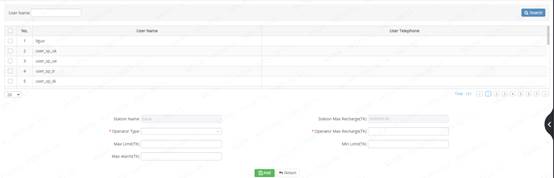
1. Search
users based on user name.
2. Check the
checkboxes which operator wants to add.
3. Choose
Operator type and input Operator Max Recharge.
4. Click
"Add" button to add operators.
Notes: Can only add the user as the vending
station's operator who does not belong to any station or is already belong to
other station but the status is stopped.
3.7.2.3.3 Edit
Click
"Edit" icon to open "Edit" popup.
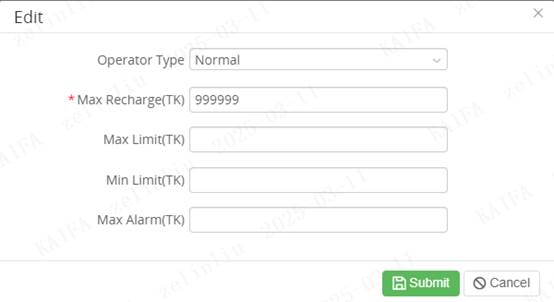
Max Recharge and
Operator Type can be modified.
Notes: Only
when the status of the operator is stopped, the operator can do this operation.
3.7.2.3.4 Start/Stop Operator
Click "Stop" icon to change
operator's status from start to stop.
Click "Start" icon to change
operator's status from initial or stop to Start.
3.7.2.4
Station Recharge
Click
"Recharge Detail" icon to recharge money to the station.
|
No |
Item |
Description |
|
|
1 |
Max
Recharge |
The
maximum money can recharge |
Cannot
be modify |
|
2 |
Balance |
Balance
money of the station |
The
total station recharge money minus the total operator recharge money. Cannot
be modify |
|
3 |
Recharge
Money |
Amount
that operator wants to recharge to the station |
|
|
4 |
Recharge Type |
Cash |
|
Once recharge operation is successful,
the recharge record will display:
3.7.2.5 Edit
Click
"Edit" icon to modify the selected station.
3.7.2.6
Delete
Click
"Delete" 3.7.2 Vending Station Operation Recharge
From
the global menu, click "Vending Management " to expand it, and then click
"Vending Station Operation Recharge" to enter this page (Global menu
> Vending Management > Vending Station Operation
Recharge).

In
this page, the operator can recharge and access recharge information.
Notes: Operator only can operate which is in the vending station
that operator belongs.
3.7.2.7 Station Information
The station information of the operator
can display.
![]()
3.7.2.8
Operator List
The operator list of the station can display.

3.7.2.8.1 View
Click
"view" icon to open the popup.
3.8 Account
Management
This section provides an introduction
to Open Account Management menu. The operator can manage Open Account and Close
account.
Open Account includes following 2 submenus:
v Open Account
v Close Account
3.8.1 Open Account
From the global menu, click
"Account Management" to expand it, and then click "Open
Account" to enter this page (Global menu > Account Management > Open
Account).
The operator can open an account in
this page.

3.8.1.1
Search
Search Open Account Operation based on
Meter No., Account No., Scheme Name, Status, Area, Meter Type, Communication
Type and Connect Type, Main Device No.
The
following table lists the items shown in the figure above:
|
Item |
Description |
|
|
1 |
No. |
The
show sequence number of Open Account operation |
|
2 |
Meter
No. |
Identification
number of the Meter which operator want to Open
account |
|
3 |
Account
ID |
Identification
number of the account which operator want to account |
|
4 |
TR
No. |
Transformer
No |
|
5 |
Scheme
Name |
The
name of Scheme which operator choose to open account |
|
6 |
Main
Device No. |
|
|
7 |
Main
Device Type |
|
|
8 |
Meter
Type |
The
type of meter -1p -3p |
|
9 |
Communication
Type |
-GPRS -485 |
|
10 |
Connect
Type |
-Connect
to server -Connect
to the main meter |
|
11 |
Create
Time |
The
time when this operation was created |
|
12 |
Status |
-Initial:
token order is just created. -Failed:
meter receive the tokens failed -Success:
meter receive the tokens successfully |
|
13 |
Action |
|
3.8.1.2
Generate Open Account Token Orders
Click
"Open Account" button to open "Batch Open Account" popup.
![]()
The
operator can search Account based on Meter No., Account No., Mother Meter No.,
Meter Type, Communication Type and Connect Type.
Only
Account which has been set the open account scheme (Setting in section 3.3.1.7)
can display.
Click
"Open Account" icon to add a new open account record which means the
one-time generation of token orders setting by the open account scheme.
![]()
Once
operation successfully, the open account record will display.

3.8.1.3 Send
Open Account Token Orders
Click
"Setting" icon to enter "Token Order" page.
3.8.1.3.1 Search Token
Orders
The
following table lists the items shown in the figure above:
v
Meter Information
|
No |
Item |
Description |
|
1 |
Meter No. |
Meter No. of the open account
record |
|
2 |
Account No. |
Account No. of the open account
record |
v Token Order
|
No |
Item |
Description |
|
1 |
Order No |
Order No of the order generating
by the open account. Click order no and the "Token
Order" popup can display which is same as section 3.2.4.2 |
|
2 |
Token Type |
token type of the order |
|
3 |
Seq No. |
The sequence of Token |
|
4 |
Operator |
The name of operator who
generate this Token Order |
|
5 |
Create Time |
The time when this Token Order
was created |
|
6 |
Issued Mode |
The mode which the operator use
to send the Token Order |
|
7 |
Status |
-Initial: Token order is just
created. -Issued: Token order has been
written into the card. -Failed: Meter cannot receive
the Token Order -Success: Meter has already received
the Token Order |
|
8 |
Action |
|
3.8.1.3.2 Send Token Orders
Click
"Net Send" button to send all of the orders of the open account by
net.
![]()
3.8.1.3.3 View Token Order'
System and Real-time Configuration data
Click
"Detail" icon to open "Token Detail" popup.
![]()
The
operator can view the setting configuration data of the order.
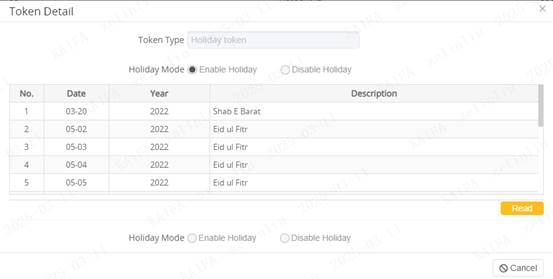
The operator also can click
"Read" button to read real-time configuration data in the meter.
3.8.2 Close Account
From the global menu, click
"Account Management" to expand it, and then click "Close
Account" to enter this page (Global menu > Account Management >
Close Account).
3.8.2.1
Account Logoff
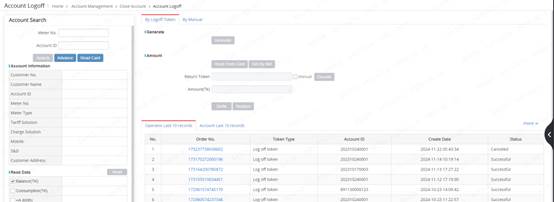
3.8.2.1.1 Search
Search
area information based on Account ID, Meter No., Status, Order No..
The following table lists the items
shown in the figure above.
|
No |
Item |
Description |
|
1 |
Order
No. |
Order
No |
|
2 |
Account
ID |
Account
ID |
|
3 |
Meter No. |
Meter number |
|
4 |
Seq
No. |
Seq
No. |
|
5 |
Create
Date |
Update
time |
|
6 |
Issued
Mode |
HES |
|
7 |
Issue
Time |
|
|
8 |
Status |
Status |
3.8.2.2
Account Logoff History

3.8.2.2.1 Search
Search
History based on Account ID, Select Type, Status, Meter No., Order No., Logoff
Date.
The following table lists the items
shown in the figure above.
|
No |
Item |
Description |
|
1 |
Order No. |
Order
number |
|
2 |
Account
ID |
Account identification |
|
3 |
Meter
No. |
Meter
number |
|
4 |
Balance |
Balance amount |
|
5 |
Balance Source |
Source
of the balance |
|
6 |
Seq
No. |
Sequence
number |
|
7 |
Logoff
Date |
Date of
account logout or deactivation |
|
8 |
Settle
Type |
Type of
settlement |
|
9 |
Status |
Current
status of the record |
|
10 |
Settle
Operator |
Operator
who performed the settlement |
|
11 |
Settle
Date |
Date when
the settlement was made |
|
12 |
Action |
|
3.8.2.2.2 Export
Click "Export" button to
export data to excel.
3.8.2.2.3 View
Click
"view” icon to open the operator recharge history.

3.8.2.3
Balance Transfer
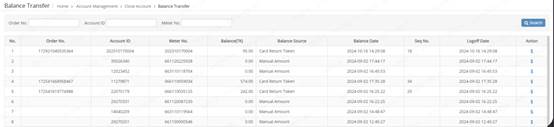
3.8.2.3.1 Search
Search
History based on Order No., Account ID, Meter No..
The following table lists the items
shown in the figure above.
|
No |
Item |
Description |
|
1 |
Order No. |
Order
number |
|
2 |
Account
ID |
Account identification |
|
3 |
Meter
No. |
Meter
number |
|
4 |
Balance |
Balance amount |
|
5 |
Balance Source |
Source
of the balance |
|
6 |
Balance Date |
Date
of the balance |
|
7 |
Seq
No. |
Sequence
number |
|
8 |
Logoff
Date |
Date of
account logout or deactivation |
|
9 |
Action |
|
3.8.2.3.2 Balance transfer
Click
"Balance Transfer” icon to open transfer info.
3.9 Token
This
section provides an introduction to the Token menu. The operator can access and
manage all kinds Token Order, read and reset the card, read meter
configuration, logoff account here.
The token
includes following 13 submenus:
v Token Order
v Management Token
v Red Meter Configuration
v Key Change
v Card Reset
v Test Token
v Holiday Definition
v Get Meter Key
v Writeoff Topup
v Token Batch Task
v Special Recharge
v Top Up Token Order
3.9.1 Token Order
From the global menu, click
"Token" to expand it, and then click "Token Order" to enter
this page (Global menu > Token > Token Order).
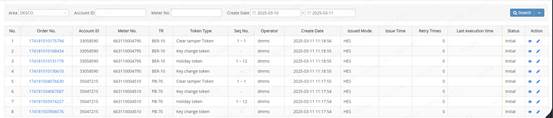
In this part, the operator can access
Token Order records and manage Token Order.
3.9.1.1
Search
Search based on Area , Account ID,
Meter No. , Create Date.
The following table lists the items
shown in the figure above:
|
No |
Item |
Description |
|
1 |
No. |
The Show
Sequence Number of the Token Order |
|
2 |
Order No. |
Identification
number of the Token Order |
|
3 |
Account ID. |
Identification
number of the Meter Point |
|
4 |
Meter No. |
Identification
number of the Meter |
|
5 |
TR |
|
|
6 |
Token Type |
The type of
the Token Order |
|
7 |
Seq No. |
The Sequence
Number of the Token |
|
8 |
Operator |
The name of
the operator who created this Token Order |
|
9 |
Create Date |
The time when
this Token Order was created |
|
10 |
Issued Mode |
The mode which
the operator uses to send the Token Order |
|
11 |
Issued Time |
The time when
this Token was issued |
|
12 |
Retry Times |
The times of
the operator retry to issue this Token Order |
|
13 |
Last Execution
Time |
Last Execution
Time |
|
14 |
Status |
The
Status of Token Order. -Initial:
Token order is just created. -Issued:
Token order has been written into the card or sending by net -Failed:
Meter cannot receive the Token Order (View
appendix to access the detailed information about fail) -Success:
Meter has already received the Token Order |
|
15 |
Action |
|
3.9.1.2 Token
Order Status Log
Click "Status Log" to access
log of the selected order.
3.9.3.3
Modify
The
operator can click "modify" icon to open change status.
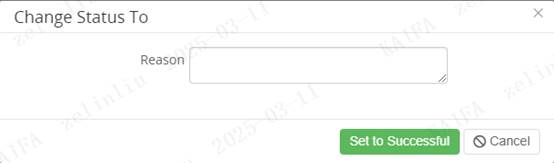 3.9.2
Management Token
3.9.2
Management Token
From
the global menu, click "Token" to expand it, and then click
"Management Token" to enter this page (Global menu > Token >
Management Token):
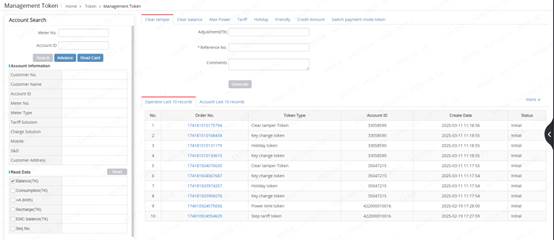
Management
Token consists of 3 parts: Account Search, Token Generate, Token Order records.
3.9.2.1
Account Search
Viewing
section "3.1.1 Account Search" to access detailed information.
3.9.2.2 Token
Generate
There are
eight types of token order can be generated:
v Clear tamper
v Clear balance
v Max Power
v Tariff
v Holiday
v Friendly
v Credit Amount
v Switch payment mode token
The operator can click tab to access corresponding token order.
![]()
Click
"Generate" button to generate token order on each tab.
![]()
3.9.2.2.1 Clear tamper
Access the "Clear tamper" token
order generation.
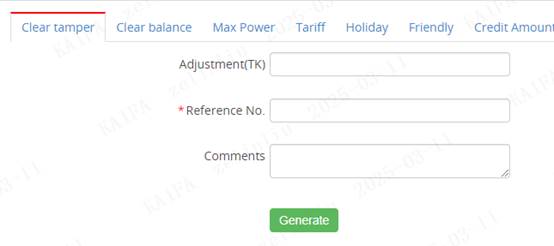
3.9.2.2.2 Clear balance
Access
the "Clear balance" token order generation.
v Clear balance: Set meter balance to 0.
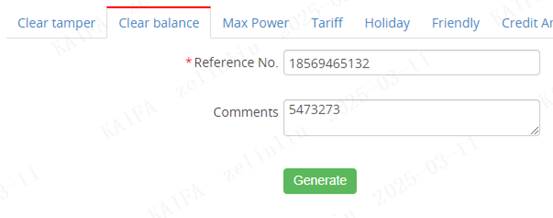
3.9.2.2.3 Max Power
Click "Max Power" tab to access
"Max Power" token order generation.

The following
table lists the items and inputting rules:
|
No |
Item |
Description |
|
|
1 |
Reference No. |
Reference No. |
|
|
|
Effective Date |
The Date when
the max power configuration effective. |
|
|
2 |
Power Limit 1 |
The first max
power limit |
|
|
3 |
Effective Time
1 |
The first time
when the max power configuration effective. |
|
|
4 |
Power Limit 2 |
The second max
power limit |
|
|
5 |
Effective Time
2 |
The second time when the max power configuration
effective. |
|
3.9.2.2.4 Tariff
Click
"Tariff" tab to access "Tariff" token order generation.
Notes: Generate Tariff Token Order
which setting in Archive Management (See 3.3.1) and Tariff Solution (See
3.3.2).
3.9.2.2.5 Holiday
Click
"Holiday" tab to access "Holiday" token order generation.
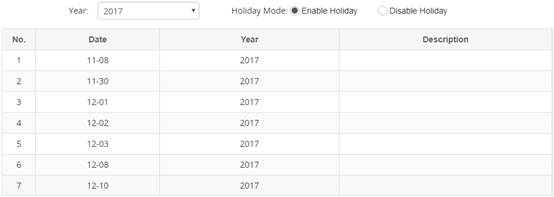
v Year: Which year's holiday the operator wants to generate.
v Holiday Mode: Which mode the operator wants to generate.
Enable Holiday:
To enable Holiday configuration into meter
Disable Holiday:
To disable Holiday configuration into meter
v Holiday Information: Show the lists of the holidays of the selected
year.(See holidays configuration in section 3.2.1)
3.9.2.2.6 Friendly
Click
"Friendly" tab to access "Friendly" token order generation.
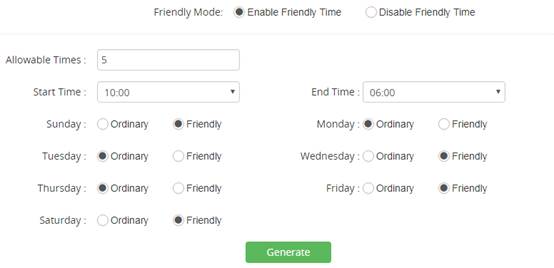
v Friendly Mode: Which mode the operator wants to generate.
Enable Friendly
Time: To enable Friendly Time configuration into meter
Disable Friendly
Time: To disable Friendly Time configuration into meter
v Allowable Times: The allowable times of the Friendly Time effective.
v Start Time: The Start time of the Friendly Time effective.
v End Time: The end time of the Friendly Time effective.
v Is Friendly:
Ordinary: Which
means the day is Ordinary day and the Friendly Time settings are ineffective.
Friendly: Which
means the day is Friendly day and the Friendly Time settings are effective.
3.9.2.2.7 Credit Amount
Click
"Credit Amount" tab to access "Low credit amount","
Maximum credit amount" and "Emergency credit amount" token order
generation.
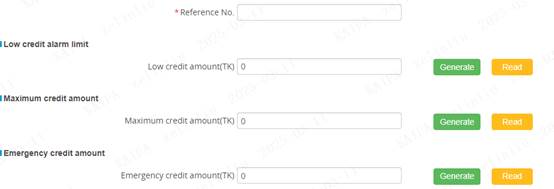
v Low credit amount: When meter balance is lower than this, the meter will
alarm.
v Maximum credit amount: Meter balance cannot be over the maximum credit
amount.
v Emergency credit amount: When emergency or friendly time, the outage will
not happen if the user using electricity is lower than the amount of emergency
credit.
3.9.2.3 Token
Order Records
In this part,
the operator can access and manage last 10 records based on operator or account
by clicking the corresponding tab.
When the
"Operator Last 10 records" tab is active, the table will show the
login operator's last 10 records. When the "Account Last 10 records"
tab is active, the table will show the selected account's last 10 records.
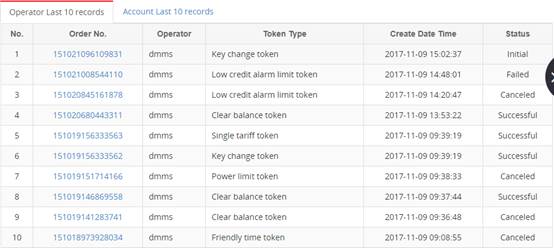
The following table lists the items
shown in the figure above:
|
No |
Item |
Description |
|
1 |
Order
No. |
Identification
number of the token order |
|
2 |
Account
No. |
Identification
number of the metering point which only displays when the "Account Last
10 records" tab is active |
|
Operator |
Operator
name which only displays when the "Operator Last 10 records" tab is
active |
|
|
3 |
Token
Type |
-
Single tariff token -
Step tariff token -
TOU tariff token -
Holiday token -
Friendly time token -
Key change token -
Emergency credit token -
Maximum credit amount token -
Low credit alarm limit token -
Power limit token -
Clear tamper token -
Clear balance token -
Get credit token |
|
4 |
Create
Date Time |
The
time when the order was created |
|
5 |
Status |
The
Status of Token Order. -Initial:
Token order is just created. -Issued:
Token order has been written into the card or sending by net -Failed:
Meter cannot receive the Token Order (View
appendix to access the detailed information about fail) -Success:
Meter has already received the Token Order |
3.9.3 Read Meter Configuration
From the global menu, click "Token"
to expand it, and then click "Read Meter Configuration" to enter this
page (Global menu > Token > Read Meter Configuration).
In this part, operator can read real-time
meter configuration.
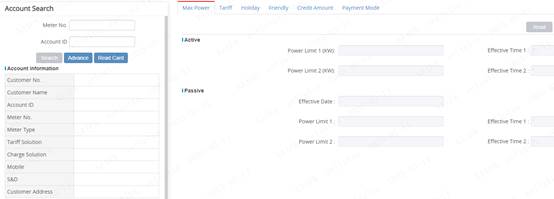
3.9.3.1
Account Search
View section 3.1.1 to access "Account
Search" detail.
3.9.3.2 Read
There are five
types of configurations can be read:
v Max Power
v Tariff
v Holiday
v Friendly
v Credit Amount
v Payment Mode
The operator can click tab to access reading of the corresponding configuration.

Click "Read" button to read real-time configuration info in
meter and read time will update synchronously on each tab.
![]()
3.9.3.2.1 Max Power
When "Max
Power" tab is active and click "Read" button to read real-time
"Max Power" configuration info in the meter.

3.9.3.2.2 Tariff
When the
"Tariff" tab is active and clicks "Read" button to read
real-time "Tariff" configuration info in the meter.

3.9.3.2.3 Holiday
When the
"Holiday" tab is active and clicks "Read" button to read
real-time "Holiday" configuration info in the meter.
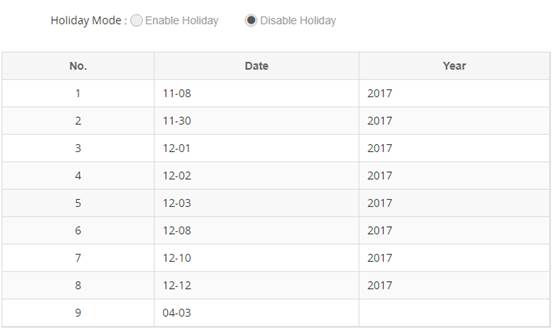
The following table lists the items
shown in the figure above:
|
No |
Item |
Description |
|
1 |
Holiday Mode |
The mode which
meter received last |
|
2 |
No. |
The show
sequence of holiday |
|
3 |
Date |
The date of
holiday |
|
4 |
Year |
The year of
holiday |
3.9.3.2.4 Friendly Time
When the
"Friendly Time" tab is active and clicks "Read" button to
read real-time "Friendly Time" configuration info in the meter.
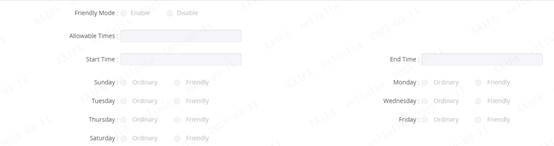
3.9.3.2.5 Credit Amount
When the
"Credit Amount" tab is active and clicks "Read" button to
read real-time "Credit Amount" configuration info in the meter.
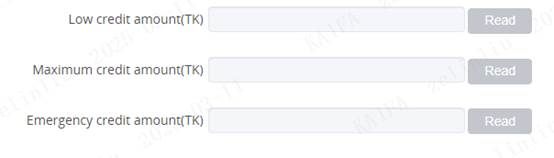
3.9.3.2.6 Payment Mode
When the
"Payment Mode" tab is active and clicks "Read" button to
read real-time "Payment Mode" configuration info in the meter.

3.9.4 Key Change
From the global menu, click "Token"
to expand it, and then click "Key Change" to enter this page (Global
menu > Token > Key Change).
In this part, operator can generate Key Change
Token and reset Meter Key.

3.9.4.1
Account Search
View section
3.1.1 to access "Account Search" detail.
3.9.4.2 Generate
Click
"Generate" button to generate Key Change Token to change the sequence
of token to 0.
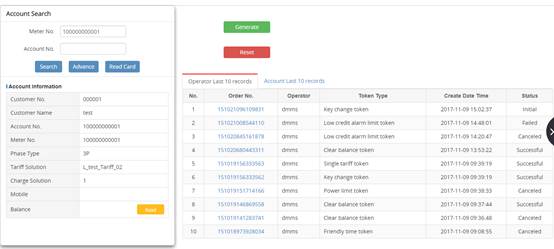
3.9.5 Card Reset
From the global menu, click "Token"
to expand it, and then click "Card Reset" to enter this page (Global
menu > Token > Card Reset).

In this part, the operator can read and reset
the card.
3.9.5.1 Read
Card Info
The operator can click "Read
Card" button to read card info.
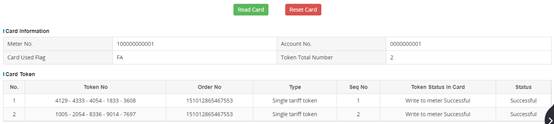
The
following table lists the items shown in the figure above:
v Card
Information
|
No |
Item |
Description |
|
1 |
Meter No. |
Identification
number of the meter of the card. |
|
2 |
Account No. |
Identification
number of the metering point
of the card |
|
3 |
Card Used Flag |
If the
card has already been read by meter -FA: This card's data has
already been read by meter -FF: This card's data has been not read by meter |
|
4 |
Token Total
Number |
The count of
tokens of
the card |
v 3.2.4.2
Card Token
|
No |
Item |
Description |
|
1 |
Token Number |
The number of
the token -6038 - 0511 - 6129 - 6705 - 4975 |
|
2 |
Order No. |
Identification
number of the token order |
|
3 |
Type |
The token's type |
|
4 |
Seq No |
The token's sequence |
|
5 |
Token Status
In card |
The status of the
token in card |
|
6 |
Status |
The status of the
token in system |
3.9.5.2 Reset
Card Info
The operator can click "Reset Card"
button to reset card info.
Once the operation is successful, the info in
the card will be reset. Click "Read Card" button to read the card
again, and the info will display as follows:

Meter No.: change
to "000000000000"
Account No.: change to "0000000000"
Card Used Flag: change to "FF"
Token Total
Number: change to "0" and the tokens in the card will be clear.
3.9.6 Test Token
From
the global menu, click "Token" to expand it, and then click
"Management Token" to enter this page (Global menu > Token >
Test Token):
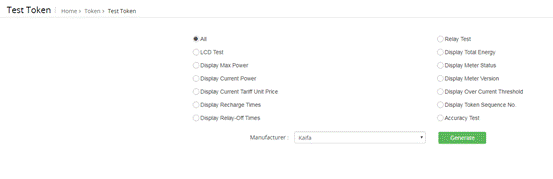
There are 14
types of test tokens order can be generated:
v All
v Relay Test
v LCD Test
v Display Total Energy
v Display Current Power
v Display Meter Version
v Display Current Tariff Unit Price
v Display Over Current Threshold
v Display Recharge Times
v Display Token Sequence No.
v Display Relay-Off Times
v Accuracy Test
Check one type o and select
Manufacturer (which is
default "Kaifa" ) , then click
"Generate" button to generate test
token.
When
the operation successfully and the token order popup display as follows:
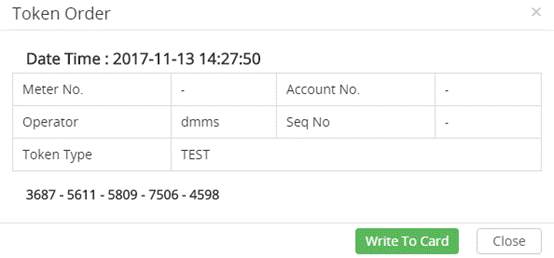
3.9.7 Holiday Definition
Holiday:
Meter will not spend balance in the holiday.
From the global menu, click "Token"
to expand it, and then click "Holiday Definition" to enter this page
(Global menu > Token > Holiday Definition):
In this page,
operator can use the following function to manage holiday.
3.9.7.1
Search
The
operator can search the holiday based on Year and Recursive Holiday.
The following table lists the items shown in the search result
table:
|
No |
Item |
Description |
|
1 |
Year |
The year of
the holiday -
If the year is Recursive which means the holiday is defined every year. |
|
2 |
Date |
The date of
the holiday |
|
3 |
Description |
The
description of the holiday |
|
4 |
Action |
|
3.9.7.2 Add
The operator can click "Add" button
to add a holiday.

The following
table lists the items and inputting rules:
|
No |
Item |
Description |
|
|
1 |
Date |
Holiday date |
|
|
2 |
Recursive
Holiday |
If tick off
the recursive holiday
and the date enables
every year. |
|
|
3 |
Description |
|
|
3.9.7.3
Modify
The operator can modify the selected
holiday info by clicking "Modify" icon.
Date,
Recursive Holiday and Description info can be modified.
3.9.7.4
Delete
The
operator can delete the selected holiday by clicking "delete" icon.
3.9.8 Get Meter Key
From the global menu, click "Token"
to expand it, and then click "Get Meter key" to enter this page
(Global menu > Token > Get Meter key).
In this
page, the operator can use following functions to access and manage meter key:
3.9.8.1
Search
Search based on Meter key status., Meter No.,
Account ID, Task Status, Region, Connect Type, Main Device No., install Date.
The
following table lists the items shown in the figure above.
|
No |
Item |
Description |
|
1 |
No. |
Record number |
|
2 |
TR |
TR |
|
3 |
Meter No. |
Meter number |
|
4 |
Main Device No. |
Main device number |
|
5 |
Main Device Type |
Main device type |
|
6 |
Account ID |
Account identification |
|
7 |
Meter Type |
Meter type |
|
8 |
Model Name |
Model name, shown as TSS-PPM510LTCT |
|
9 |
Communication Type |
Communication type, shown as
GPRS |
|
10 |
Install Date |
Installation date |
|
11 |
Meter Key Status |
Meter key status |
|
12 |
Task Status |
Task status |
|
13 |
Start Execution Time |
Start execution time |
|
14 |
Get Time |
Get time |
3.9.8.2 Get
Meter Key
The operator can obtain the meter key by clicking
the "Get Meter Key" button.

3.9.9 Writeoff Topup
From the global menu, click "Writeoff
Topup" to expand it, and then click "Get Meter key"
to enter this page (Global menu > Token > Writeoff Topup).
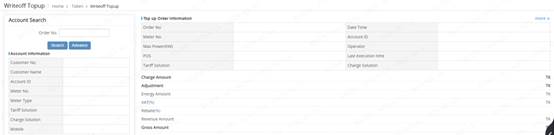
In this page, the operator can use following functions to access
and manage writeoff Touup:
3.9.9.1
Search
Search based on
Account ID, Meter No., Status, Order No., Top up Order No., Issued Mode.
The
following table lists the items shown in the figure above.
|
No |
Item |
Description |
|
1 |
No |
Record
number |
|
2 |
Order No |
Order
No |
|
3 |
Top up Order No |
Top-up order
number |
|
4 |
Account ID |
Account ID. |
|
5 |
Meter No. |
Meter
number |
|
6 |
Seq
No. |
Sequence
number |
|
7 |
Amount(TK) |
Amount
in TK |
|
8 |
Vending Date |
Transaction
date |
|
9 |
Issued Mode |
Issuance
mode |
|
10 |
Issue
Time |
Issuance
time |
|
11 |
Status |
Status |
3.9.10 Token Batch Task
From the
global menu, click "Token” to expand it, and then click "Token Batch Task” to enter user information page (Global menu
> Token > Token Batch Task):

In this page, the operator can use following functions to access
and manage token batch task:
3.9.10.1
Search
Search based on User Name.
The following table lists the items shown in
the figure above.
|
No |
Item |
Description |
|
1 |
Token
Type |
Type
of token |
|
2 |
Region
Name |
Name
of the region |
|
3 |
Success
Generate Token Count |
Number of
tokens successfully generated |
|
4 |
Success
Generate Send-Task Count |
Number of
send tasks successfully generated |
|
5 |
Total
Count |
Total
quantity |
|
6 |
Generate
Token Finish Date |
Date
and time when token generation was completed |
|
7 |
Generate
Send-Task Finish Date |
Date and
time when send-task generation was completed |
|
8 |
Create
Date |
Creation
date and time |
|
9 |
Operator
Name |
Name
of the operator |
|
10 |
Action |
|
3.9.10.2 Add
Operator can add a new task by clicking
"Add” button.
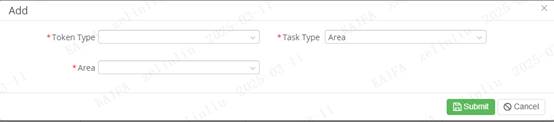
|
No |
Item |
Description |
|
|
1 |
Token Type |
- Holiday
token -
Friendly time token -
Power limit token |
|
|
|
Task
Type |
-
Area -
Import |
|
|
2 |
Area |
|
|
3.9.10.3 View
Click
"view” icon to open the batch task info.

3.9.11
Special Recharge
From the
global menu, click "Token” to expand it, and then
click "Special Recharge” to enter
user information page (Global menu > Token > Special Recharge):

On
this page, operators can use the following functions to Recharge and Write Off customers,
and view their history records
3.9.11.1
Recharge
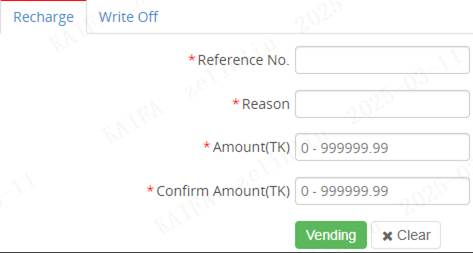
Recharge the account
3.9.11.2
Write Off
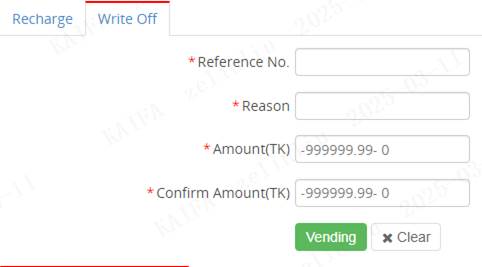
Write off the account
3.9.12
Top Up Token Order
From the
global menu, click "Token” to expand it, and then click "Top Up Token
Order” to enter role information page (Global menu > Token > Top Up Token
Order):

In this
page, the operator can use following functions to access and manage Top Up
Token Order:
3.9.12.1
Search
Search based on Vending Station, Account ID, Meter
No., Vending Date.
The
following table lists the items shown in the figure above.
|
No |
Item |
Description |
|
1 |
No. |
Record number |
|
2 |
Order No. |
Order number |
|
3 |
Account ID |
Account identification |
|
4 |
Meter No. |
Meter number |
|
5 |
Vending Station |
Vending station |
|
6 |
Token Type |
Token type |
|
7 |
Seq No. |
Sequence number |
|
8 |
Adjustment(TK) |
Adjustment amount in TK |
|
9 |
VAT(TK) |
VAT amount in TK |
|
10 |
Total (TK) |
Total amount in TK |
|
11 |
Operator |
Operator name |
|
12 |
Issued Mode |
Issuance mode |
|
13 |
Issue Time |
Issuance time |
|
14 |
Retry Times |
Number of retry attempts |
|
15 |
Last execution time |
Last execution time |
|
16 |
Status |
Status |
|
17 |
Action |
|
3.9.13
Management Token Order
From the
global menu, click "Token” to expand it, and then click "Management Token Order” to enter
role information page (Global menu > Token > Management Token Order):
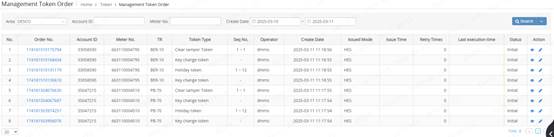
In this
page, the operator can use following functions to access and manage Management
Token Order:
3.9.13.1
Search
Search based on Area, Account ID, Meter No.,
Create Date.
The following table lists the items shown in
the figure above.
|
No |
Item |
Description |
|
|
1 |
No. |
Record number |
|
|
2 |
Order No. |
Order number |
|
|
3 |
Account ID |
Account identification |
|
|
4 |
Meter No. |
Meter number |
|
|
5 |
TR |
Vending station |
|
|
6 |
Token Type |
Token type |
|
|
7 |
Seq No. |
Sequence number |
|
|
8 |
Operator |
Adjustment amount in TK |
|
|
9 |
Create Date |
Create Date |
|
|
10 |
Issued Mode |
Issuance mode |
|
|
11 |
Issue Time |
Issuance time |
|
|
12 |
Retry Times |
Number of retry attempts |
|
|
13 |
Last execution time |
Last execution time |
|
|
14 |
Status |
Status |
|
|
15 |
|
|
3.9.13.2 Token Order Status Log
The
operator can click "Token Order Status Log” button to view log.

3.9.13.3
Modify
The operator can modify status by clicking the
"Modify” icon.
3.10 Adjustment
This section provides an introduction to the
Adjustment menu. The operator can access and manage them
The token includes following 2 submenus:
v Financial Adjustment
v Adjustment Order
3.10.1
Financial Adjustment
From
the global menu, click "Adjustment" to expand it, and then click
" Financial Adjustment " to enter this page (Global menu > Adjustment
> Financial Adjustment).
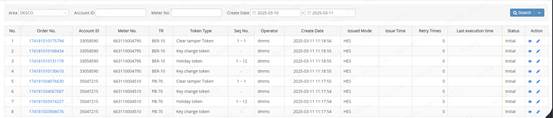
In
this part, the operator can access Token Order records and manage Token Order.
3.10.1.1 Search
Search based on Meter No.
The following table lists the items shown in
the figure above.
|
No |
Item |
Description |
|
1 |
No. |
Sequence
number. |
|
2 |
Adjustment
No. |
Adjustment
number. |
|
3 |
Adjustment
Time |
Time
of the adjustment. |
|
4 |
Adjustment
Type |
Type
of adjustment. |
|
5 |
Amount(TK) |
Amount
in TK. |
|
6 |
Create
Operator |
Operator
who created the adjustment. |
|
7 |
Action |
Meter type |
3.10.2 Adjustment Order
From
the global menu, click "Adjustment" to expand it, and then click
" Adjustment Order" to enter this page (Global menu >
Adjustment> Adjustment Order).
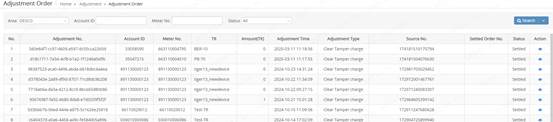
In
this part, the operator can access Token Order records and manage Adjustment Order.
3.10.2.1 Search
Search based on Area, Account ID, Meter No., Status.
The following table lists the items shown in
the figure above.
|
No |
Item |
Description |
|
1 |
No. |
Record
number |
|
2 |
Adjustment
No. |
A
unique identifier for each adjustment operation. |
|
3 |
Account ID |
customer
account |
|
4 |
Meter No. |
Meter
identification number |
|
5 |
TR |
Transformer
model |
|
6 |
Amount(TK) |
The amount
involved in the adjustment |
|
7 |
Adjustment Time |
The exact
time when the adjustment was made. |
|
8 |
Source No. |
Source
number |
|
9 |
Settled Order No. |
Settlement
order number |
|
10 |
Action |
|
3.10.2.2 View
Click "View" icon to view adjustment order detail.
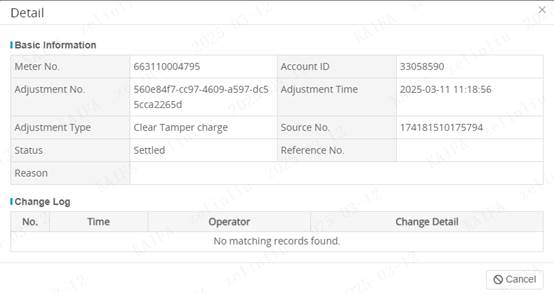
3.11 Event Configuration
This section provides an introduction to the
Event Management. The operator can access and manage Event Configuration, Abnormal Recharge Alarm, Event Data, Alarm Notify, SMS To Customer Log.
The event includes following 5 submenus:
v Event Configuration
v Abnormal Recharge Alarm
v Event Data
v Alarm Notify
v SMS To Customer Log
3.11.1
Event Configuration
From
the global menu, click "Event Management" to expand it, and then
click " Event
Configuration" to enter this page (Global menu >
Event Management > Event Configuration).
In
this part, the operator can access event configuration.
3.11.1.1 Search
Search
based on Device Type, Event Level, Event Process Type, Event Name.
The
following table lists the items shown in the figure above:
|
No |
Item |
Description |
|
1 |
No |
Row number |
|
2 |
Event Code |
Event
Code |
|
3 |
Device Type |
The type of device that triggered the
event |
|
4 |
Event Name |
The name of the event |
|
5 |
Event Level |
Indicates the severity level of the
event |
|
6 |
Event Process Type |
Shows how the event is processed, |
|
7 |
Yellow Threshold |
threshold value |
|
8 |
Red Threshold |
threshold value |
3.11.1.2 Save
The operator can click the "Save" button to save the
information.

3.11.2
Abnormal Recharge Alarm
From
the global menu, click "Event Management" to expand it, and then
click "Abnormal
Recharge Alarm" to enter this page (Global menu >
Event Management > Abnormal Recharge Alarm).

In
this part, the operator can access Abnormal Recharge Alarm.
3.11.2.1 Search
Search
based on Account ID, Meter No., Check Result, Validate Type, Region, Check
Type, Start Date, End Date.
The
following table lists the items shown in the figure above:
|
No |
Item |
Description |
|
1 |
No |
Row number |
|
2 |
Account ID |
A unique
identifier for each account. |
|
3 |
Meter No |
A unique identifier for each meter. |
|
4 |
Occurrence Date |
The date when an event occurred. |
|
5 |
Validate Type |
The method or type of validation
performed. |
|
6 |
Validate Date |
The date when the validation was
performed. |
|
7 |
Check Time |
The time when the inspection took
place. |
|
8 |
Check Type |
The method or type of inspection
performed. |
|
10 |
Check Operator |
The person who carried out the
inspection. |
|
11 |
Meter Balance(TK) |
The balance on the meter, denominated
in TK. |
|
12 |
Check Balance(TK) |
The balance during the inspection,
denominated in TK. |
|
13 |
Difference Balance(TK) |
The difference between the meter
balance and the check balance, denominated in TK. |
|
14 |
Abnormal Tokens |
Tokens that indicate abnormalities
found during the inspection. |
|
15 |
Remark |
Additional information or notes about
the record. |
|
16 |
Check Result |
The outcome of the inspection. |
|
17 |
Action |
|
3.11.2.2 Export
Click
"Export" button to export data to excel.
3.11.3
Event Data
From
the global menu, click "Event Management" to expand it, and then
click "Event
Data" to enter this page (Global menu > Event Management > Event Data).

In
this part, the operator can access Event Data.
3.11.3.1 Search
Search
based on Device No., Device Type, Event Name, Event Category, Start Date, End
Date.
The
following table lists the items shown in the figure above:
|
No |
Item |
Description |
|
1 |
No |
Row number |
|
2 |
Occurred Time |
The
time when the event occurred |
|
3 |
Device Type |
The type of device involved in the
event |
|
4 |
Device No. |
The identification number of the
device involved in the event. |
|
5 |
Event Name |
The name of the event, describing what
happened. |
3.11.3.2 Export
Click
"Export" button to export data to excel.
3.11.4
Alarm Notify
From
the global menu, click "Event Management" to expand it, and then
click "Alarm
Notify" to enter this page (Global menu > Event Management > Alarm Notify).
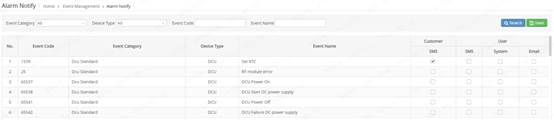
In
this part, the operator can manage alarm notify.
3.11.4.1 Search
Search
based on Event Category, Device Type, Event Name.
The
following table lists the items shown in the figure above:
|
No |
Item |
Description |
|
1 |
No |
Row number |
|
2 |
Event Code |
A unique identifier for each event. |
|
3 |
Event Category |
The category to which the event
belongs, describing the classification of the event. |
|
4 |
Device Type |
The type of device involved in the
event |
|
5 |
Event Name |
The name of the event |
|
6 |
Customer |
Notification method for customers |
|
7 |
User |
Notification methods for users |
3.11.4.2 Save
The operator can click the "Save" button to save the information.

3.11.5
SMS To Customer Log
From
the global menu, click "Event Management" to expand it, and then
click " SMS To
Customer Log" to enter this page (Global menu >
Event Management > SMS To Customer Log).
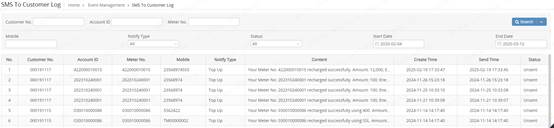
In
this part, the operator can manage log.
3.11.5.1 Search
Search
based on Customer No., Account ID, Meter No., Mobile, Notify Type, Status,
Start Date, End Date.
The
following table lists the items shown in the figure above:
|
No |
Item |
Description |
|
1 |
No |
Row number |
|
2 |
Customer No. |
A unique identifier for each customer. |
|
3 |
Account ID |
An identifier associated with a
customer's account. |
|
4 |
Meter No. |
The specific meter involved in the
event. |
|
5 |
Mobile |
Phone number used to receive
notifications. |
|
6 |
Notify Type |
Type of notification |
|
7 |
Content |
Detailed information about the
notification. |
|
8 |
Create Time |
The time when the notification record
was created. |
|
9 |
Send Time |
The actual time when the notification
was sent. |
|
10 |
Status |
Indicates the status of the
notification |
3.12 Device Management
This section provides an introduction to the
Device Management menu. The operator can access and manage Schedule Setting, Relay Control Task,
Firmware Upgrade, Batch Tariff Sending, Load Management, Relay Control Task
History, Device Configuration, Device Configuration Scheme,
system.device_configuration_setting
The event includes following 8 submenus:
v Schedule Setting
v Relay Control Task
v Firmware Upgrade
v Batch Tariff Sending
v Load Management
v Relay Control Task History
v Device Configuration
v Device Configuration Scheme
3.12.1 Schedule Setting
From
the global menu, click "Device Management" to expand it, and then
click " Schedule Setting" to enter schedule setting page (Global
menu > Device Management > Schedule Setting):

In
this page, the operator can use following functions to set automatic task and
data collection schedule.
3.12.1.1 Search
Search based on Schedule Name, Task Type, Status, Schedule Type.
The following table lists the items shown in
the figure above.
|
No |
Item |
Description |
|
1 |
No. |
Record
number |
|
2 |
Schedule Name |
The name of
the schedule used to identify each task plan. |
|
3 |
Task Type |
Describes
the specific operation of the task |
|
4 |
Schedule Type |
Describes
the nature of the schedule |
|
5 |
Task Object Type |
Indicates
the type of object involved in the task |
|
6 |
Start Time |
The start
time when the task plan begins. |
|
7 |
End Time |
The end time
when the task plan terminates. |
|
8 |
Next Generate
Time |
The time
when the next instance of the task will be generated. |
|
9 |
Frequency
Interval |
The interval
at which the task is executed |
|
10 |
Retry Interval |
The time
interval between retries if the task fails. |
|
11 |
Retry Times |
The maximum
number of retry attempts allowed if the task fails. |
|
12 |
Delay Time |
The delay
time before the task starts executing. |
|
13 |
Action |
|
3.12.1.2 Add
Create a
new schedule.
Click
"Add" button to create a
new read schedule, the following is displayed:
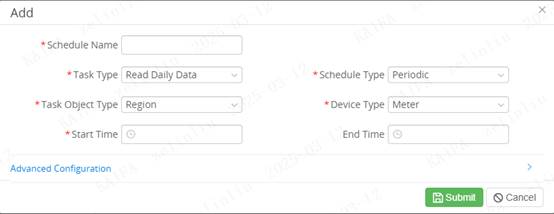
Note: The Enable should not check while the
schedule is creating. It must be after assigning the meter or concentrator then
setting the schedule to enable.
Enter the attribute of parameter then
click "Add" button to "Submit" or "Back" button
to cancel and back to Read Schedule List page
3.12.1.2 Edit
Modify a
schedule attribute parameters:
1. Select one of the schedules and click Modify
icon to access edit the schedule screen.
2. Enter the modify attribute of the schedule
and then click "Modify" button to submit or "Back" button
to cancel and back to Read Schedule List page.
3.12.1.3 Parameter
Setting
1. Select a reading schedule and then click
"Setting" icon to set the schedule, the screen is below:

2. Within this screen the user can set schedule
is used to which Target Type.
3. The Target Type includes ESP, Meter,
Concentrator, Metering Point, Meter Group.
4. Select one of the Target Type, e.g. Concentrator then click the button
"Add" >" Search", the following screen is displayed:

5. Input or select query terms, and click
"Search" button, and the following Search Result list is displayed:
6. Select one of the concentrators or several
and checked then click "OK" button to confirm or "Back"
button to cancel.
7. The select concentrator will belong to the
reading schedule.
3.12.1.4 Delete
Delete the
schedule which is not used or discarded.
Select one
of the not used or discard schedule then click "Delete" icon, the
system will pop up a query form for the user to confirm delete or not.
3.12.2
Relay Control Task
From
the global menu, click "Device Management" to expand it, and then
click "Relay Control Task" to enter schedule setting page (Global
menu > Device Management > Relay Control Task):

In
this page, the operator can use following functions to access and manage relay
control task.
3.12.2.1 Add
Click "Add" button to create relay
tasks.
The operator can search meter by task type, meter no, area and
account id.
Click "Save" button to create tasks.
Tasks will be executed in the background after creating.
Note: When operator select "Disconnect" task type,
"Disconnect" tasks will be created by clicking "Save"
button. When operator select "Connect" task type, "Connect"
tasks will be created after clicking "Save" button
3.12.2.2 Import
Import provides creating a batch tasks by importing excel.
The batch tasks will be executed in the background after
importing.
3.12.2.3 Export
Click "Export" button to export tasks.
3.12.3 Firmware Upgrade
From the global menu, click "Device
Management" to expand it, and then click
"Firmware Upgrade" to enter firmware upgrade page (Global menu > Device
Management > Firmware Upgrade):
3.12.3.1 Search
Search
based on Device No., Device Type, Upgrade Device Type, Status, Upgrade Device
Model, Firmware Version, Upgrade Mode, File Receive Mode, Scheduled Date, Task
Name.
The
following table lists the items shown in the figure above:
|
No |
Item |
Description |
|
1 |
No |
Row number |
|
2 |
Device No. |
Device
identification number |
|
3 |
Device Type |
The category or type of the device |
|
4 |
Upgrade Device Type |
The type of device that needs to be
upgraded. |
|
5 |
Upgrade Device Model |
The specific model of the device that
needs to be upgraded. |
|
6 |
Firmware Version |
The current firmware version installed
on the device. |
|
7 |
TR |
Transmission protocol |
|
8 |
Communication Type |
The method of communication used by
the device |
|
9 |
Upgrade Mode |
The method by which the device is
upgraded |
|
10 |
File Receive Mode |
The method by which the upgrade file
is received |
|
11 |
Create Time |
The time when the task was created. |
|
12 |
Scheduled Start Time |
The planned start time for the task
execution. |
|
13 |
Task |
The name of the specific task being
performed. |
|
14 |
Task Status |
The status of the task execution |
|
15 |
Upgrade Status |
The status of the device upgrade
process |
3.12.3.2 Add
The operator can click "Add" button
to add a new task.
3.12.4 Batch
Tariff Sending
From the global menu, click "Device
Management" to expand it, and then click
" Batch
Tariff Sending" to enter
firmware upgrade page (Global menu > Device
Management > Batch Tariff Sending):

In
this page, the operator can use following functions to access and manage Batch Tariff Sending.
3.12.4.1 Search
Search
based on Region, Account ID, Meter No., Unsent Tariff.
The
following table lists the items shown in the figure above:
|
No |
Item |
Description |
|
1 |
No |
Row number |
|
2 |
TR No. |
Transmission
request number |
|
3 |
Account ID |
An identifier for each account. |
|
4 |
Meter No. |
Meter identification number |
|
5 |
Meter Type |
The type or category of the meter |
|
6 |
Communication Type |
The method of communication used by
the device |
|
7 |
Connect Type |
The connection method of the meter |
|
8 |
Unsent Tariff |
The tariff information that has not
yet been sent or applied |
|
9 |
Effective Date |
The date when the new tariff will
become effective. |
|
10 |
Current Tariff |
The current tariff information being
used. |
3.12.4.2 Send
The operator can click the "Send" button to
send the selected Tariff.

3.12.5 Load
Management
From the global menu, click "Device
Management" to expand it, and then click
" Load
Management" to enter firmware upgrade page
(Global menu > Device Management > Load
Management):

In
this page, the operator can use following functions to access and manage Load Management.
3.12.5.1 Search
Search
based on Profile.
The
following table lists the items shown in the figure above:
|
No |
Item |
Description |
|
1 |
No |
Row number |
|
2 |
Profile |
Profile |
|
3 |
hour |
hour |
|
4 |
Action |
|
3.12.5.2 Add
The operator can click "Add" button
to add a new profile.

|
No |
Item |
Description |
|
|
1 |
Profile |
Profile |
|
|
2 |
Start Date |
Start Date |
|
|
3 |
End Date |
End Date |
|
|
4 |
Hour |
|
|
3.12.5.3 Assign
The
operator can click the "Assign" button to assign users to the
profile.

3.12.5.4 Modify
The
operator can modify the selected profile info by clicking "Modify” icon.
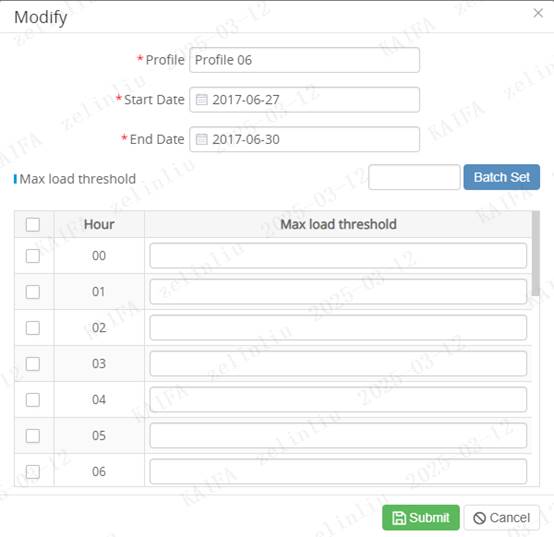
Profile, Start Date, End Date, Hour can be
modified.
3.12.5.5 Delete
The
operator can delete the selected profile by clicking "delete” icon.
3.12.6 Relay Control Task History
From the global menu, click "Device
Management" to expand it, and then click
" Relay
Control Task History" to enter
firmware upgrade page (Global menu > Device
Management > Relay Control Task History):

In
this page, the operator can use following functions to access task history.
3.12.6.1 Search
Search
based on Region, Status, Account ID, Task Type, Meter No. Start Date, End Date.
The
following table lists the items shown in the figure above:
|
No |
Item |
Description |
|
1 |
No |
Row number |
|
2 |
Account ID |
An
identifier for each account. |
|
3 |
Meter No. |
Meter identification number |
|
4 |
S&D |
Source and Destination |
|
5 |
TR |
Transmission request number |
|
6 |
Task Type |
The category or kind of task
being performed. |
|
7 |
Type |
Further classification of the
task type, providing more detailed information about the task. |
|
8 |
By |
The executor of the task |
|
9 |
Remark |
Additional notes or comments providing
extra information about the task. |
|
10 |
Operator |
The person responsible for
executing the task, often an operator or technician. |
|
11 |
Status |
The current state of the task |
|
12 |
Try Times |
The number of attempts made to execute
the task successfully. |
|
13 |
Create Time |
The time when the task was
created. |
|
14 |
Last execution time |
The most recent time when the task was
executed. |
3.12.6.2 Export
Click
"Export" button to export data to excel or PDF.
3.12.7 Device
Configuration
From the global menu, click "Device
Management" to expand it, and then click
" Device
Configuration" to enter
firmware upgrade page (Global menu > Device
Management > Device Configuration):
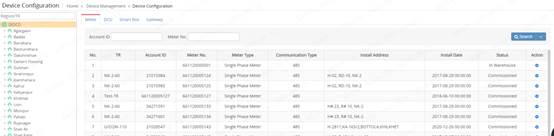
In
this page, the operator can use following functions to access device
configuration.
3.12.7.1 Search
The operator can click on the corresponding buttons of
"Meter", "DCU", "Smart Box", and
"Gateway" to go to different pages
3.12.8 Device
Configuration Scheme
From the global menu, click "Device
Management" to expand it, and then click
" Device
Configuration Scheme" to enter
firmware upgrade page (Global menu > Device
Management > Device Configuration Scheme):
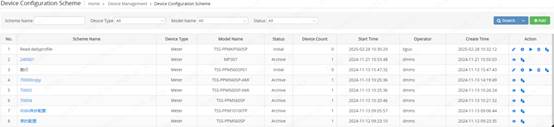
In
this page, the operator can use following functions to access Device Configuration Scheme.
3.12.8.1 Search
Search
based on Scheme Name, Device Type, Model Name, Status.
The
following table lists the items shown in the figure above:
|
No |
Item |
Description |
|
1 |
No |
Row number |
|
2 |
Scheme Name |
The name of
the scheme or task |
|
3 |
Device Type |
The category or type of device |
|
4 |
Model Name |
The specific model of the device |
|
5 |
Status |
Status |
|
6 |
Device Count |
The total number of devices |
|
7 |
Start Time |
The time when the task or
operation begins. |
|
8 |
Operator |
Operator |
|
9 |
Create Time |
The time when the task or operation
was created. |
|
10 |
Action |
|
3.12.8.2 Add
The
operator can click "Add” button to add a device configuration scheme.
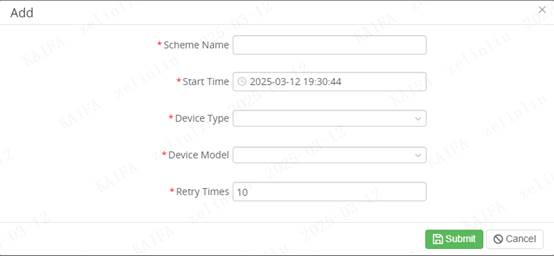
The following table lists the items shown in
the figure above.
|
No |
Item |
Description |
|
|
1 |
Scheme Name |
Name |
|
|
2 |
Start Time |
Start Time |
|
|
3 |
Device Type |
-Meter -DCU -Gateway -Module -Smart Box |
|
|
4 |
Device Model |
-Device Model |
|
|
5 |
Retry Times |
Retry Times |
|
3.12.8.3 Modify
The operator can modify a Scheme by clicking the "Modify”
icon.
Scheme
Name, Start Time, Retry Times info can be modified.
3.12.8.4 Start
The operator can click "Start" to start the selected scheme
3.12.8.5 Delete
The
operator can delete the selected scheme by clicking "delete” icon.
![]()
3.13 Report
This
section provides an introduction to report menus. The operator can access and
query, export, and
print report different reports based on different query criteria
here.
Report
includes following 10 sub menus:
v Fault Token Report
v Negative Balance Report
v Consumption Statistics Report Daily
v Payment Mode Switch Report
v Account Max Power Setting Reconcilation
v Uncollected Meter
v Zero Monthly Consumption Report
v Connect Relationship
v Sales
Statistics
v Vending Statistics Report
v Account Information
v Adjustment Statistics
v Installation Statistics
v Vending Operation Log
v Consumption Statistics Report
v Consumption Statistics Report Monthly
v Tax Statistics Report
v Sanction Load Violation Report
v Special Recharge Details Report
v Not Collected Meter Statistics Report
v Operator List
v Abnormal Archive Information Report
v Purchase SMS Preview List
v Meter On/Offline Details
v SIM details report
v User List Report
v Clear Tamper Report
3.13.1 Fault Token Report
From
the global menu, click "Report" to expand it, and then click "Fault
Token Report" to expand it, Here are the two reports:1.Fault Token,2.Fault
Token Statistics
(Global menu > Report > Fault Token
Report):
3.13.1.1 Fault Token
3.13.1.2 Fault Token Statistics
3.13.2 Negative Balance Report
From
the global menu, click "Report" to expand it, and then click
"Negative Balance Report" to expand it, Here are the two
reports:1.Negative Balance Customer Details,2.Negative Balance Summary (Global
menu > Report > Negative Balance Report):
3.13.2.1 Negative Balance Customer Details
3.13.2.2 Negative Balance Summary
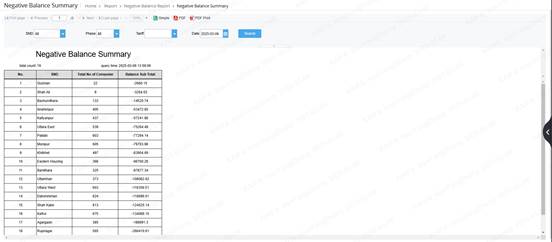
3.13.3 Consumption Statistics Report Daily
From the
global menu, click "Report" to expand it, and then click
"Consumption Statistics Report Daily" to enter corresponding report
page (Global menu > Report > Consumption Statistics Report Daily):
3.13.4 Payment Mode Switch Report
From
the global menu, click "Report" to expand it, and then click
"Payment Mode Switch Report" to expand it, Here are the two
reports:1.Payment Mode Switch Details,2.Payment Mode Switch Report(Global menu
> Report > Negative Balance Report):
3.13.4.1 Payment Mode Switch Details
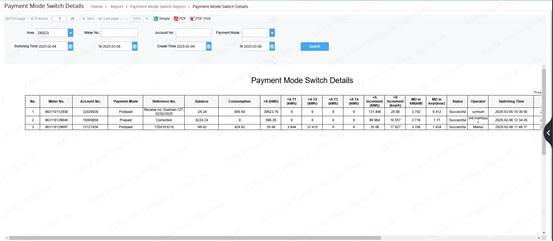
3.13.4.2 Payment Mode Switch Report
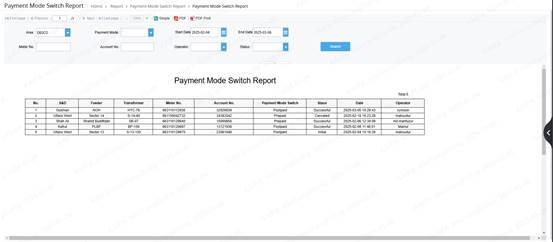
3.13.5 Account Max Power Setting Reconcilation
From
the global menu, click "Report" to expand it, and then click "Account
Max Power Setting Reconcilation" to enter corresponding report page
(Global menu > Report > Account Max Power Setting Reconcilation):
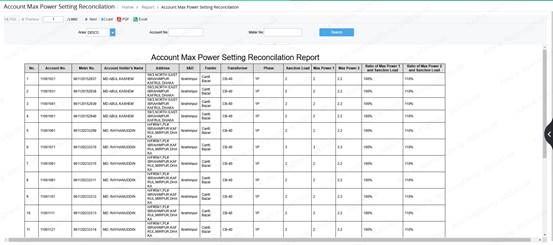
3.13.6 Uncollected Meter
From
the global menu, click "Report" to expand it, and then click
"Uncollected Meter" to enter corresponding report page (Global menu
> Report > Uncollected Meter):
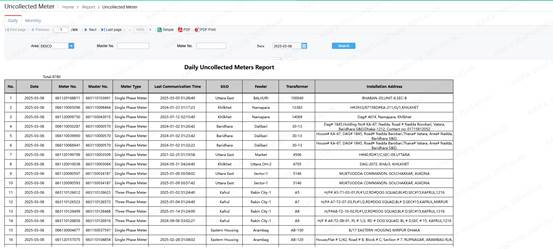
3.13.7
Zero Monthly
Consumption Report
From
the global menu, click "Report" to expand it, and then click
"Zero Monthly Consumption Report" to enter corresponding report page (Global
menu > Report > Zero Monthly Consumption Report):
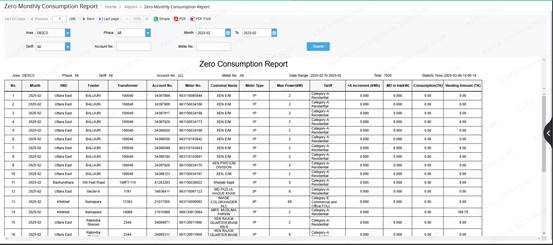
3.13.8
Connect Relationship
From
the global menu, click "Report" to expand it, and then click
"Connect Relationship" to enter corresponding report page (Global
menu > Report > Connect Relationship):
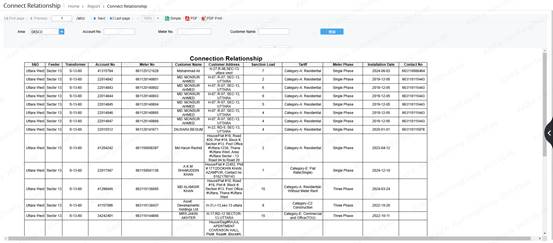
3.13.9
Sales Statistics
From
the global menu, click "Report" to expand it, and then click
"Payment Mode Switch Report" to expand it, Here are the four
reports:1.Monthly Operation Data (MOD),2.Sales Ranking Report,3.Sales Ranking
Report By Vending,4.Sales Ranking Report By Operator(Global menu > Report
> Sales Statistics):
3.13.9.1 Monthly Operation Data (MOD)
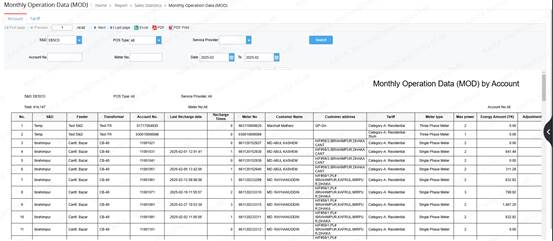
3.13.9.2 Sales Ranking Report
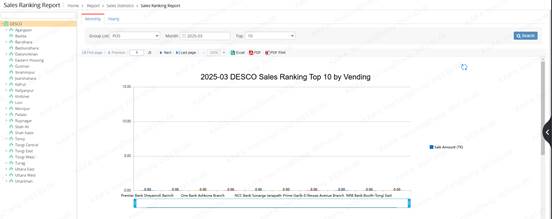
3.13.9.3 Sales Ranking Report By Vending
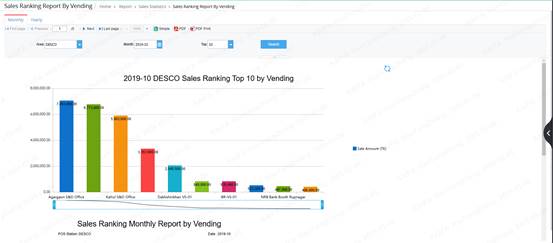
3.13.9.4 Sales Ranking Report By Operator
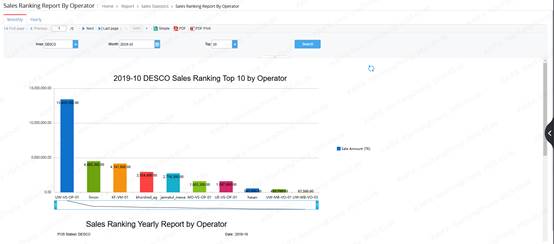
3.13.10 Vending Statistical Report
From the
global menu, click "Report" to expand it, and then click
"Vending Statistical Report" to expand it, Here are the seven reports:1.Vending Statistical
Report,2.Vending Details Report,3.Vending In Different SD,4.Monthly Vending
Trend by Chart,5.User Without Purchase Electricity For N Month,6.Vending
Statistics By Operator Report,7.S&D Wise Vending Report (Global
menu > Report > Vending Statistical Report):
3.13.10.1 Vending Statistical Report
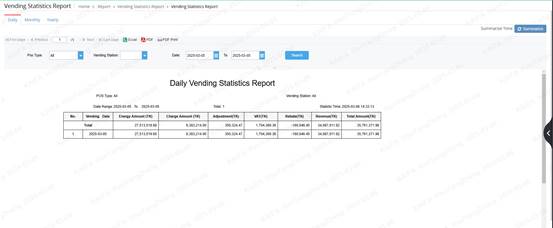
3.13.10.2 Vending Details Report
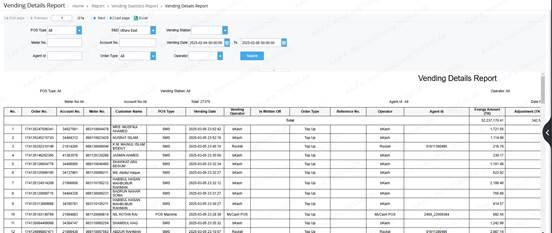
3.13.10.3 Vending In Different SD
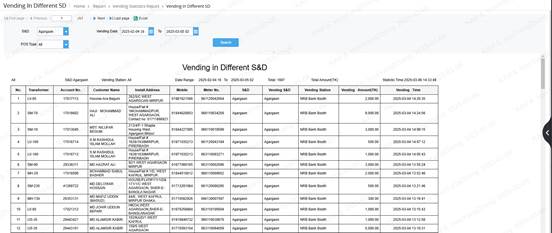
3.13.10.4 Monthly Vending Trend by Chart
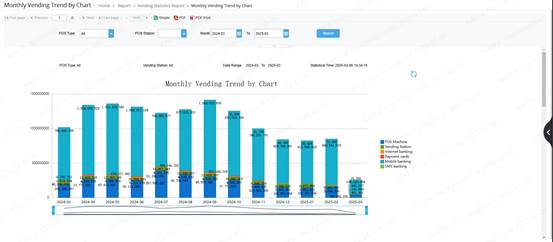
3.13.10.5 User Without Purchase Electricity For N Month
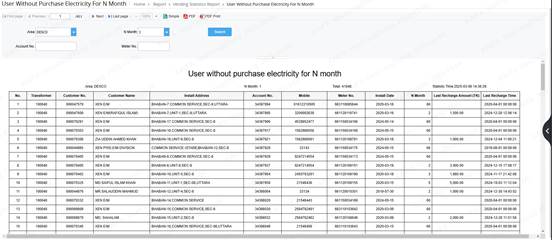
3.13.10.6 Vending Statistics By Operator Report
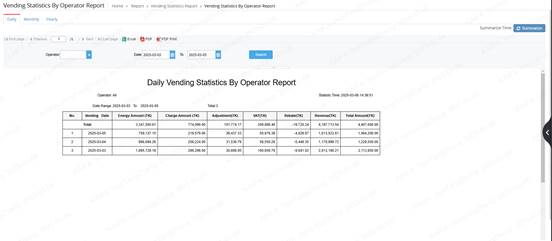
3.13.10.7 S&D Wise Vending Report
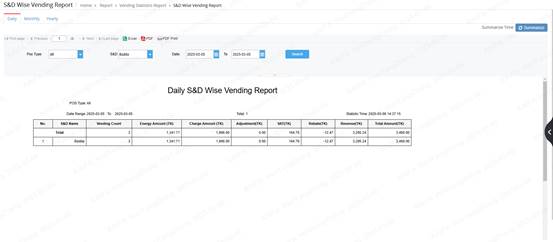
3.13.11 Account Information
From
the global menu, click "Report" to expand it, and then click
"Account Information" to expand it, Here are the two
reports:1.Account Information Report,2.Account Information Statistics
Report(Global menu > Report > Account Information):
3.13.11.1 Account Information Report
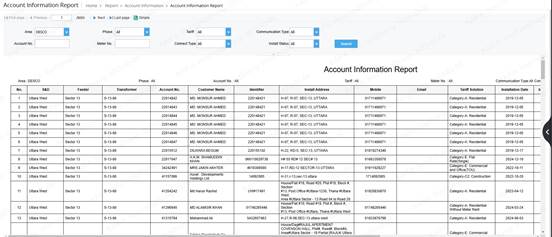
3.13.11.2 Account Information Statistics Report
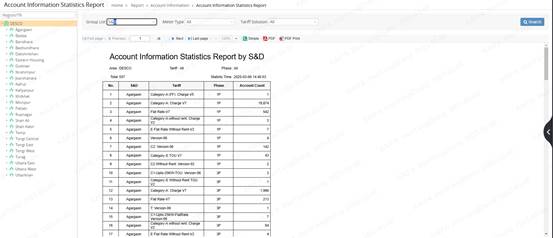
3.13.12 Adjustment Statistics
From
the global menu, click "Report" to expand it, and then click
"Adjustment Statistics" to expand it, Here are the two reports:1.PFC
Charge Calculation Details Report,2.Adjustment Imposed Report(Global menu >
Report > Adjustment Statistics):
3.13.12.1 PFC Charge Calculation
Details Report
3.13.12.2 Adjustment Imposed Report
3.13.13 Installation Statistics
From the global menu, click
"Report" to expand it, and then click "Installation
Statistics" to expand it, Here are the five reports:1.Meter Installation
Statistic By Month,2.Installation Trend Statistic,3.Meter Installation
Details,4.Gateway Installation Details Report,5.S&D Wise Meter Installation
Statistics Report(Global menu > Report > Installation Statistics):
3.13.13.1 Meter Installation Statistic
By Month
3.13.13.2 Installation Trend Statistic
3.13.13.3 Installation Trend Statistic
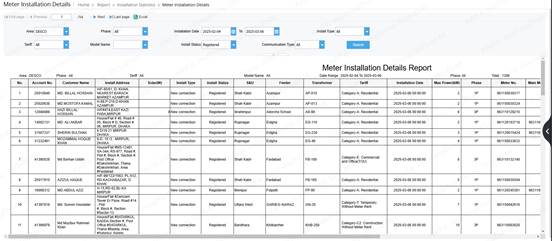
3.13.13.4 Gateway Installation Details
Report
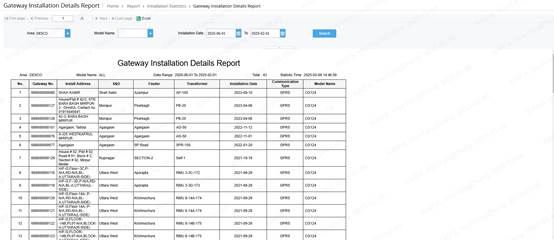
3.13.13.5 S&D Wise Meter
Installation Statistics Report
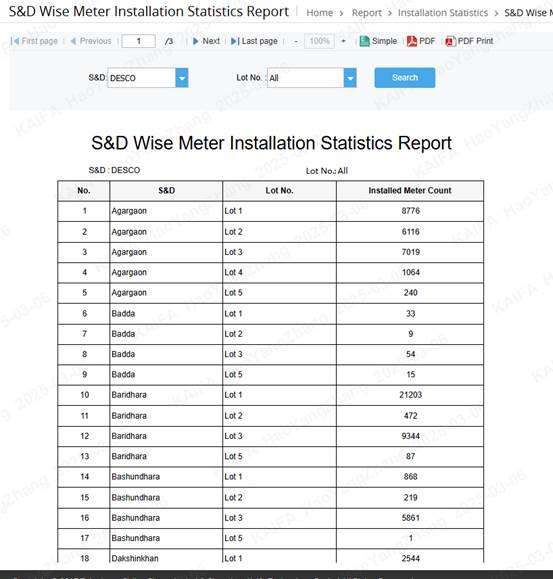
3.13.14 Vending Operation Log
From
the global menu, click "Report" to expand it, and then click
"Vending Operation Log" to expand it, Here are the two
reports:1.Vending Order Cancellation Report,2.Recharge Failed Report(Global
menu > Report > Vending Operation Log):
3.13.14.1 Vending Order Cancellation
Report
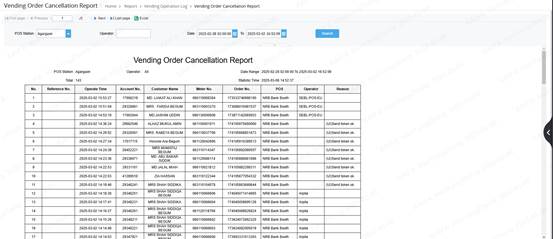
3.13.14.2 Recharge Failed Report
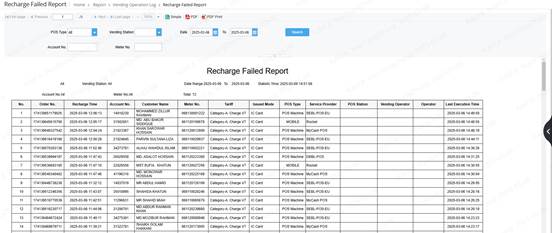
3.13.15
Consumption Statistics Report
From
the global menu, click "Report" to expand it, and then click
"Consumption Statistics Report" to enter corresponding report page
(Global menu > Report > Consumption Statistics Report):
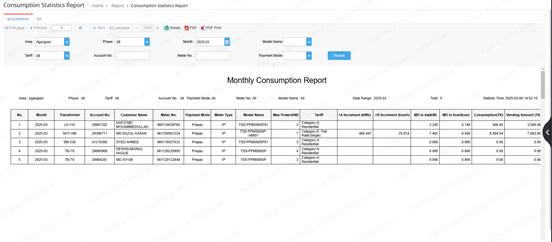
3.13.16
Consumption Statistics Report Monthly
From
the global menu, click "Report" to expand it, and then click
"Consumption Statistics Report Monthly" to enter corresponding report
page (Global menu > Report > Consumption Statistics Report Monthly):
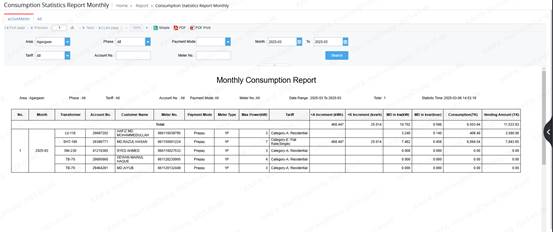
3.13.17
Tax Statistics Report
From
the global menu, click "Report" to expand it, and then click
"Tax Statistics Report" to enter corresponding report page (Global
menu > Report > Tax Statistics Report):
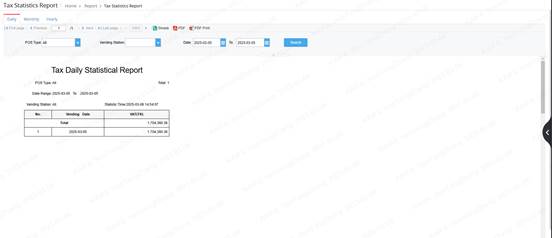
3.13.18
Sanction Load Violation Report
From
the global menu, click "Report" to expand it, and then click
"Sanction Load Violation Report" to enter corresponding report page
(Global menu > Report > Sanction Load Violation Report):
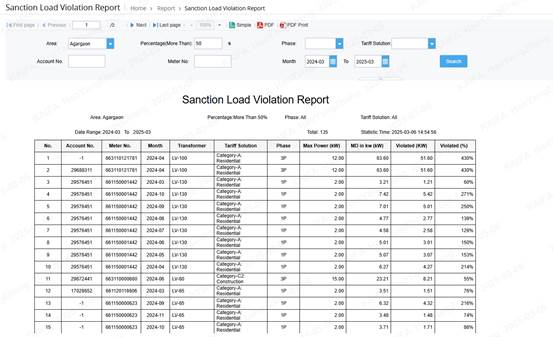
3.13.19
Special Recharge Details Report
From
the global menu, click "Report" to expand it, and then click
"Special Recharge Details Report" to enter corresponding report page
(Global menu > Report > Special Recharge Details Report):
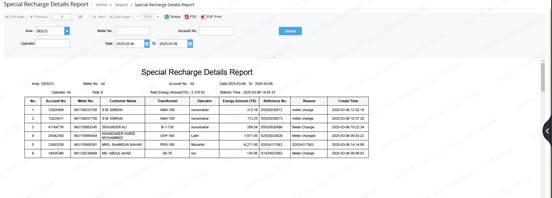
3.13.20
Not Collected Meter Statistics Report
From
the global menu, click "Report" to expand it, and then click
"Not Collected Meter Statistics Report" to enter corresponding report
page (Global menu > Report > Not Collected Meter Statistics Report):
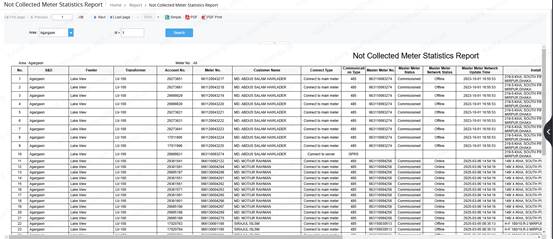
3.13.21
Operator List
From
the global menu, click "Report" to expand it, and then click
"Operator List" to enter corresponding report page (Global menu >
Report > Operator List):
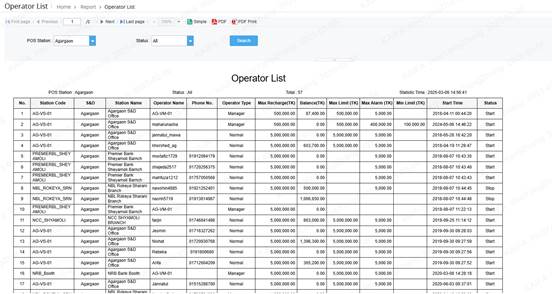
3.13.22
Abnormal Archive Information Report
From
the global menu, click "Report" to expand it, and then click
"Abnormal Archive Information Report" to enter corresponding report
page (Global menu > Report > Abnormal Archive Information Report):
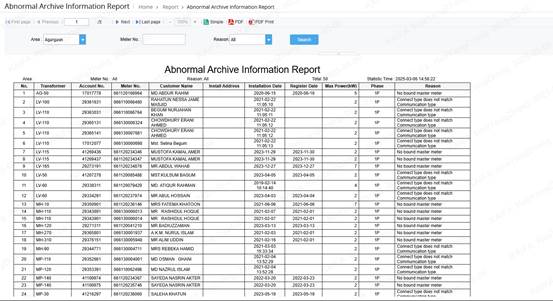
3.13.23
Purchase SMS Preview List
From
the global menu, click "Report" to expand it, and then click
"Purchase SMS Preview List" to enter corresponding report page
(Global menu > Report > Purchase SMS Preview List):
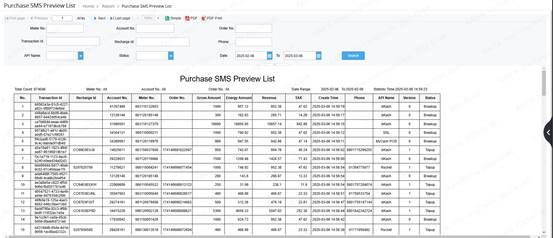
3.13.24
Meter On/Offline Details
From
the global menu, click "Report" to expand it, and then click
"Meter On/Offline Details" to enter corresponding report page (Global
menu > Report > Meter On/Offline Details):
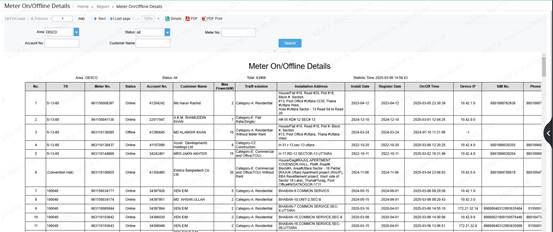
3.13.25
Meter On/Offline Details
From
the global menu, click "Report" to expand it, and then click
"Meter On/Offline Details" to enter corresponding report page (Global
menu > Report > Meter On/Offline Details):
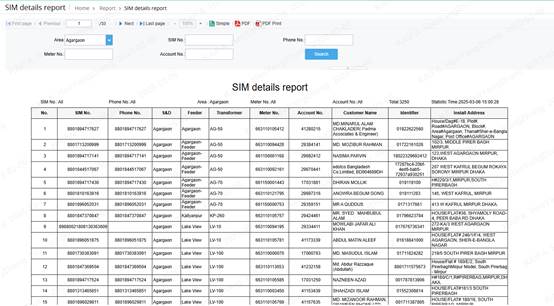
3.13.26
User List Report
From
the global menu, click "Report" to expand it, and then click
"User List Report" to enter corresponding report page (Global menu
> Report > User List Report):
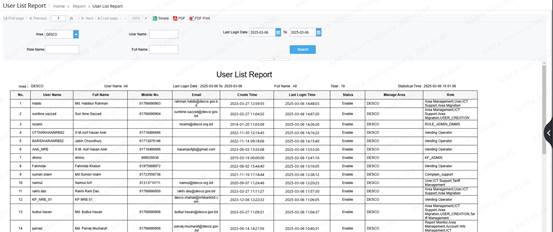
3.13.27
Clear Tamper Report
From
the global menu, click "Report" to expand it, and then click
"Clear Tamper Report" to enter corresponding report page (Global menu
> Report > Clear Tamper Report):
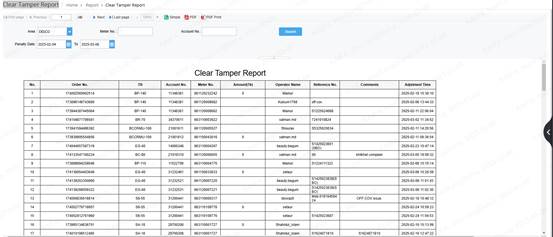
3.14
Monitoring
This
section provides an introduction to the Monitoring menu. The operator can access and manage Device Monitoring, Online Device Monitoring, User Operation Log, User Login Log, Customer Information Change Log.
The event
includes following 5 submenus:
v Device Monitoring
v Online Device Monitoring
v User Operation Log
v User Login Log
v Customer Information Change Log
3.14.1
Device Monitoring
From the
global menu, click "Monitoring” to expand it, and then click "Device
Monitoring” to enter user information page (Global menu > Monitoring >
Device Monitoring):
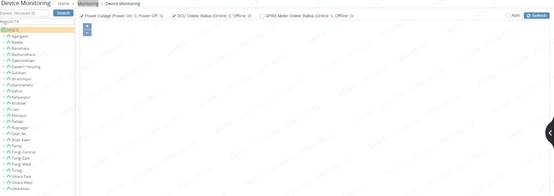
In this
page, the operator can use following functions to access and manage device
monitoring.
3.14.2
Online Device Monitoring
From the
global menu, click "Monitoring” to expand it, and then click "Online
Device Monitoring” to enter user information page (Global menu > Monitoring
>On line Device Monitoring):
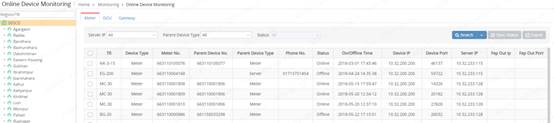
In this
page, the operator can use following functions to access and manage online
device monitoring.
3.14.2.1
Search
Operators
can enter different pages by clicking on the "Meter",
"DCU", and "Gateway" buttons
3.14.2.1.1 Meter
Search based on Server IP, Parent Device Type,
Status, Meter No., Parent Device No.
The following table lists the items shown in
the figure above.
|
No |
Item |
Description |
|
1 |
TR |
TR |
|
2 |
Device
Type |
The category
or type of the device |
|
3 |
Meter
No. |
Meter
Identification Number |
|
4 |
Parent
Device No |
Parent
Device Number |
|
5 |
Parent
Device Type |
Parent
Device Type |
|
6 |
Phone
No |
Phone
Number |
|
7 |
Status |
The current
state of the device |
|
8 |
On/Offline
Time |
The time
when the device status changed to online or offline. |
|
9 |
Device
IP |
The IP
address of the device |
|
10 |
Device
Port |
Port |
|
11 |
Server
IP |
The IP
address of the server |
|
12 |
Fep
Out IP |
Front-end
Output IP Address |
3.14.2.1.2 DCU
Search
based Server IP and Status and DCU No.
The
following table lists the items shown in the figure above:
|
No |
Item |
Description |
|
1 |
TR |
TR |
|
2 |
Device
Type |
The category
or type of the device |
|
3 |
Device
No |
Meter
Identification Number |
|
4 |
Phone
No |
Phone
Number |
|
5 |
Status |
The current
state of the device |
|
6 |
On/Offline
Time |
The time
when the device status changed to online or offline. |
|
7 |
Device
IP |
The IP
address of the device |
|
8 |
Device
Port |
Port |
|
9 |
Server
IP |
The IP
address of the server |
|
10 |
Fep
Out IP |
Front-end
Output IP Address |
3.14.2.1.3 Gateway
Search
based Server IP and Status and Gateway No.
The
following table lists the items shown in the figure above:
|
No |
Item |
Description |
|
1 |
TR |
TR |
|
2 |
Device
Type |
The category
or type of the device |
|
3 |
Device
No |
Meter
Identification Number |
|
4 |
Phone
No |
Phone
Number |
|
5 |
Status |
The current
state of the device |
|
6 |
On/Offline
Time |
The time
when the device status changed to online or offline. |
|
7 |
Device
IP |
The IP
address of the device |
|
8 |
Device
Port |
Port |
|
9 |
Server
IP |
The IP
address of the server |
|
10 |
Fep
Out IP |
Front-end
Output IP Address |
3.12.2.2
Export
Export checked data into Excel file
3.14.3
User Operation Log
From the
global menu, click "Monitoring” to expand it, and then click "User Operation Log” to enter user information page
(Global menu > Monitoring > User Operation Log):

In this
page, the operator can use following functions to access and manage User
Operation Log.
3.14.3.1
Search
Search based on Operators, Operation
Type, Operation Time.
The following table lists the items shown in the figure above:
|
No |
Item |
Description |
|
1 |
Operation
Time |
The specific
time when the operation was performed. |
|
2 |
Operator |
Operator |
|
3 |
Operation
Type |
The category
of the operation |
|
4 |
Business
Type |
The type of
business |
|
5 |
Attribute |
Attribute |
|
6 |
Business
ID |
Business
ID |
|
7 |
Before
Change |
The state of
the data before the operation was performed. |
|
8 |
After
Change |
The state of
the data after the operation was performed. |
|
9 |
Reference
No. |
A reference
number that may be used to link to other related records or information. |
3.14.3.2
Export
Export checked data into Excel file
3.14.4
User Login Log
From the
global menu, click "Monitoring” to expand it, and then click "User Login Log” to enter user information page (Global menu
> Monitoring > User Login Log):
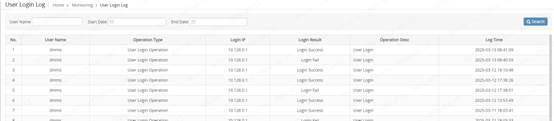
In this
page, the operator can use following functions to access and manage User Login
Log.
3.14.4.1
Search
Search based on User Name, Start Date,
End Login Log.
The following table lists the items shown in the figure above:
|
No |
Item |
Description |
|
1 |
User
Name |
The username
of the user |
|
2 |
Operation
Type |
The category
of the operation being performed |
|
3 |
Login
IP |
The IP address
from which the user logged in. |
|
4 |
Login
Result |
The result of
the login operation |
|
5 |
Operation
Desc |
A detailed
description of the specific operation performed. |
|
6 |
Log
Time |
The
timestamp when the operation was logged. |
3.14.5
Customer Information Change Log
From the
global menu, click "Monitoring” to expand it, and then click
"Customer Information Change Log” to enter user information page (Global menu
> Monitoring > Customer Information Change Log):

In this
page, the operator can use following functions to access and manage Customer
Information Change Log.
3.14.5.1
Search
Search based on User Name, Start Date,
End Login Log.
The following table lists the items shown in the figure above:
|
No |
Item |
Description |
|
1 |
Object
Type |
Object
Type |
|
2 |
Operation
Type |
The specific
type of operation |
|
3 |
Object
No |
Object
No |
|
4 |
Operation
Time |
Object
No |
|
5 |
Operator |
The person
or system that executed the operation. |
|
6 |
Action |
The
timestamp when the operation was logged. |
3.15
User Management
This
section provides an introduction to user management menus. The operator can
access and manage user information, role information, application information
and menu leader information here.
User
Management includes following 4 sub menus:
v User
v Role
v Application
v Menu
3.15.1 User
From the
global menu, click "User Management” to expand it, and then click
"User” to enter user information page (Global menu > User Management
> User):
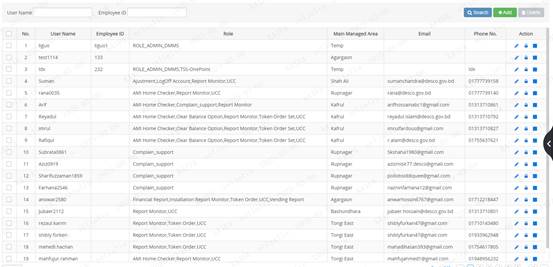
In this
page, the operator can use following functions to access and manage user
information:
3.15.1.1 Search
Search based on User Name.
The following table lists the items shown in
the figure above.
|
No |
Item |
Description |
|
1 |
User
Name |
User
Name |
|
2 |
Role |
Roles
which the user have (See 3.9.2) |
|
3 |
Email |
User
email |
|
4 |
Phone
No. |
User
phone no. |
|
5 |
Action |
|
3.15.1.2 Add
Operator can add a new user by clicking
"Add” button

|
No |
Item |
Description |
|
|
1 |
User Name |
User name |
|
|
|
|
|
|
|
2 |
Full
Name |
Full
Nmae |
|
|
3 |
Designation |
Designation |
|
|
4 |
Empolyee
ID |
Empolyee
ID |
|
|
5 |
Password |
Password |
|
|
6 |
Confirm
Password |
Same
as password |
|
|
|
|
|
|
|
|
|
|
|
|
7 |
Email |
User email |
|
|
8 |
Phone No. |
User phone no. |
|
|
|
|
|
|
3.15.1.3 Delete
The
operator can delete users by checking boxes and clicking the "Delete”
button.
3.15.1.4 Modify
The
operator can modify a user by clicking the "Modify” icon.
3.15.1.4.1 Modify User Info
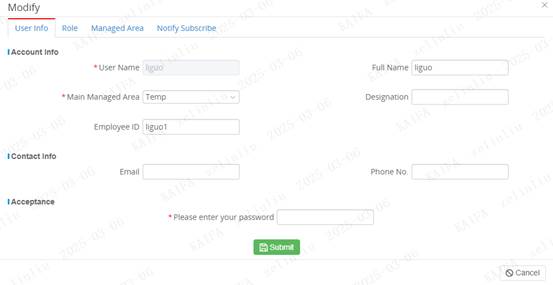
.
Full Name, Main Managed Area, Designation, Employee ID, Email,
Phone No can be modified.
3.15.1.4.2 Modify Role
Assign role privilege for the selected user.
1.
Select
one user, Click "Role”
icon to assign roles to user
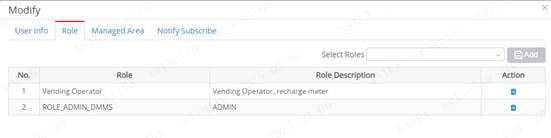
2.
Select
"Select
Role” and click "Add”
button
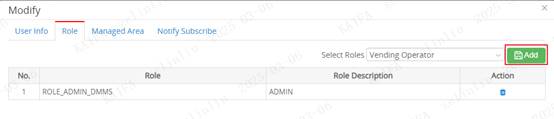
3. When adding selected role successfully, the
selected role will display on the table
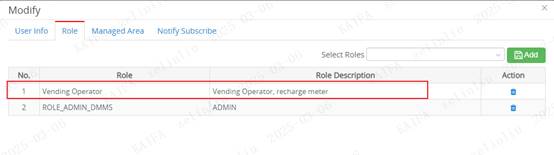
4. Click "delete” icon to delete role for
the selected user.
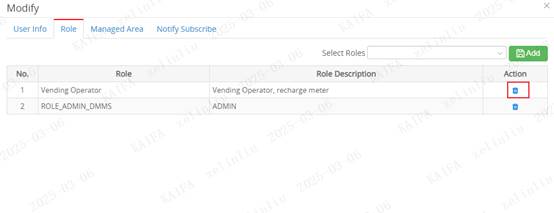
3.15.1.4.3 Modify Managed Area
Assign area for the selected user.
1.
Select
one user, Click "Managed
Area” icon to assign areas to user
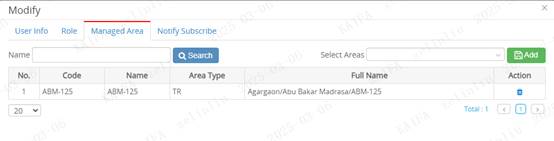
2.
Select
"Select
Areas” and click "Add”
button
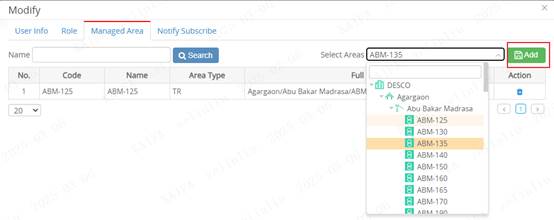
3. When adding selected area successfully, the
selected area will display on the table
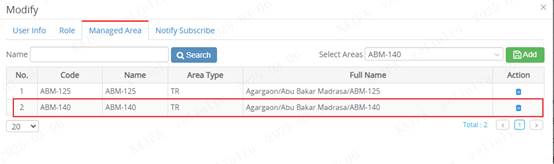
4. Click "delete” icon to delete area for
the selected user.
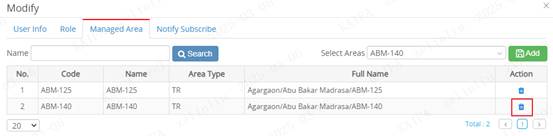
3.15.1.4.4 Notify Subscribe
Assign
notify for the selected user
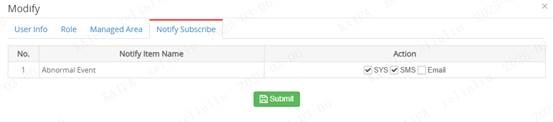
3.7.1.5 Change Password
Click
"Modify Password” icon to change the password for the selected user.
3.7.1.6 Change User Status
Click "Pause” or "Play” icon to run
or stop selected user. Only when the user status is running and operator can
use the user account to login to system successful.
3.15.2
Role
From the
global menu, click "User Management” to expand it, and then click
"Role” to enter role information page (Global menu > User Management
> Role):
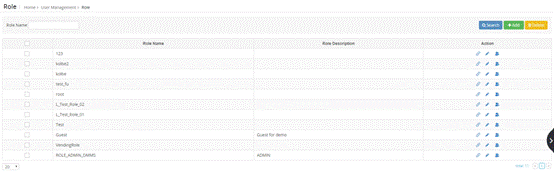
In this
page, the operator can use following functions to access and manage user role
information:
3.15.2.1 Search
Search based on Role Name.
The following table lists the items shown in
the figure above:
|
No |
Item |
Description |
|
1 |
Role
Name |
Role
Name |
|
2 |
Role
Description |
Role
Description |
|
5 |
Action |
|
3.15.2.2 Add
Operator can add a new role by clicking
"Add” button
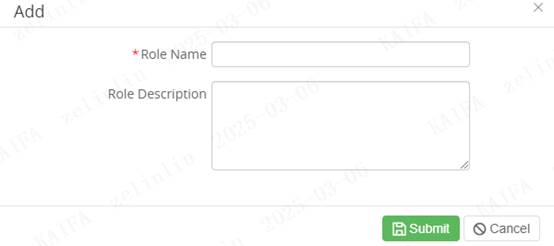
|
No |
Item |
Description |
|
|
1 |
Role Name |
Role name |
|
|
2 |
Role
Description |
- Role
Description |
|
|
|
|
|
|
|
|
|
|
|
|
|
|
|
|
|
|
|
|
|
|
|
|
|
|
|
|
|
|
|
|
|
|
|
|
3.15.2.3 Delete
The
operator can delete roles by checking boxes and clicking the "Delete”
button.
3.15.2.4 Modify
Click
"Modify” icon to modify role information.
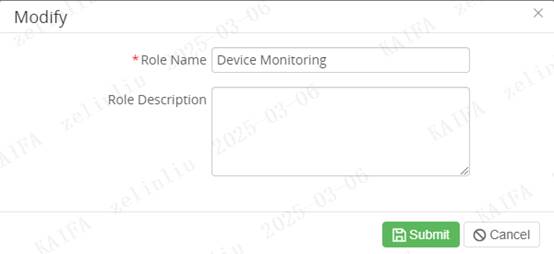
3.15.2.5 Assign Function
Assign
function privilege to the selected role:
1. Click
"Assign Function”
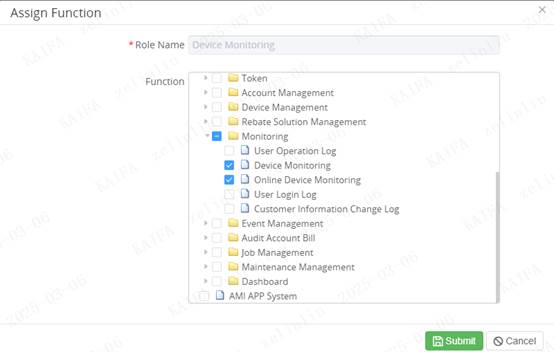
2. Tick
off function check boxes.
3. Click
"Submit” button to save
4. Click
"Cancel” button to cancel.
3.15.2.6 Assign User
The operator can assign users to the selected
role by clicking "Assign User” icon.
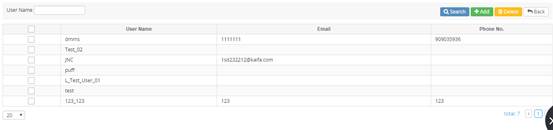
Click "Add”
button to add users.
![]()
Tick off checkboxes
and click "Assign” button.
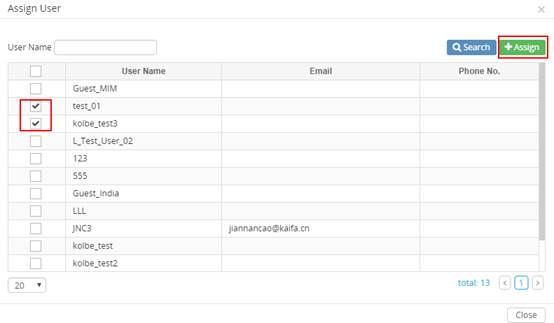
When assigning operation successful, the
selected users will display on the table.
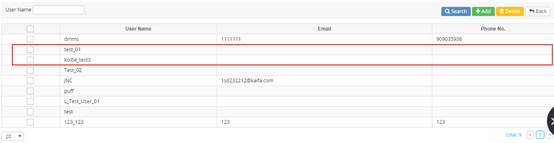
The operator also can delete assigned users by
ticking off checkboxes and clicking "Delete” button.
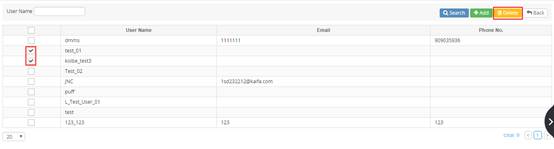
3.15.3 Application
From the
global menu, click "User Management” to expand it, and then click
"Application” to enter application information page (Global menu > User
Management > Application):

In this
page, the operator can use following functions to access and manage application
information:
3.15.3.1 Search
In this page, the operator can search application based on Code,
Name.
|
No |
Item |
Description |
|
1 |
Code |
Application
code |
|
2 |
Name |
Application
name |
|
3 |
I18N Code |
I18N code
of application name |
|
4 |
Description |
Description of
application |
|
5 |
Option |
|
3.15.3.2 Add
The operator can add a new application by
clicking the "Add” button:
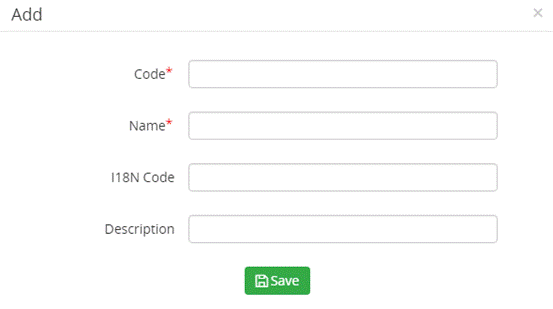
|
No |
Item |
Description |
|
|
1 |
Code |
Application
code -
using uppercase letters is recommended like ‘AMI_WEB'. |
|
|
2 |
Name |
Application
name |
|
|
3 |
I18N Code |
I18N code
of application name (Definition
data in database) |
|
|
4 |
Description |
Description of
application |
|
3.15.3.3 Modify
The
operator can modify the application by clicking the "Modify” icon:
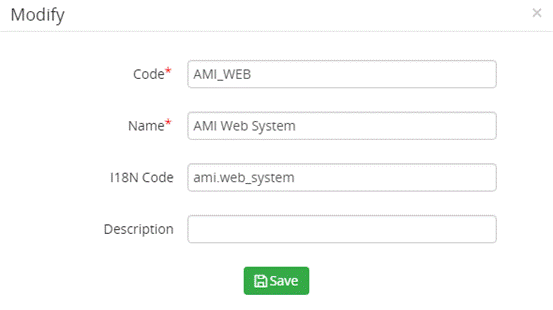
Code, Name, I18N Code, and Description can be
modified.
3.15.3.4 Delete
The operator can delete the application by
checking boxes and clicking the "Delete” button.
3.15.3.5 Assign
The operator can assign function groups and
functions to the selected application by clicking the "Assign” icon.
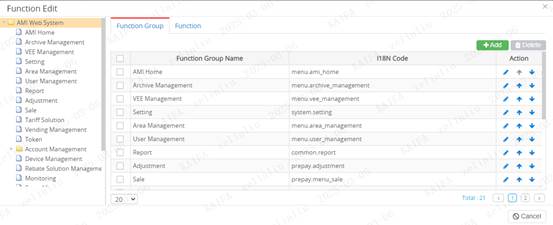
One application can have one or more function
groups, and one function group have one or more functions.
Function group tree is a basic filter of
selected application on the left.
The operator can choose a function group tree
node to add a new function group as its descendent when "Function Group”
tab is active.
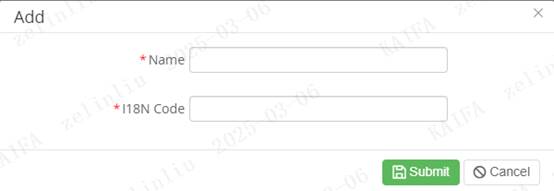
The operator also can choose a function group
tree node to add a new function as its function when "Function” tab is
active.
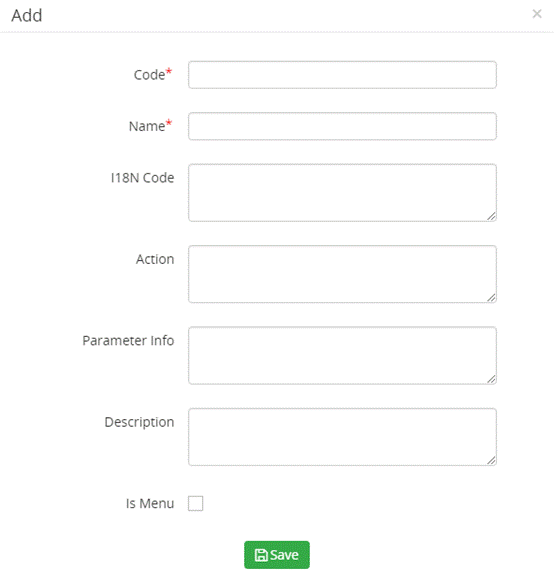
Click "Up” and "Down” icon to change
these function groups or functions orders.
Click "Modify” icon to modify the
selected function group or function information.
The operator can choose a node, and right side
detail will display all of its descendent function groups and functions belong
to the function group. Select one or more items using checkboxes, then click
"Delete” to delete them and all of their descendent function groups and
functions belong to the function group
3.15.4
Menu
From the
global menu, click "User Management” to expand it, and then click
"Menu” to enter menu information page (Global menu > User Management
> Menu):

On this page, operators can access and
manage menus by clicking on the navigation tab
3.15.4.1 Search
v Search parent menu by selected "AMI” tree node .
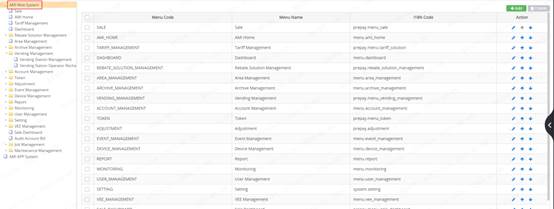
|
No |
Item |
Description |
|
1 |
Menu Code |
Menu Code |
|
2 |
Menu Name |
Menu Name |
|
3 |
I18N Code |
I18N code of
menu name |
|
5 |
Action |
|
|
|
|
|
|
|
|
|
|
|
|
|
|
|
|
|
|
|
|
|
|
|
|
|
|
|
|
|
3.15.4.2 Add
The
operator can add a new menu by clicking "Add” button.
The
operator can add a leaf menu by selecting a tree node and click "Add”
button when "Leaf” tab is active.
|
No |
Item |
Description |
|
|
1 |
Menu
Code |
Menu
code -
using increasing number is recommended like ‘940006' |
|
|
2 |
Menu
Name |
Menu
name |
|
|
3 |
I18N
Code |
I18N code
of menu name (Definition
data in database) |
|
|
4 |
Is
Leaf |
leaf |
|
|
|
|
|
|
|
|
|
|
|
|
|
|
|
|
|
|
|
|
|
|
|
|
|
|
|
|
|
|
|
|
|
|
|
|
3.15.4.3 Modify
The
operator can modify the menu by clicking the "Modify” icon.
|
No |
Item |
Description |
|
|
1 |
Menu
Code |
Menu
code -
using increasing number is recommended like ‘940006' |
|
|
2 |
Function
Code |
Select
one function to bind to the menu(See 3.10) |
|
|
3 |
Menu
Name |
Menu
name |
|
|
4 |
I18N
Code |
I18N code
of menu name (Definition
data in database) |
|
|
5 |
Menu
Action |
|
|
|
6 |
Parameter
Info |
|
|
3.15.4.4 Delete
The operator can delete
the application by checking boxes and clicking the "Delete” button.
3.15.4.5 Sort
The operator can click "Up” and
"Down” icon to change these menus orders.
3.16
Setting
This section introduces the
configuration. Operators can access and search system configuration, dictionary
setting, and Internationalization information based on different query criteria
here.
Search
includes following 3 sub menus:
v System Configuration
v Dictionary Setting
v Internationalization
3.16.1 System
Configuration
From
global menu, click "Setting” to expand it, and then click "System
Configuration” to enter system configuration page (Global menu > Setting
> System Configuration)
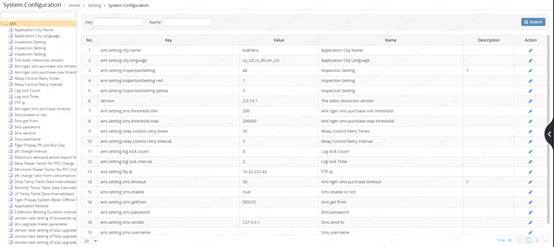
In this
page, the operator can use following functions to access and manage global
system configuration.
Example: Meter expire time, its value
can be modified here
|
|
|
|
|
|
|
|
|
|
|
|
|
|
|
|
|
|
|
|
|
|
|
|
3.16.2 Dictionary
Setting
From the global menu, click "Setting” to
expand it, and then click "Dictionary Setting” to enter
the page (Global menu >Setting> Dictionary Setting):
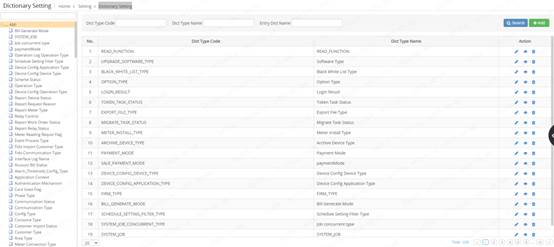
In this page, the operator can use following
functions to access and manage Dictionary:
|
|
|
|
|
|
|
|
|
|
|
|
|
|
|
|
|
|
|
|
|
|
|
|
|
|
|
|
|
|
|
|
|
|
|
|
|
|
|
|
|
|
|
|
|
|
|
|
|
No |
Item |
Description |
|
|
|
|
|
|
|
|
|
|
|
|
|
|
|
|
|
|
|
|
|
|
|
|
|
|
|
|
|
|
|
|
|
|
|
|
|
|
|
|
|
|
|
|
3.16.2.1
Search
Search
based on Dict Type Code, Dict Type Name, Entry Dict Name.
The
following table lists the items shown in the figure above.
|
No |
Item |
Description |
|
1 |
Dict
Type Code |
The
dict code of the dictionary |
|
2 |
Dict
Type Name |
The
dict name of the dictionary |
|
3 |
Action |
|
3.16.2.2 Add
Operator can add a new dictionary by clicking "Add”
button
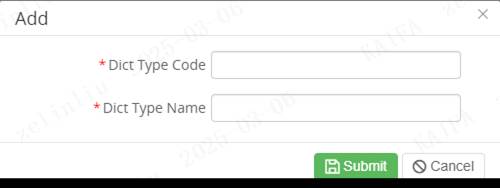
|
No |
Item |
Description |
|
|
1 |
Dict Type Code |
Dict Type Code |
|
|
2 |
Dict Type Name |
Dict Type Name |
|
3.16.2.3
Modify
The operator can modify a dictionary by
clicking the "Modify” icon.
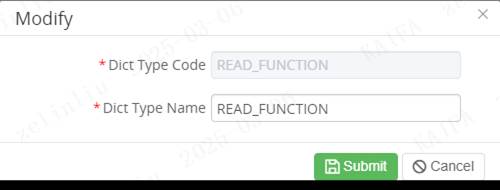
Dict
Type Name can be modified.
3.16.2.4 View
1. View the selected dictionary by
clicking the "View” icon.
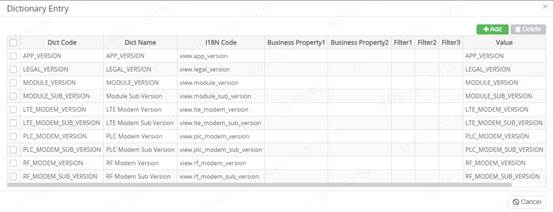 2.Click
"Add” button to add dictionary.
2.Click
"Add” button to add dictionary.
![]()
3.
Add a new dictionary value
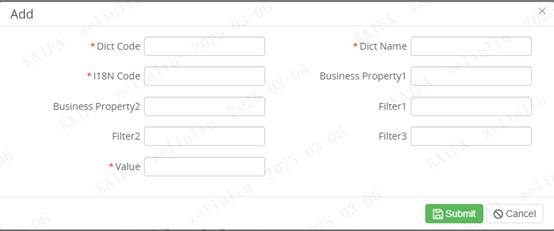
4.
After the successful addition operation, the new value added will be displayed
on the table.
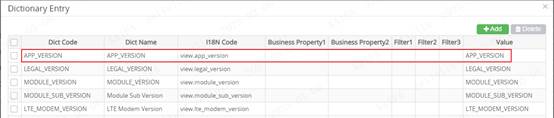
5. The operator also can delete value by
ticking off checkboxes and clicking "Delete” button.
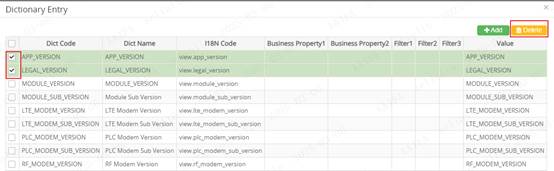
3.16.2.5
Delete
The operator can delete a dictionary by
clicking the "Delete” icon.
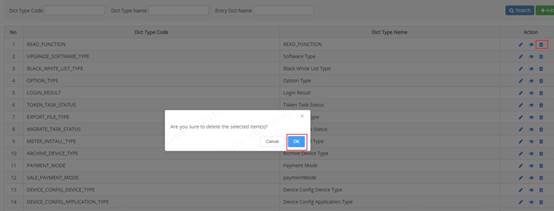
3.16.3 Internationalization
From the global menu, click "Setting” to expand it, and then
click "Internationalization” to enter
the page (Global menu >Setting> Internationalization):
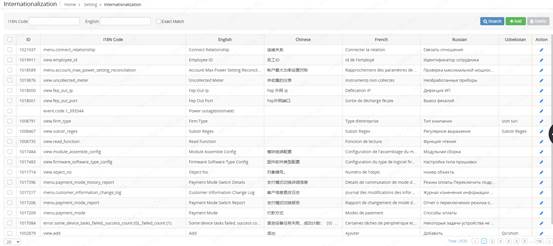
In this page, the operator can use following functions to access
and manage Internationalization:
3.16.3.1
Search
Search based on I18N Code, English.
The following table lists the items
shown in the figure above.
|
No |
Item |
Description |
|
1 |
ID |
ID |
|
2 |
I18N Code |
I18N Code |
|
3 |
English |
English |
|
4 |
Chinese |
Chinese |
|
5 |
French |
French |
|
6 |
Russian |
Russian |
|
7 |
Uzbekistan |
Uzbekistan |
|
8 |
Action |
|
3.16.3.2 Add
Operator can add a new internationalization by clicking
"Add” button.
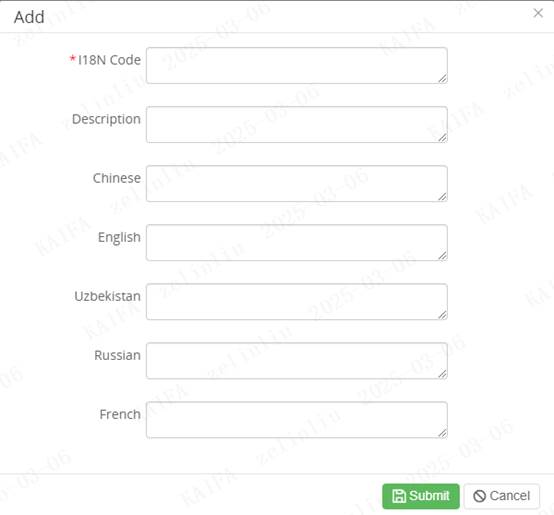
|
No |
Item |
Description |
|
|
1 |
I18 Code |
I18 Code |
|
|
2 |
Description |
Description |
|
|
3 |
Chinese |
Chinese |
|
|
4 |
English |
English |
|
|
5 |
Uzbekistan |
Uzbekistan |
|
|
6 |
Russian |
Russian |
|
|
7 |
French |
French |
|
3.16.3.3
Delete
The operator can delete internationalization
by checking boxes and clicking the "Delete” button.
3.16.3.4
Modify
The operator can modify a
internationalization by clicking the "Modify” icon.
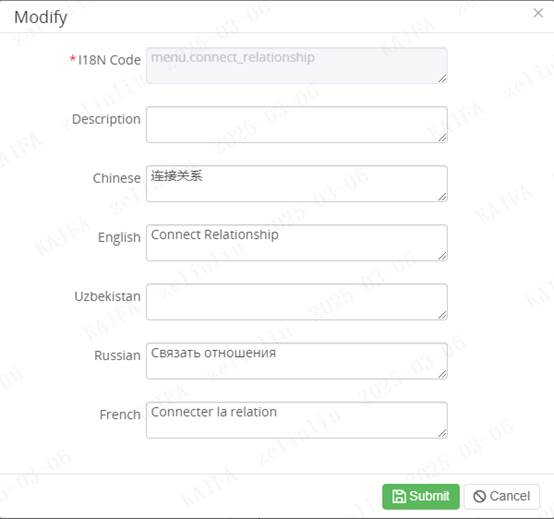 Description, Chinese, English,
Uzbekistan, Russian, French can be modified.
Description, Chinese, English,
Uzbekistan, Russian, French can be modified.
|
|
|
|
|
|
|
|
|
|
|
|
|
|
|
|
|
|
|
|
|
|
|
|
|
|
|
|
|
|
|
|
|
|
|
|
|
|
|
|
3.17
VEE Management
This section provides an introduction
to vee management menus. The operator can access and manage vee rule
definition, basic validation rule management, customized rule management
information here.
user management includes following 3 sub
menus:
v VEE Rule Definition Role
v Basic Validation Rule Management
v Customized Rule Management
3.17.1
VEE Rule Definition
From the
global menu, click "VEE Management” to expand it, and then click "VEE
Rule Definition” to enter application information page (Global menu > VEE
Management > VEE Rule Definition):

In this
page, the operator can use following functions to access and manage VEE Rule
Definition information:
3.17.1.1
Search
v Clicking
"Validation Rule” tab.

Search
based on Rule Code, Rule Name, Is Basic, Object Type, Profile, Register.
The
following table lists the items shown in the figure above:
|
No |
Item |
Description |
|
1 |
No |
No |
|
2 |
Rule
Code |
Rule
Code |
|
3 |
Rule
Name |
Rule
Name |
|
4 |
Object
Type |
Object
Type |
|
5 |
Is
Basic |
Is
Basic |
|
6 |
Supported
Object Type |
Supported
Object Type |
|
7 |
Realtime |
Realtime |
|
8 |
Seq
No. |
Seq
No. |
|
9 |
Remark |
|
|
10 |
Action |
|
v Clicking
"Estimation Rule” tab.

Search based on Rule Code, Rule Name, Profile,
Register.
The
following table lists the items shown in the figure above:
|
No |
Item |
Description |
|
1 |
No |
No |
|
2 |
Rule
Code |
Rule
Code |
|
3 |
Rule
Name |
Rule
Name |
|
4 |
Supported
Object Type |
Supported
Object Type |
|
5 |
Realtime |
Realtime |
|
6 |
Seq
No. |
Seq
No. |
|
7 |
Remark |
Remark |
|
8 |
Action |
|
3.17.2
Basic Validation Rule Management
From the
global menu, click "VEE Management” to expand it, and then click
"Basic Validation Rule Management” to enter application information page (Global
menu > VEE Management > Basic Validation Rule Management):

In this
page, the operator can use following functions to access and manage Basic
Validation Rule Management:
3.17.2.1
Search
Search
based on Group Name, Status, Object Type Profile.
The
following table lists the items shown in the figure above.
|
Item |
Description |
|
|
1 |
Group Name |
Group Name |
|
2 |
Status |
Rule Status -All -Initial -Issued -Expired |
|
3 |
Object Type |
-All -Profile -Register |
|
4 |
Profile |
-All -Daily -Monthly -Energy
Load -Power
Quality Load -Event |
|
5 |
Register |
-All -+A -+R -+P --A --R(kvarh) --P |
3.17.2.2 Add
Operator
can add a new
rule by clicking "Add” button.

|
No |
Item |
Description |
|
1 |
Group
Name |
Group
Name |
|
2 |
Object
Type |
-Profile -Register |
|
3 |
Profile |
-Daily -Monthly -Energy Load -Power Quality Load -Event |
|
4 |
Register |
-+A -+R -+P --A --R(kvarh) --P |
|
5 |
Remark |
Rule Description |
3.17.3
Customized
Rule Management
From the
global menu, click "VEE Management” to expand it, and then click "Customized Rule Management” to enter
application information page (Global menu > VEE Management > Customized Rule Management):

In this
page, the operator can use following functions to access and manage Customized Rule Management:
3.17.3.1
Search
Search based on Solution Name, Status.
The following table lists the items shown in
the figure above.
|
No |
Item |
Description |
|
1 |
Solution
Name |
Name |
|
2 |
Status |
-All -Initial -Issued -Expired |
|
3 |
Action |
|
3.17.3.2 Add
Operator can add
a new solution by clicking "Add” button
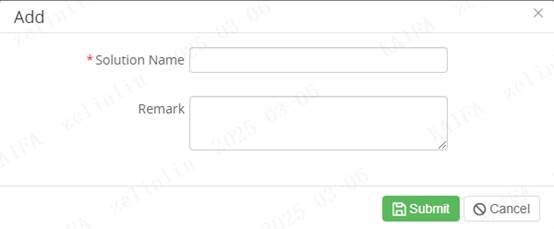
|
No |
Item |
Description |
|
|
1 |
Solution Name |
Solution name |
|
|
2 |
Remark |
Solution
remark |
|
3.17.3.3
Modify
The
operator can modify a solution by clicking the "Modify” icon.
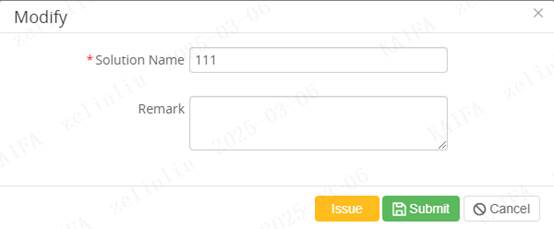
Solution
Name can be modified.
Click the issue button, and the status
of this solution will change to Issued.
![]()
3.17.3.4
Setting
The
operator can setting a solution by clicking the "Setting” icon.

In this
page, the operator can manage Customized
Rule Management.
3.17.3.4.1 Validation Group
3.17.3.4.1.1 Search
Search based on Group Name, Status.
The following table lists the items shown in
the figure above.
|
No |
Item |
Description |
|
1 |
Group
Name |
Name |
|
2 |
Status |
-All -Initial -Issued -Expired |
|
3 |
Action |
|
3.17.3.4.1.2 Add
Operator can add a new group by clicking
"Add” button

|
No |
Item |
Description |
|
|
1 |
Group Name |
Group name |
|
|
2 |
Object Type |
- Profile - Register |
|
|
3 |
Profile |
- Daily - Monthly - Energy Load - Power Quality Load -
Event |
|
|
4 |
Register |
- All - +A - +R - +P - -A - -R(kvarh) - -P |
|
|
5 |
Remark |
Remark |
|
3.17.3.4.1.3 Modify
The operator can modify the group info by
clicking the "Modify” icon:
Group
Name, Remark can be modified.
Click the issue button, and the status
of this group will change to Issued.
3.17.3.4.1.4 Setting
The
operator can setting a group by clicking the "Setting” icon.
In this
page, the operator can manage rule.
3.17.3.4.1.5 Delete
The
operator can delete Validation Groups in Initial status by clicking the
'Delete' button.
![]()
3.17.3.4.2 Estimation Group
3.17.3.4.2.1 Search
Search based on Group Name, Status, Profile,
Register.
The following table lists the items shown in
the figure above.
|
No |
Item |
Description |
|
1 |
Group
Name |
Name |
|
2 |
Status |
-All -Initial -Issued -Expired |
|
3 |
Profile |
- Daily - Monthly - Energy Load - Power Quality Load -
Event |
|
4 |
Register |
- All - +A - +R - +P - -A - -R(kvarh) - -P |
|
3 |
Action |
|
3.17.3.4.2.2 Add
Operator can add a new estimation group by
clicking "Add” button
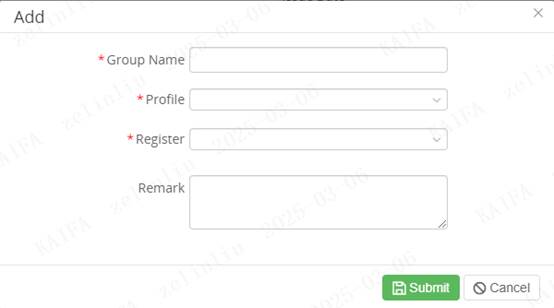
|
No |
Item |
Description |
|
|
1 |
Group Name |
Group name |
|
|
2 |
Profile |
- Daily - Monthly - Energy Load - Power Quality Load -
Event |
|
|
3 |
Register |
- All - +A - +R - +P - -A - -R(kvarh) - -P |
|
|
4 |
Remark |
Remark |
|
3.17.3.4.2.3 Modify
The operator can modify the estimation group
info by clicking the "Modify” icon:

Group
Name, Remark can be modified.
Click the issue button, and the status
of this group will change to Issued.
3.17.3.4.2.4 Setting
The
operator can setting a estimation group by clicking the "Setting” icon.

In this
page, the operator can manage rule.
3.17.3.4.2.5 Delete
The
operator can delete estimation groups in Initial status by clicking
the 'Delete' button.

3.17.3.4.3 Meter
3.17.3.4.3.1 Search
Search
Meter information based on Area, Meter NO., Account ID.
The following table lists the items
shown in the figure above.
|
No |
Item |
Description |
|
1 |
No. |
Serial Number |
|
2 |
Meter
No. |
Meter
No. |
|
3 |
Account
ID |
Account
ID |
|
4 |
TR
No. |
Number |
|
5 |
Meter
Type |
Meter
Type |
|
6 |
Communication
Type |
Communication |
|
7 |
Create
Time |
The
creation Time of the meter |
|
8 |
Status |
The
status of the meter |
3.17.3.4.3.2 Add
Operator can add a new meter by clicking
"Add” button
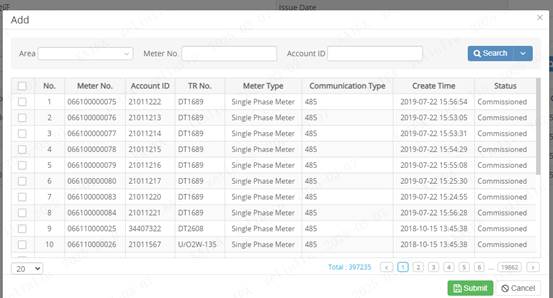
3.17.3.4.3.3 History
Operator can add view history by clicking
"History” button

3.17.3.4.3.4 Delete
The
operator can delete meters by checking boxes and clicking the "Delete”
button.

3.17.3.5
Delete
The
operator can delete Solution in Initial status by clicking the 'Delete' button.
![]()
3.18
Sale Dashboard
This
section provides an introduction to data dashboard. Operators can view various
data reports here.
Sale
Dashboard includes following 8 sub menus:
v Yearly Sales
v Sales Channels
v Account
v Time division of sales statistics
From the global menu, click "Sale
Dashboard” to enter it(Global menu > Sale Dashboard):
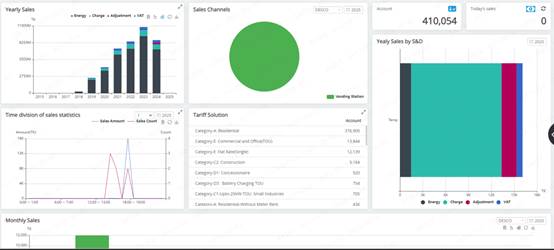
3.18.1
Yearly Sales
Energy, charge, Adjustment, VAT yearly sales,
can select data, line chart, bar chart display
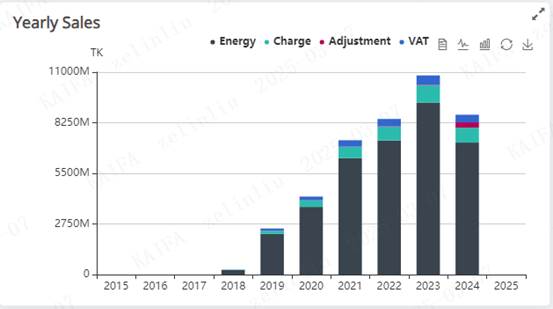
3.18.2
Sales Channels
Sales channels are displayed separately
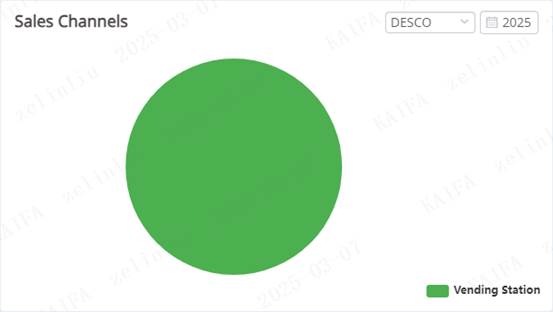
3.18.3
Account
account
statistics

3.18.4
Today's sales
Today's
sales statistics
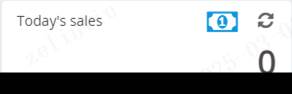
3.18.5
Time division of sales statistics
Sales
statistics for each time period
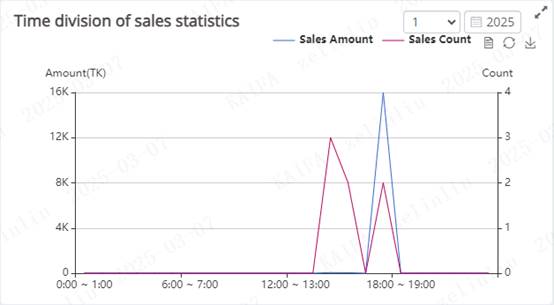
3.18.6
Tariff Solution
Tariff
solution statistics

3.18.7
Yealy Sales by S&D
Annual
sales by region
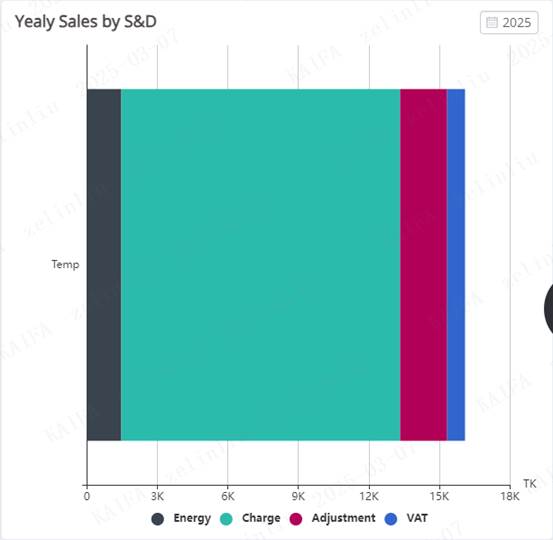
3.18.8
Monthly Sales
Monthly
sales statistics

3.19
Audit Account Bill
This
section provides an introduction to audit account bill menu. The operator can
access and management audit and history of the system.
3.19.1
Audit
click
"To Audit” to enter audit page.

In this
page, the operator can use following functions to access and manage audit:
3.19.1.1
Search
Search based on Area, Bill NO., Account No.,
Status.
The following table lists the items shown in
the figure above.
|
No |
Item |
Description |
|
1 |
No. |
Sequence
number |
|
2 |
Bill
No. |
Billing
number |
|
3 |
Account
No. |
Account
number |
|
4 |
TR
No. |
Transaction
reference number |
|
5 |
Bill
Date |
The
date of the bill is November |
|
6 |
Last
Bill Date |
The
date of the last bill is not provided |
|
7 |
Usage(kWh) |
Electricity consumption
in kilowatt-hours is not provided |
|
8 |
Energy
Amount(TK) |
Energy
amount in TK currency unit is not provided |
|
9 |
Stattus |
status |
|
10 |
Action |
|
3.19.1.2 Add
The operator can click "Add”
button to add a new bill.
3.19.1.3
Audit
Operators can click the "Audit" button to
conduct an audit
3.19.1.4
Recalculation
The operator can click the
"Recalculation" button to perform Recalculation.
3.19.2
History
click
"History” to enter history page.

In this
page, the operator can use following functions to access and manage history:
3.19.2.1
Search
Search based on Area, Bill NO., Account No.,
Status.
The following table lists the items shown in
the figure above.
|
No |
Item |
Description |
|
1 |
No. |
Sequence
number |
|
2 |
Bill
No. |
Billing
number |
|
3 |
Account
No. |
Account
number |
|
4 |
TR
No. |
Transaction
reference number |
|
5 |
Bill
Date |
The
date of the bill is November |
|
6 |
Last
Bill Date |
The
date of the last bill is not provided |
|
7 |
Usage(kWh) |
Electricity
consumption in kilowatt-hours is not provided |
|
8 |
Energy
Amount(TK) |
Energy
amount in TK currency unit is not provided |
|
9 |
Stattus |
status |
3.20
Job Management
This
section provides an introduction to the job management menu. The operator can
access and manage all jobs.
The token
includes following 2 submenus:
v Schedule Job
v Job Cluster Instance
3.20.1
Schedule Job
From the global menu, click "Job
Management” to expand it, and then click "Schedule Job” to enter meter
information page (Global menu > Job Management > Schedule Job):
In job information page, the operator
can use following functions to access and manage job.
3.20.1.1
Search
Search based on Job Name, Job Group.
The following table lists the items shown in the figure above:
|
No |
Item |
Description |
|
1 |
Job Name |
Job
task name |
|
2 |
Job Class Name |
Java
class implementing the job's logic. |
|
3 |
Concurrent Type |
Whether
the job can run multiple instances simultaneously |
|
4 |
Instance Name |
Identifier
for different instances of the same job |
|
5 |
Cron Expression |
Schedule
defining when the job runs |
|
6 |
Last execution time |
Date
and time of the last successful execution. |
|
7 |
Next execution time |
Scheduled
date and time for the next execution. |
|
8 |
Job Group |
Category
grouping related jobs together |
|
9 |
First
execution time |
Timestamp
of the job's first execution. |
|
10 |
Remark |
|
|
11 |
Status |
Current
state of the job |
|
12 |
Action |
|
3.20.1.2 Add
Operator can add a new job by clicking
"Add” button

|
No |
Item |
Description |
|
|
1 |
Job Name |
Job name |
|
|
2 |
Job Group |
Job Group |
|
|
3 |
Job Class Name |
Java
class implementing the job's logic. |
|
|
4 |
Cron
Expression |
Schedule
defining when the job runs |
|
|
5 |
Remark |
comments
about the job |
|
3.20.1.3
Pause
Click
"Pause” or "Play” icon to run or stop selected job.
![]()
3.20.1.4
Delete
Click
"Delete” icon to delete the job.
3.20.1.5
Modify
The
operator can modify a job by clicking the "Modify” icon.
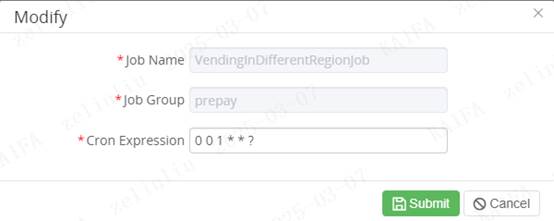
Cron
expression can be modified.
3.20.2
Job Cluster Instance
From the global menu, click "Job
Management” to expand it, and then click "Job Cluster Instance” to enter
meter information page (Global menu > Job Management > Job Cluster
Instance):

In job information page, the operator
can use following functions to access cluster instance.
3.20.2.1
Search
Search based on Schedule Name,
Instance Name, Entry ID.
The following table lists the items shown in the figure above:
|
No |
Item |
Description |
|
1 |
No. |
Serial
number |
|
2 |
Schedule Name |
The
name or type of the scheduled task. |
|
3 |
Instance Name |
Specific
instance name of the task |
|
4 |
Last
Check in Time |
The
most recent time the instance checked |
|
5 |
Check
in Interval |
Schedule
defining when the job runs |
|
6 |
Job
Count |
Number
of tasks executed by this instance. |
|
7 |
Entry
ID |
Entry
Id |
3.21
Maintenance Management
This
section provides an introduction to the maintenance management menu. The
operator can access and manage all meters.
The token
includes following 2 submenus:
v Maintenance
v Batch Change TR
3.21.1
Maintenance
From the
global menu, click "Maintenance Management” to expand it, and then click
"Maintenance” to enter user information page (Global menu > Maintenance
Management > Maintenance):
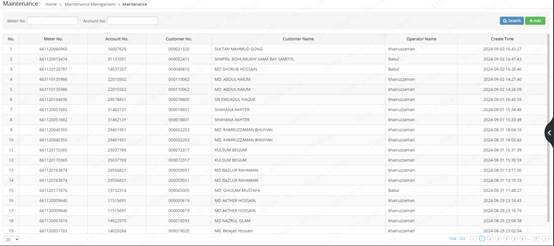
In this
page, the operator can use following functions to access and manage meter info:
3.21.1.1 Search
Search based on Meter No., Account No..
The following table lists the items shown in
the figure above.
|
No |
Item |
Description |
|
1 |
No. |
Serial
number |
|
2 |
Meter
No. |
Meter
number |
|
3 |
Account
No. |
Account
number |
|
4 |
Customer
No. |
Customer
number |
|
5 |
Customer
Name |
Customer
name |
|
6 |
Operator
Name |
Operator
name |
|
7 |
Create
Time |
Creation
time |
3.21.1.2 Add
Operator can add a meter maintenance by
clicking "Add” button
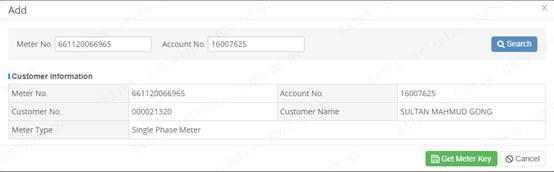
3.21.2 Batch
Change TR
From the
global menu, click "Maintenance Management” to expand it, and then click
"Batch Change TR” to enter user information page (Global menu >
Maintenance Management > Batch Change TR):
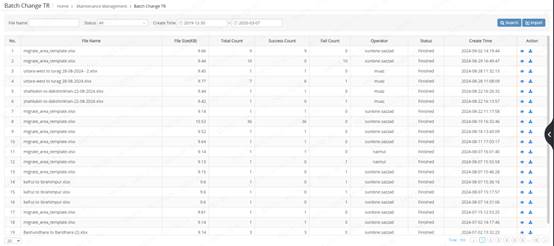
In this
page, the operator can use following functions to access and manage files:
3.21.2.1 Search
Search based on File Name, Status, Create
Time.
The following table lists the items shown in
the figure above.
|
No |
Item |
Description |
|
1 |
No. |
Serial
number |
|
2 |
File
Name |
The
name of the file |
|
3 |
File
Size (KB) |
File
size in kilobytes (KB) |
|
4 |
Total
Count |
Total
number of entries or records within the file. |
|
5 |
Success
Count |
Number
of entries or records that were successfully processed. |
|
6 |
Fail
Count |
Number
of entries or records that failed during processing. |
|
7 |
Operator |
The
name of the staff member who performed the operation. |
|
8 |
Status |
Current
status of the processing task. |
|
9 |
Create
Time |
Time
when the file was created. |
|
10 |
Action |
|
3.21.2.2 View
Operator can view a file by clicking
"view” button
3.21.2.3 Download
Operators can download files by clicking the
'Download' button
![]()
4 Process Guide
4.1 Sale Process
Step 1:
Make sure that the login operator has the privilege of Sale menu.
If the operator has the privilege, the Sale menu will display on
the global menu.
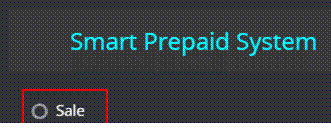
Go to User
Management->User, and check which roles the operator has.

Go
to User Management->Role, selected the role to click its "Assign
Function" icon.
 Check
if the role has the Sale function.
Check
if the role has the Sale function.
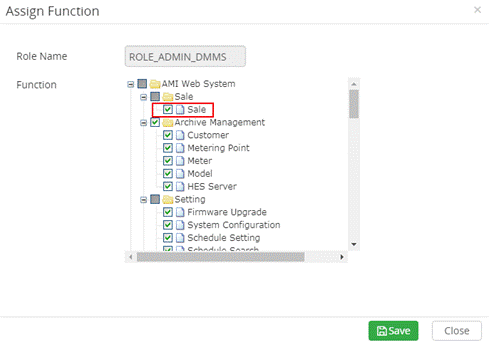
If the
role does not have the function, please tick off the checkbox.
Notes: Once assign new functions to
the role, the function will take effect in next login. If the operator wants to
use the menu of the function immediately, please login out first.
Step 2:
Make sure that the operator is belonged to a vending station and can sale.
Go
to Sale and the sale info of the operator can display on the top of the page.

The
operator should belong to a vending and status is started can do sale
operation. The operator's balance also should be over 0.
The
manager can set above info in section 3.6.
Step 3: Go
to Sale menu to select an account for sale. (See section 3.1)
4.2 Open Account Process
Step1: Add a new
Open Account Scheme in "Open Account Scheme" page and then issue it.
If there is already a scheme which operator wants, go to step 3.
Go to Open
Account > Open Account Scheme and click "Add" button to add a new
scheme.![]()
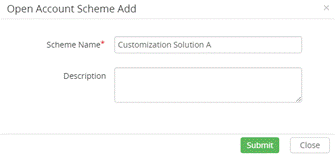
See detail of adding a new scheme in
section 3.4.1.2.
Step2: Set Open
Account Scheme Items.
After adding a scheme
successfully, the operator can click the "Setting" icon to set the
items of the selected scheme.
![]()
Operator can add,
delete, modify, move up and move down the item.

See
detail of setting items in section 3.4.1.4.
Step3: Configuration
the Scheme to metering point in "Archive Management" page.
Go
to Archive Management > Metering Point.
Tick
off checkboxes and click "Set Open Account Scheme" button.

Select a scheme name
to set it to the selected metering points
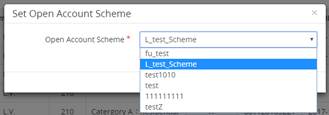
See detail in section 3.3.1.7.
Step4: Open
account in "Open Account" page.
Go
to Open Account > Open Account.
![]()
Click "Open
Account" button and the "Batch open account" popup will display.

Click "Open
Account" icon to do open account operation for the selected meter.
![]()
See detail in section 3.4.2.2.
5 Frequently Asked Questions
5.1
Common question
v Account lock
If Operator login failed over 3 times and the
account will be locked.
Please contact the manager to unlock the
account
v Go to 404 page
Make sure the login operator
has the privilege of the menu or page.
Please try to login out the system and login
in later.
Please try to clear browser cache.
If none of the above operations works, please
contact the manager
v Show "Internal Server Error" dialog box after operating
Please contact the manager
5.2
Sale
v Show "Account must bind
a tariff!" dialog box
Please bind a tariff to the
account in section 3.3.1
v Show "Tariff must bind
a charge solution!" dialog box
Please bind a charge
solution to the account's tariff in section 3.7.2
v Show "Update vending
station balance error, please try again later!" dialog box
Please try vending latter
v Show "The amount of
electricity purchased is insufficient!" dialog box
Operator select Purchase
Pattern is "Credit Amount" which means inputting amount should minus
additional amount according to the tariff. When the inputting amount minus
additional amount is less than 0 and the dialog box will show.
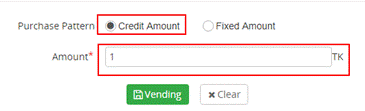
Please input a bigger amount
or change the Purchase Pattern from "Credit Amount" to "Fixed
Amount"
v Show "Please bind a
vending station first!" dialog box
Please bind a vending
station to the login operator in section 3.6.2.3
v Show "Create purchase
record error, please try again later!" dialog box
Please try vending latter or contact manager
v Show "Vending Station
operator balance is not enough!" dialog box
Please recharge money the
operator in section 3.6.1.3.2
5.3
Vending Management
v Show "version not
correct, vending station balance has been modifying" dialog box
Please try again later
v Show "version not
correct, operator balance has been modifying" dialog box
Please try again later
5.4
Token
v Show "Meter key is
dirty!" dialog box
Please reset key in section
3.2.5.3
v Show "Meter key
error!" dialog box
Please reset key in section
3.2.5.3
v Show "Order current
status is not allowed to send!" dialog box
v Show "The existence of
the hair or issued a failure of the record, please deal and then issued!"
dialog box
v Show "Un process tokens
status should be initial!" dialog box
v Show "The total number
of before records has over 25, please
deal and then try again!" dialog box
v Show "There are un
process order before the selected order, are you sure processing them
together" dialog box
v Show "The order already
exists in card!" dialog box
v Show "Card info does not
match the written info, please check or reset card?" dialog box
v Show "The Token seq is
wrong!" dialog box
v Show "Read Card Info
Failed!" dialog box
v Show "The current state
of the meter(to be removed) is not allowed to generate a token" dialog box
v Show "The card has
unused tokens, please deal with them before writing test token" dialog box
v Show "Order current
status is not allowed to update!" dialog box
v Show "The card is
blank, please reset!" dialog box
Reset card in section 3.3.6
v Show "Card info is not exist,
please check or reset card?" dialog box
Card info does not exist in
the database.
Please check the card is a
valid card.
Reset card in section 3.3.6
v Show "Token is ongoing,
please wait" dialog box
Please try again later
5.5
Open Account
v Show "
Open Account is ongoing, please wait" dialog box
Please try again later
5.6
Archive Management
v Show "
This meter has related to an account, can't be removed." dialog box
The meter has unsolved token
orders (which status area Initial or Failed), please solve them in section
3.2.4 first.
6 System Deploy
This chapter introduces deployment of the
system includes required software and configuration of required file. And it
also introduces deployment of interfaces.
6.1 Web
System Deploy
6.1.1 Required Software
v Redis Version 2.8+
v JDK Version 1.8+
v Tomcat Version 8+
v Oracle Version 11.2.0.1.0+
6.1.2 Configuration
File
v config.properties
|
Category |
Configuration |
Brief Introduction |
|
SMS |
sms.api.wings.url |
Short message server interface
Address |
|
sms.api.wings.username |
Short message server username |
|
|
sms.api.wings.password |
Short message server password |
|
|
sms.api.wings.batch.step |
Message amount in every time batch
sending |
|
|
Mail |
mai.api.address |
E-mail account |
|
mail.api.host |
E-mail server address |
|
|
mail.api.username |
E-mail username |
|
|
mail.api.password |
E-mail password |
|
|
mail.api.port |
E-mail server port |
|
|
HES |
api.hes.relay |
HES relay interface |
|
CACHE |
cache.init |
Cache is initialized(0
false, 1 true) |
|
JOB |
job.run |
Is task server(0
false, 1 true) |
v log4j.properties
|
Category |
Configuration |
Brief Introduction |
|
Root |
log4j.rootLogger |
Root log level |
|
Debug |
log4j.appender.D.File |
Debug level log path |
|
Info |
log4j.appender.I.File |
Info level log path |
|
Error |
log4j.appender.E.File |
Error level log path |
v datasource.properties
|
Category |
Configuration |
Brief Introduction |
|
Oracle |
oracle.jdbc.driverClassName |
oracle jdbc driver class |
|
oracle.jdbc.password |
Oracle password |
|
|
oracle.jdbc.url |
oracle jdbc url |
|
|
oracle.jdbc.username |
Oracle username |
|
|
Redis |
redis.host |
redis server IP |
|
redis.port |
redis server port |
|
|
redis.password |
redis server password |